6. Units in the mission
The previous chapter created and tested a group prefab. Now place units in the mission world, configure playable slots and callsigns, and add vehicles and starting zones.
Groups in the world and playable slots
Section titled “Groups in the world and playable slots”The group has been checked in Game Master. Stop the game and return to World Editor: units that should be present when the mission starts must be placed in the world itself.
Use Alpha to learn placement and slot settings. The following screenshots also show Company HQ and Split Team Bravo from the completed mission. To reproduce the full roster, prepare those groups the same way as Alpha, using their own names and rosters.
The example uses US and USSR. For your own mission, assemble the required factions’ groups from the game’s character prefabs. Later tests of triggers that compare character counts require playable units on both sides.
Making characters available in the lobby
Section titled “Making characters available in the lobby”Open the character prefab in your addon. If your soldiers inherit settings from a shared base, open that base; in our example it is TSS_Character_US_GB_BaseLoadout.et. In Object Properties, find LL_PlayableComponent and enable Is Playable. Lite Lobby supplies this component; characters derived from the prefab inherit its setting.
If you use the game’s original characters, first create child prefabs in your addon and assign them to the group roster. This keeps playable-slot settings on your own characters.
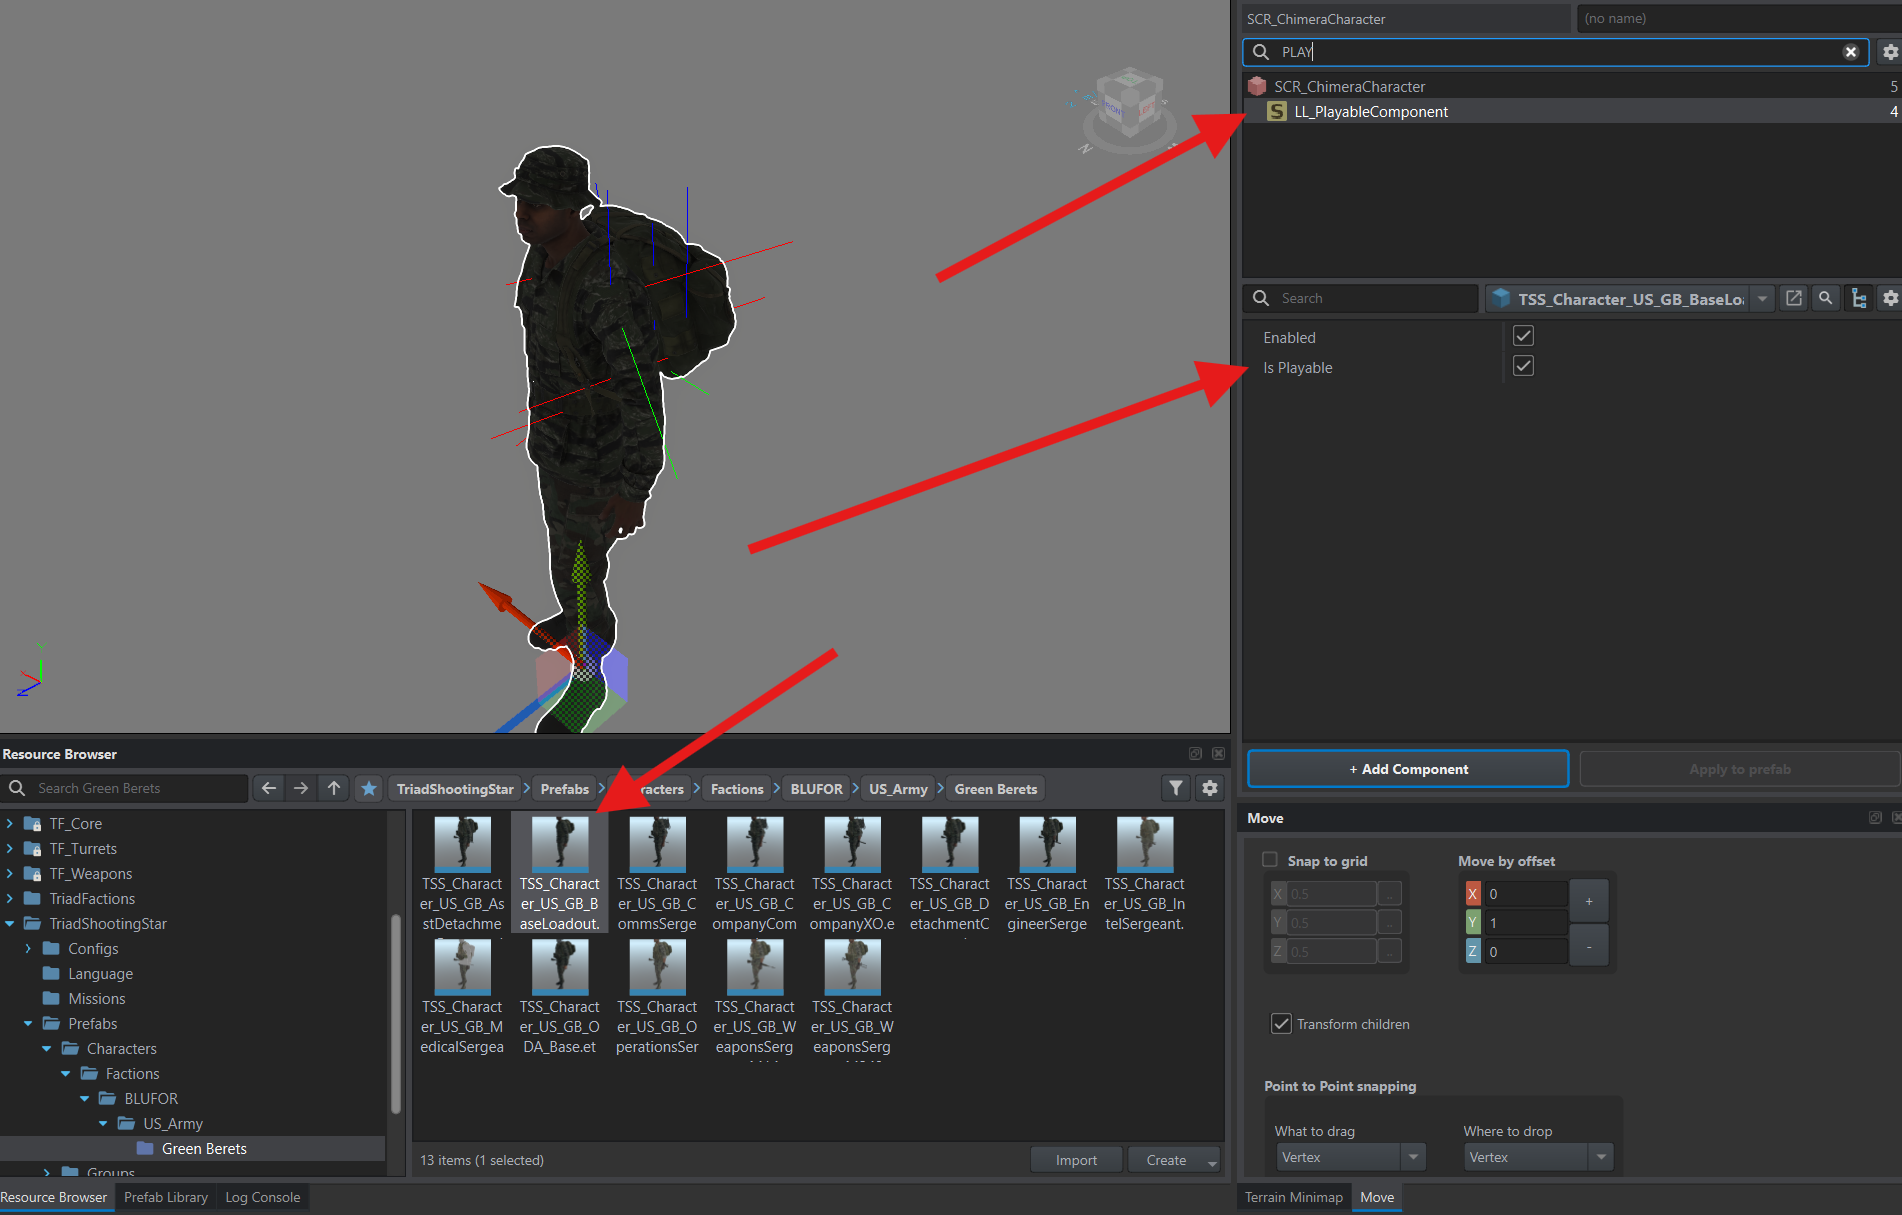
Disable Is Playable for characters intended only as AI. Save the prefab and return to the mission world.
Placing groups and assigning callsigns
Section titled “Placing groups and assigning callsigns”Create a US layer and make it active. In your addon’s Prefabs/Groups/BLUFOR/Green Berets folder, find the Alpha prefab and drag it to the group’s starting position. If you have also prepared Company HQ and Bravo, place them the same way.
For each placed group, enter its object name at the top of Object Properties, then select LL_GroupCallsign. If the component is missing, add it through Add Component.
Use Alpha’s row below to configure it. The other rows show the settings for the full example roster:
| Group | Object name | Company | Platoon | Squad |
|---|---|---|---|---|
| Company HQ | AB_PL1 | 0 | 0 | 0 |
| Alpha | AB_S1 | 0 | 1 | 0 |
| Bravo | AB_S2 | 0 | 1 | 1 |
The numbers select entries from the faction’s callsign lists, starting at zero. In this example they produce Atlas Red 1, Atlas White 1 and Atlas White 2. Company, Platoon and Squad are fields in the game’s callsign system: we use them for the headquarters and the two ODA halves without adding a platoon to their organisation.
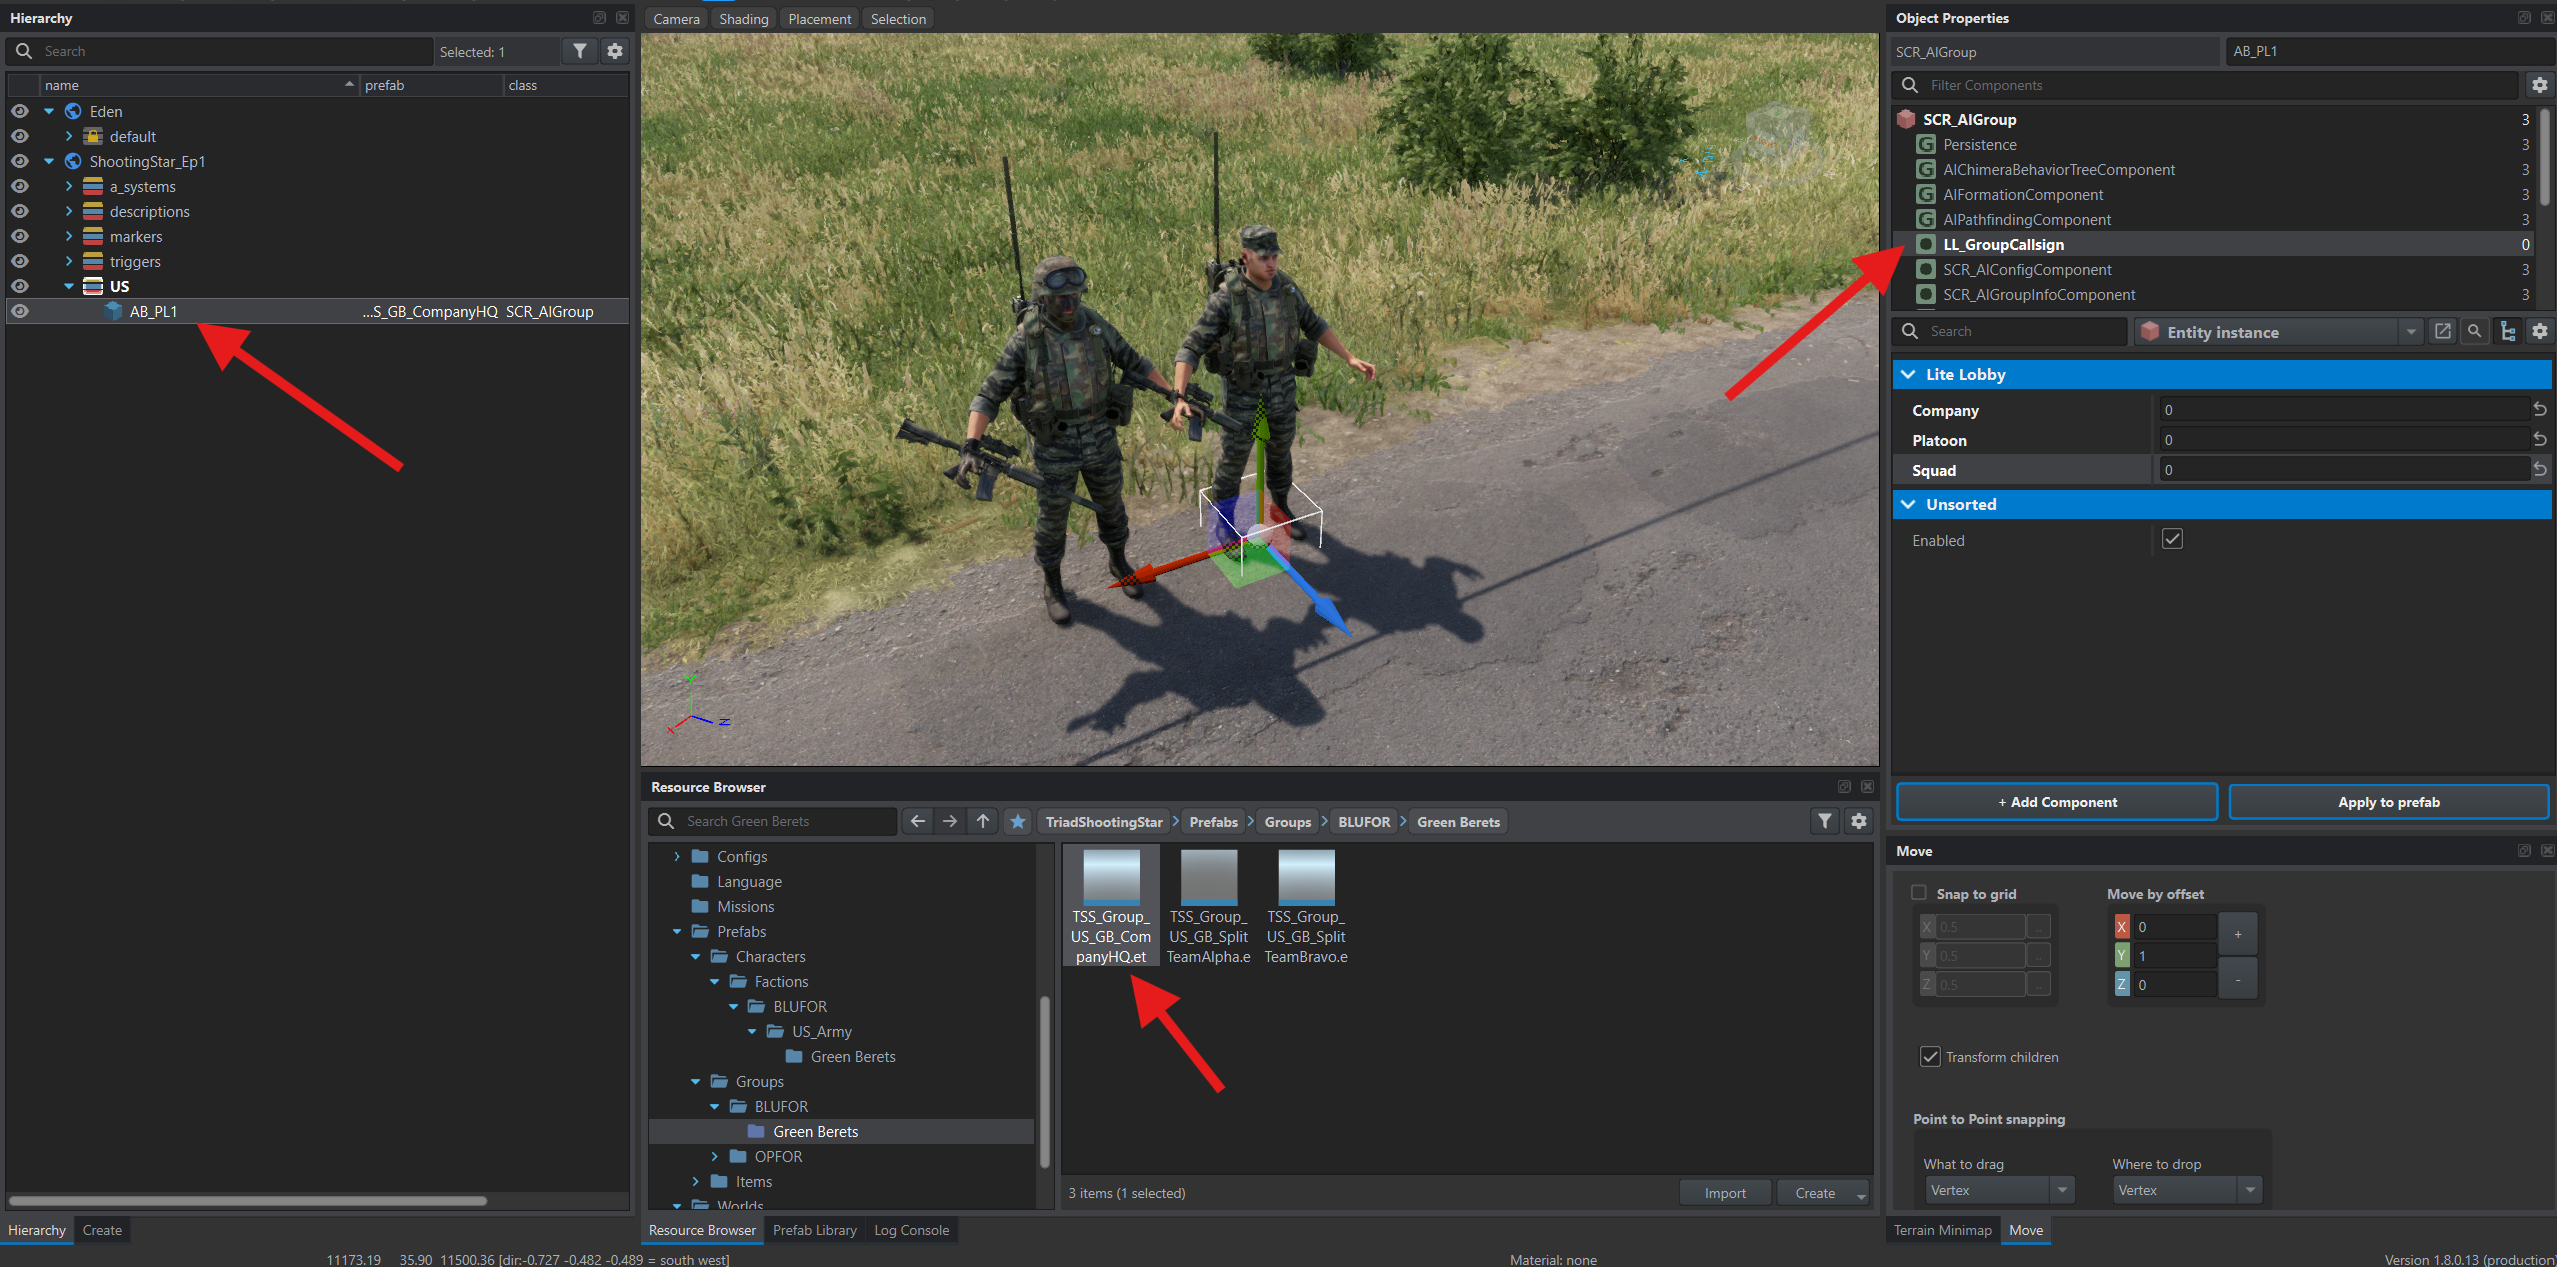
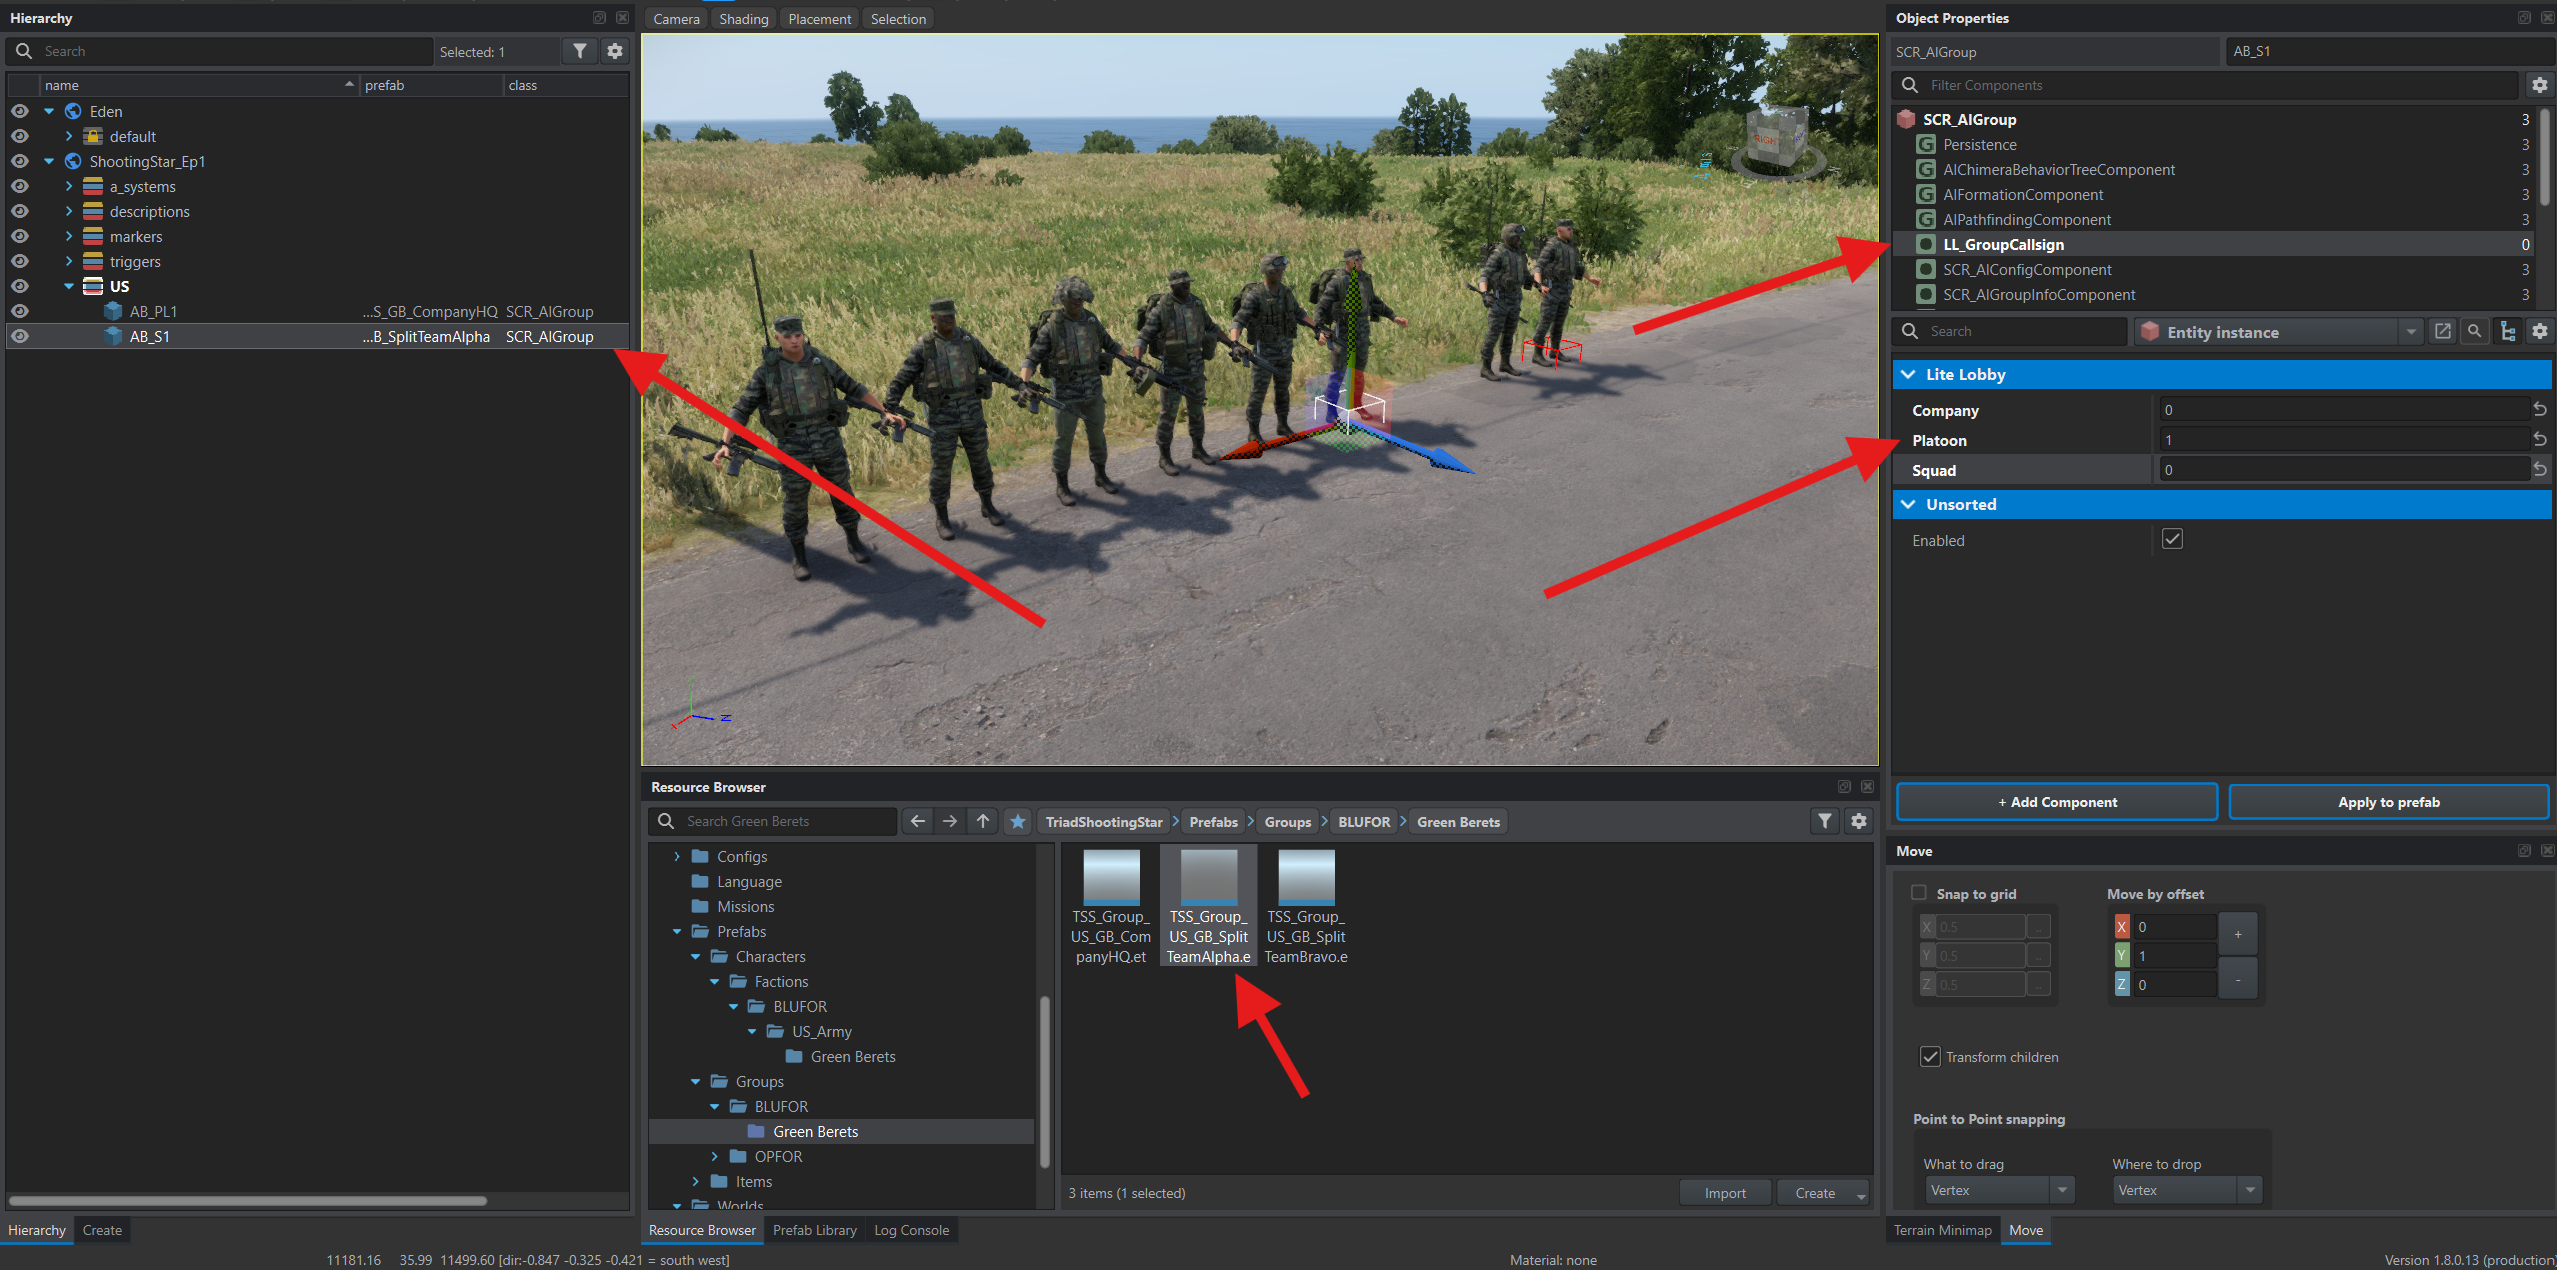
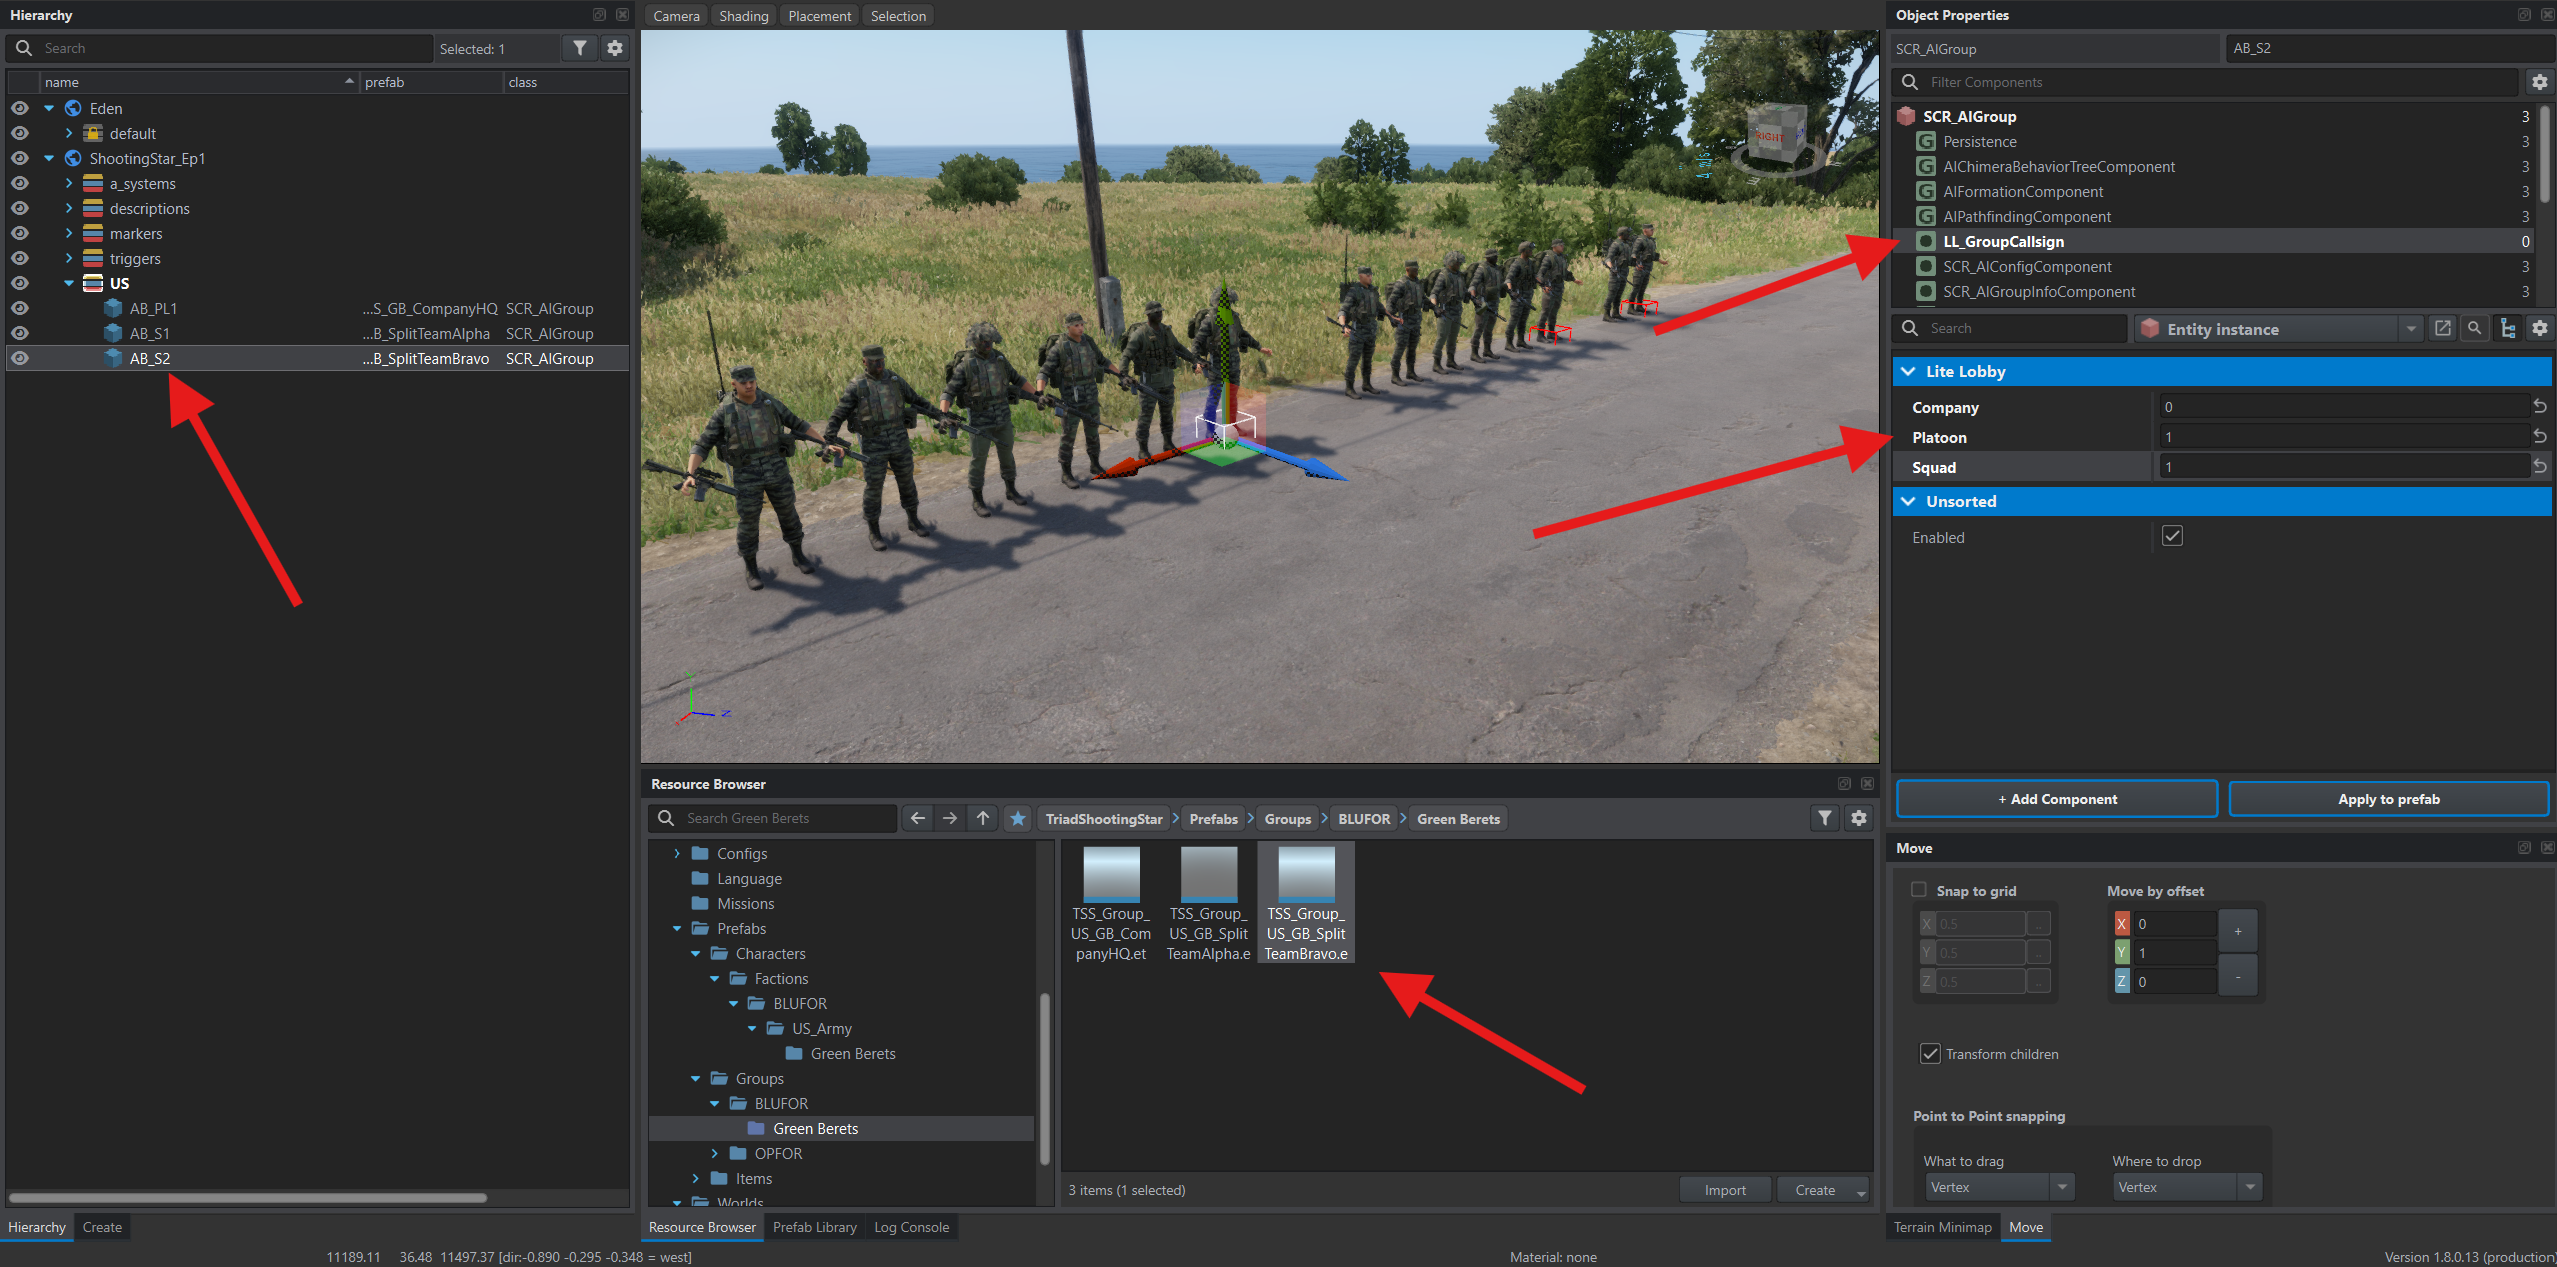
Change these settings on the placed groups: several groups using the same prefab can have different callsigns. AB_S1 is the editor object name used for references; Atlas White 1 is the callsign players see.
For additional ODAs, place more Alpha and Bravo groups with unique object names and callsign combinations. The next pair can use Platoon 2 and Squad 0/1.
If you have prepared Soviet groups for your mission, place them the same way in a separate USSR layer. Characters intended for players must also have Is Playable enabled. Alpha alone is enough for the slot-list check below; place groups on both sides before testing triggers that count characters.
Checking the slot list
Section titled “Checking the slot list”Press the green launch button in World Editor and open the lobby with U if it is hidden. Check factions, callsigns, roles and character equipment.
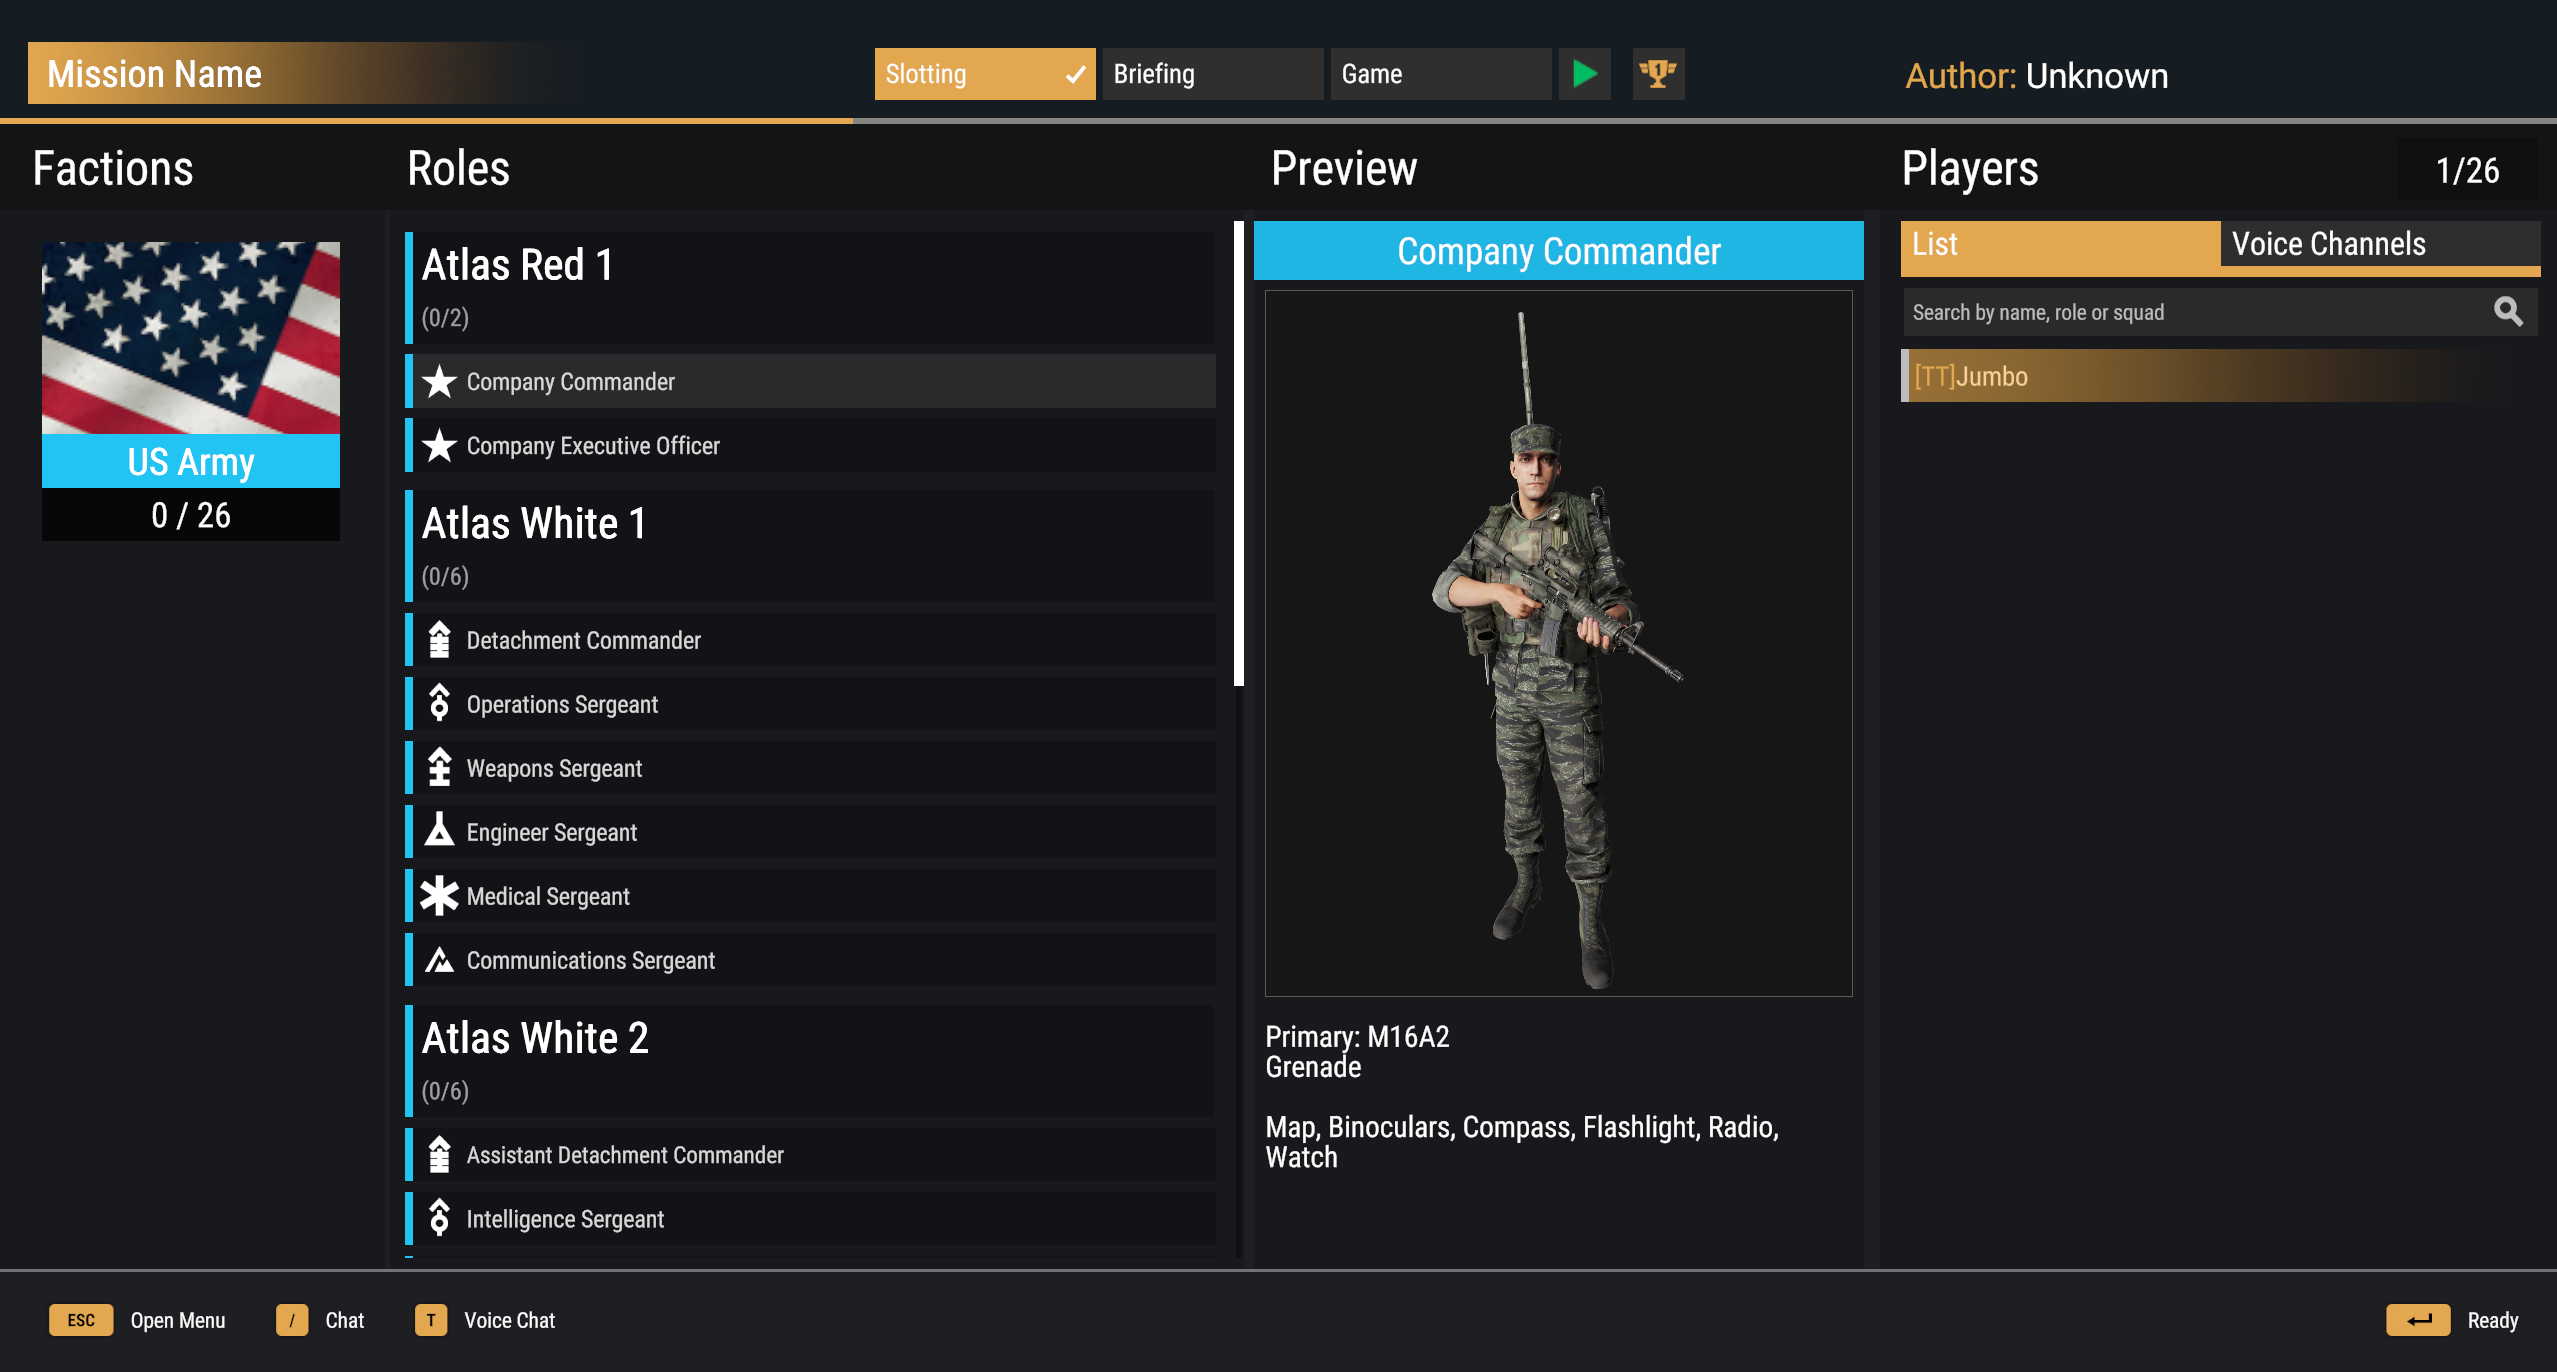
If a group is missing, check its characters’ Is Playable setting and the group prefab’s Unit Prefab Slots. Characters must belong to a group and a faction.
Group vehicles
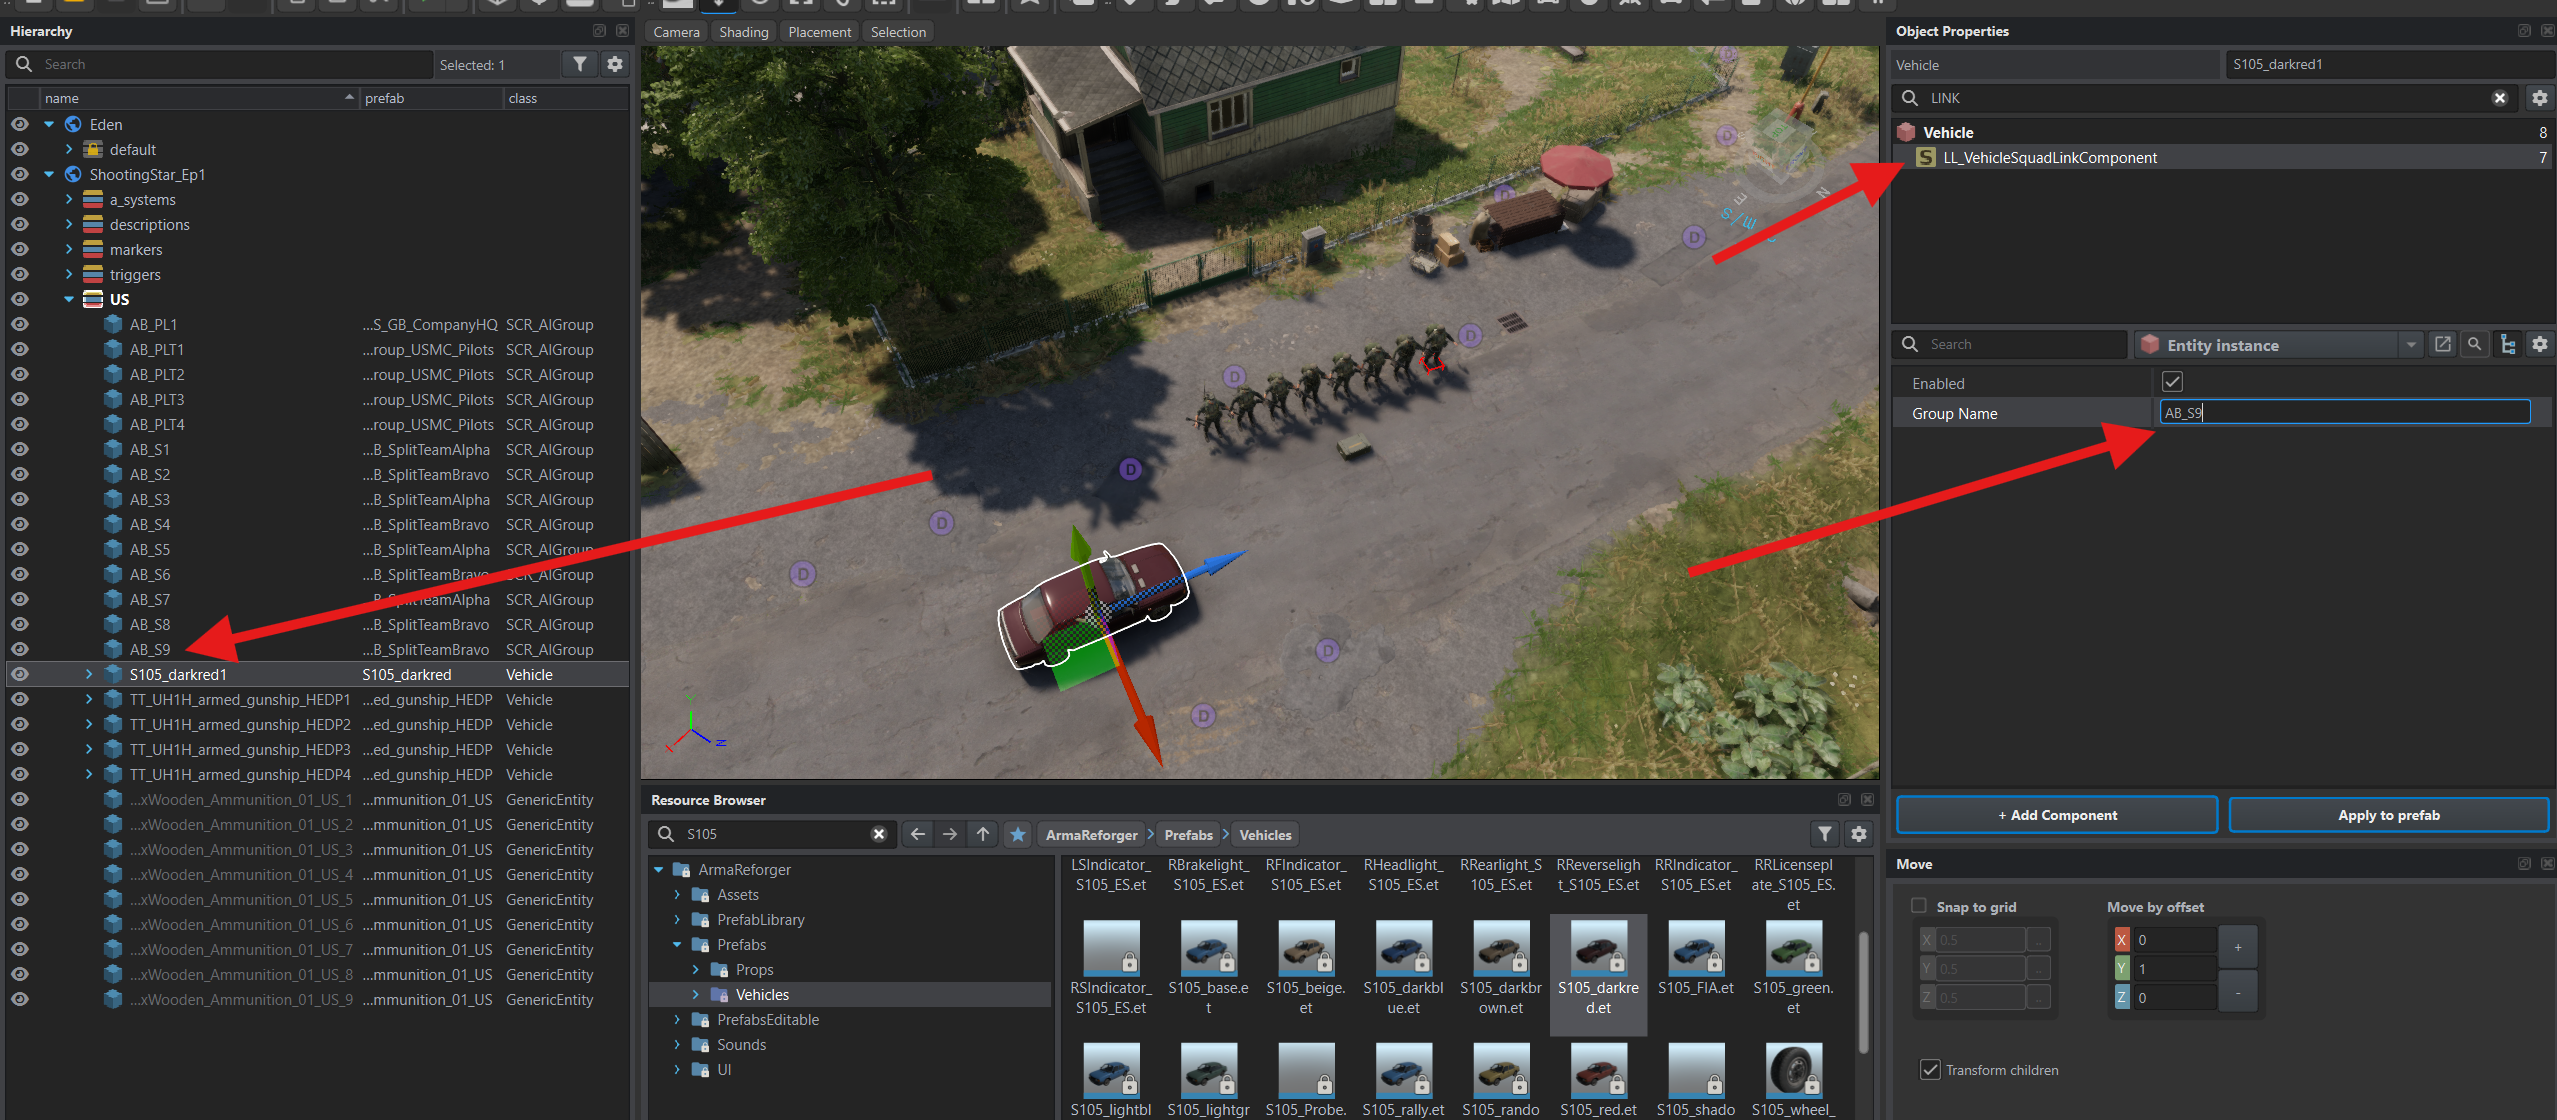
Section titled “Group vehicles”Assign vehicles to a group placed in the mission world so players can see their unit’s vehicles in the lobby. You will need the group’s object name from Hierarchy.
If the world is running, stop the test and return to the editor. Find a vehicle in Resource Browser and drag it beside the group. The screenshot uses S105_darkred.et from ArmaReforger.
Select the vehicle and LL_VehicleSquadLinkComponent. If it is missing, add it through Add Component. Set Group Name to the placed group’s object name: AB_S1 for Alpha, or AB_S2 for Bravo if you have prepared and placed it. The vehicle will then appear under that group in the lobby.
Select SCR_VehicleFactionAffiliationComponent and set Faction affiliation to US. Use USSR for Soviet vehicles.
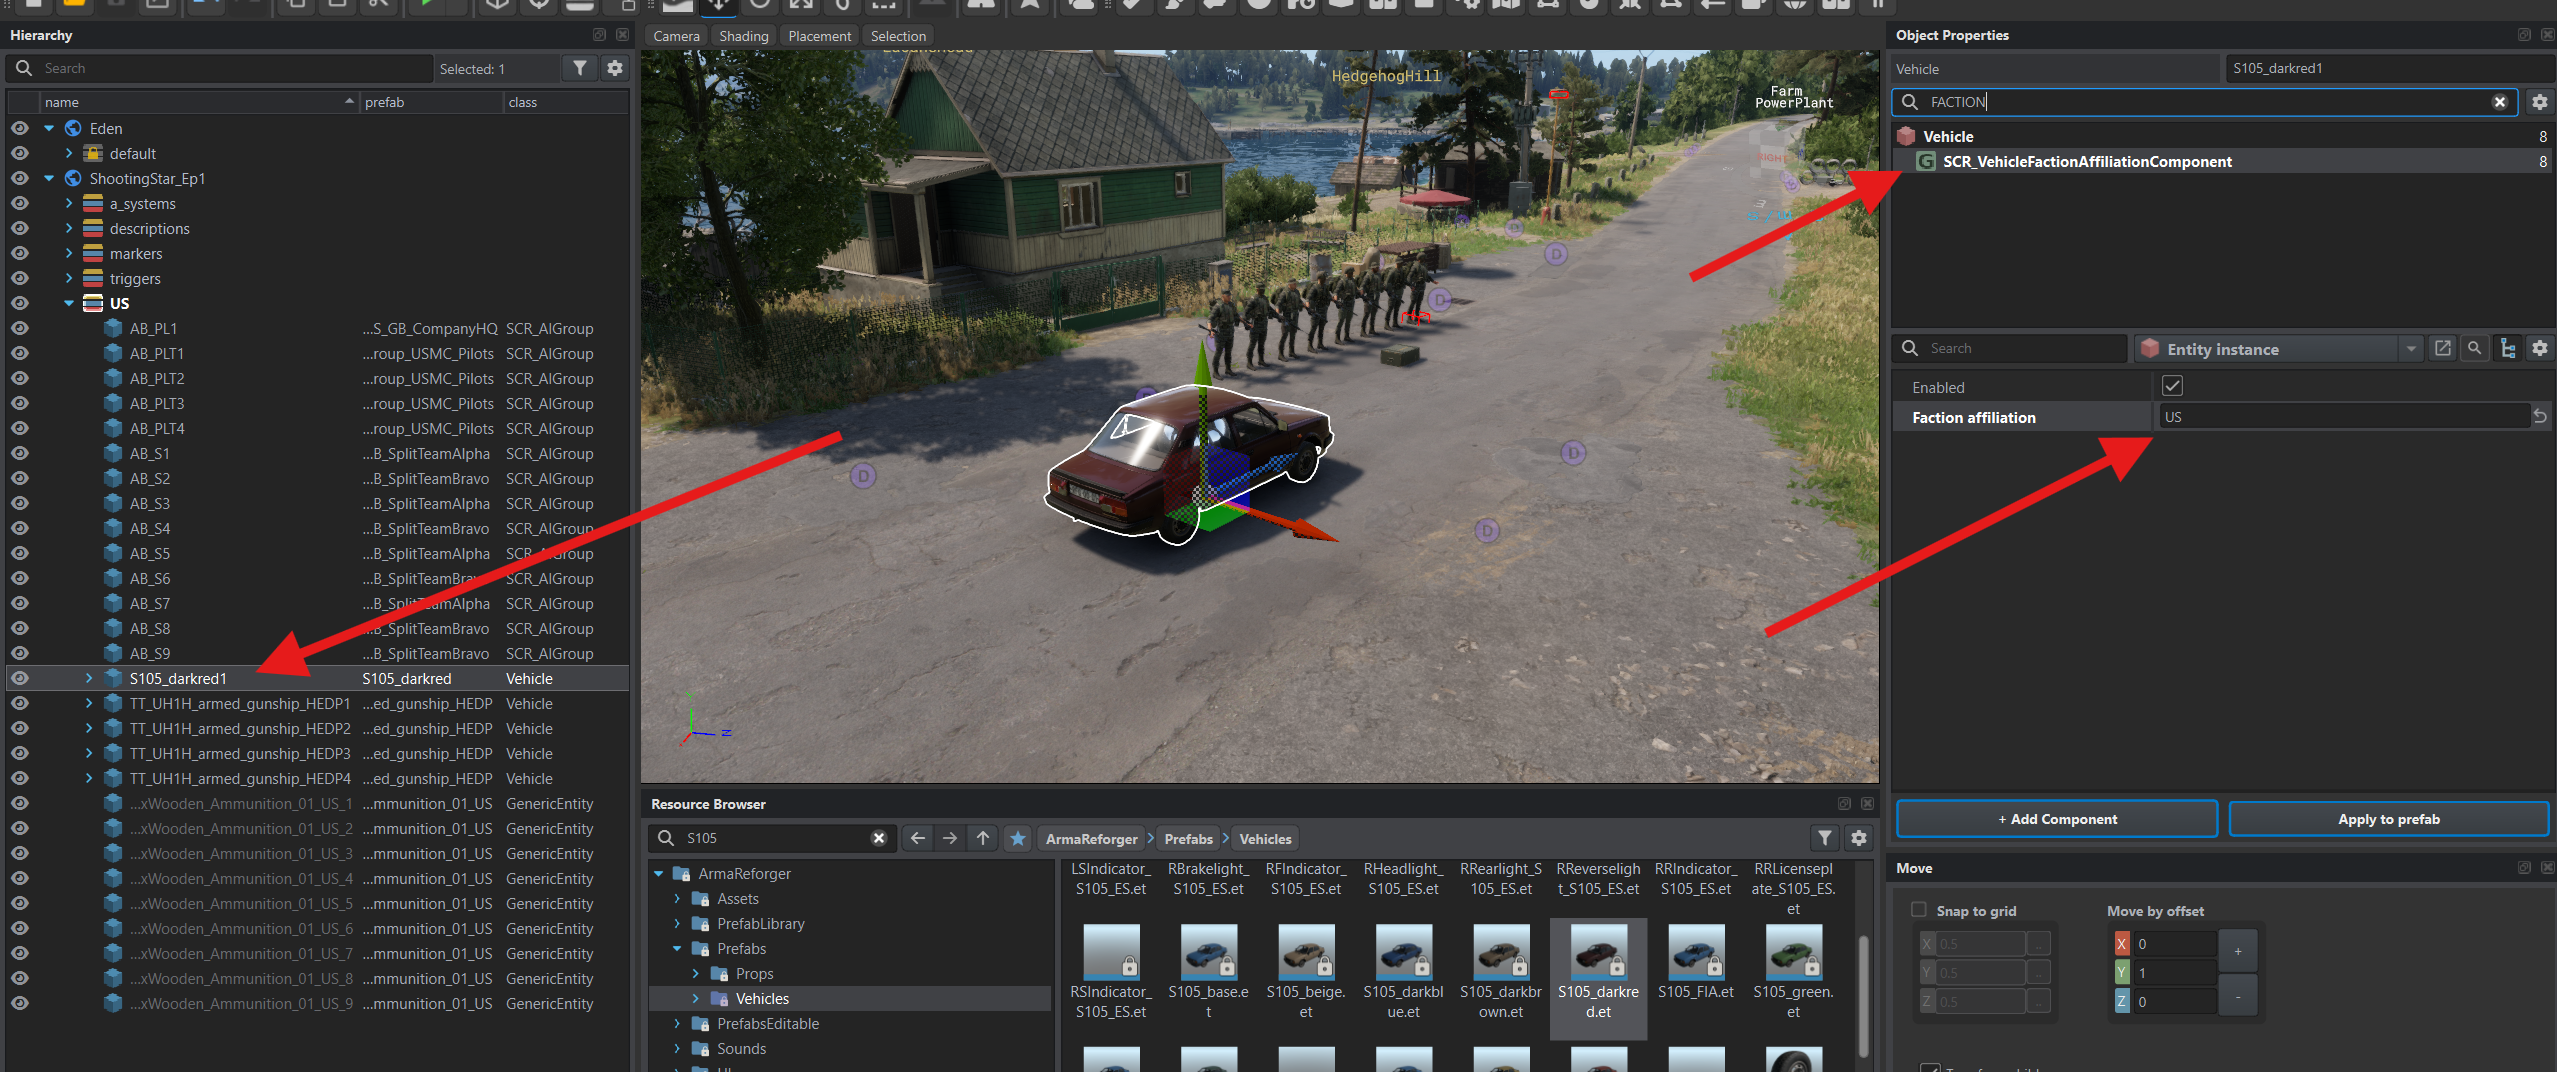
Repeat for the other vehicles. Group Name must match the object name in Hierarchy, not its callsign or prefab filename.
Starting zones and freeze time
Section titled “Starting zones and freeze time”With the groups and vehicles placed, define their starting zones and the time allowed for players to prepare.
Starting zone
Section titled “Starting zone”Freeze time is a preparation period after the game starts. A starting zone keeps players from leaving before that period ends.
In ArmaReforger → PrefabsEditable → RestrictionZone, find E_EditorRestrictionZoneLarge.et and drag it onto the starting position. Position it so characters and vehicles are inside the inner circle. Add another zone for another starting position.
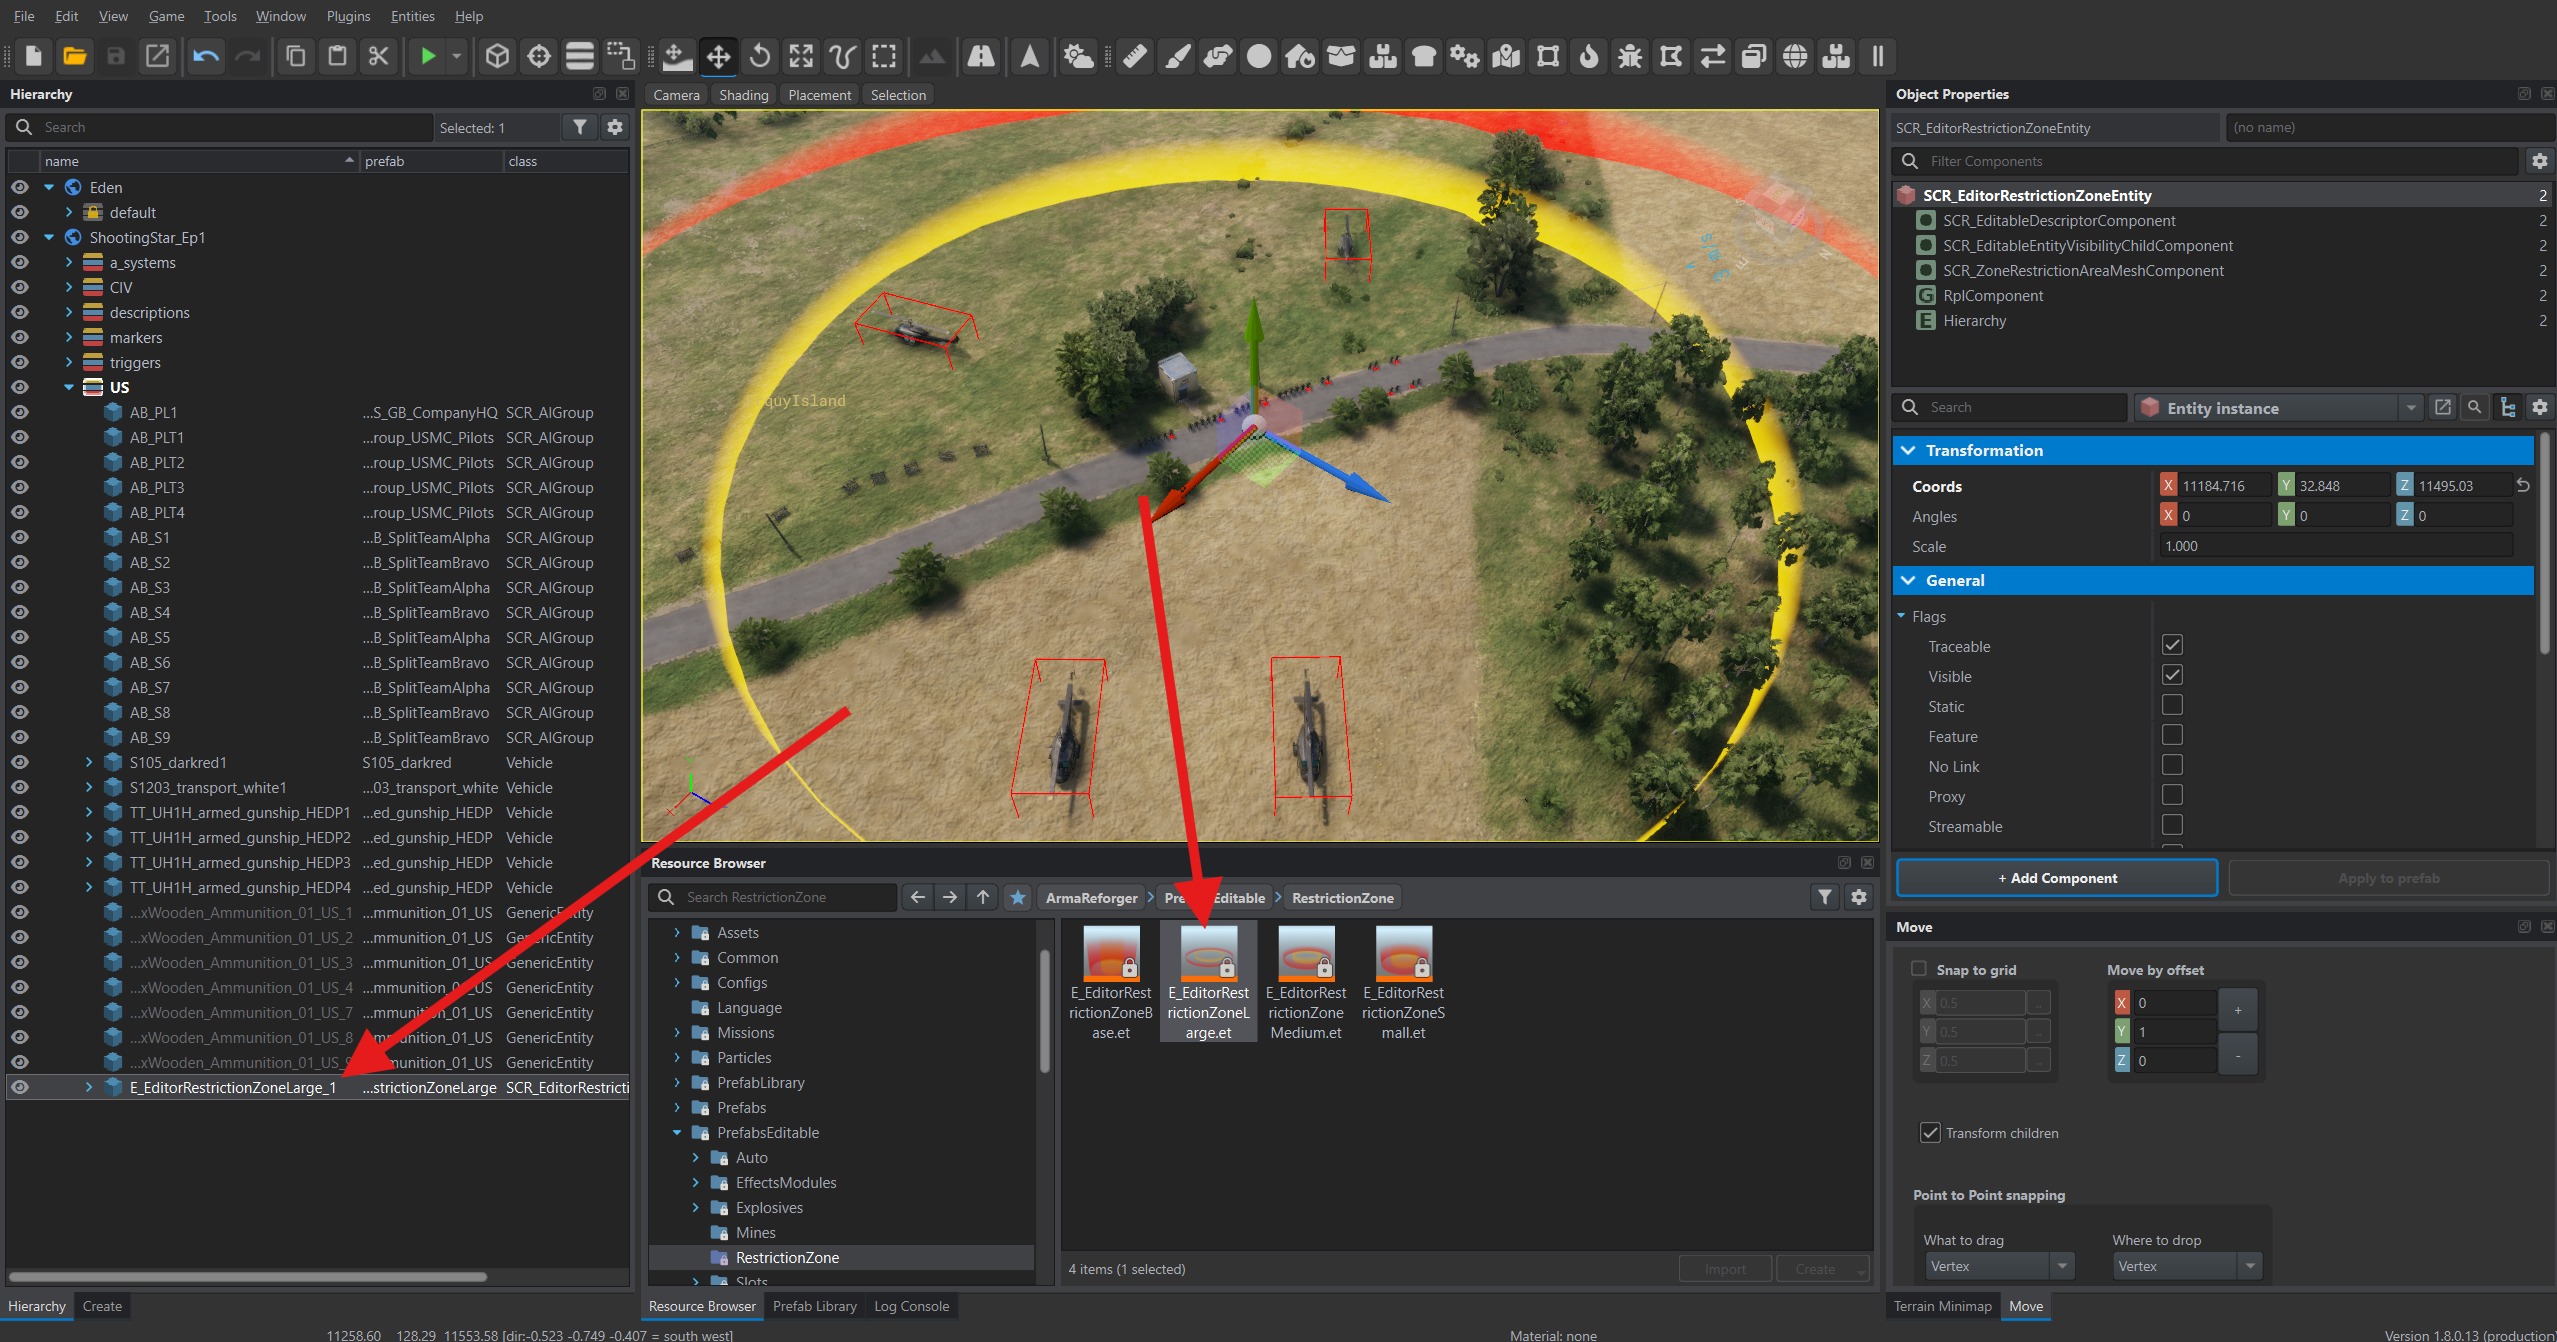
The yellow boundary marks where players receive a warning; crossing the red boundary can kill the character. Lite Lobby removes these zones when freeze time ends.
Freeze duration
Section titled “Freeze duration”In Hierarchy, select the game mode, LL_GameMode_Lobby1, then LL_GameModeCoop in Object Properties. Freeze Time is in milliseconds: 120000 means two minutes. Hard Freeze Time is the initial pause that locks controls while the world loads; it is part of the overall freeze period.
Press Ctrl+S to save the world.
In the next chapter, add map markings, configure triggers and prepare the briefing.