5. Characters and groups in Game Master
Set the character names and roles, add them to the Game Master catalog, and test them in game. Then assemble a group from the completed characters and check its roster.
Translation table
Section titled “Translation table”A translation table stores text in different languages. Create one table for the characters and groups of the Triad Shooting Star addon.
The first row will contain Communications Sergeant and Сержант связи. The game chooses the name based on the player’s language.
Creating a translation table
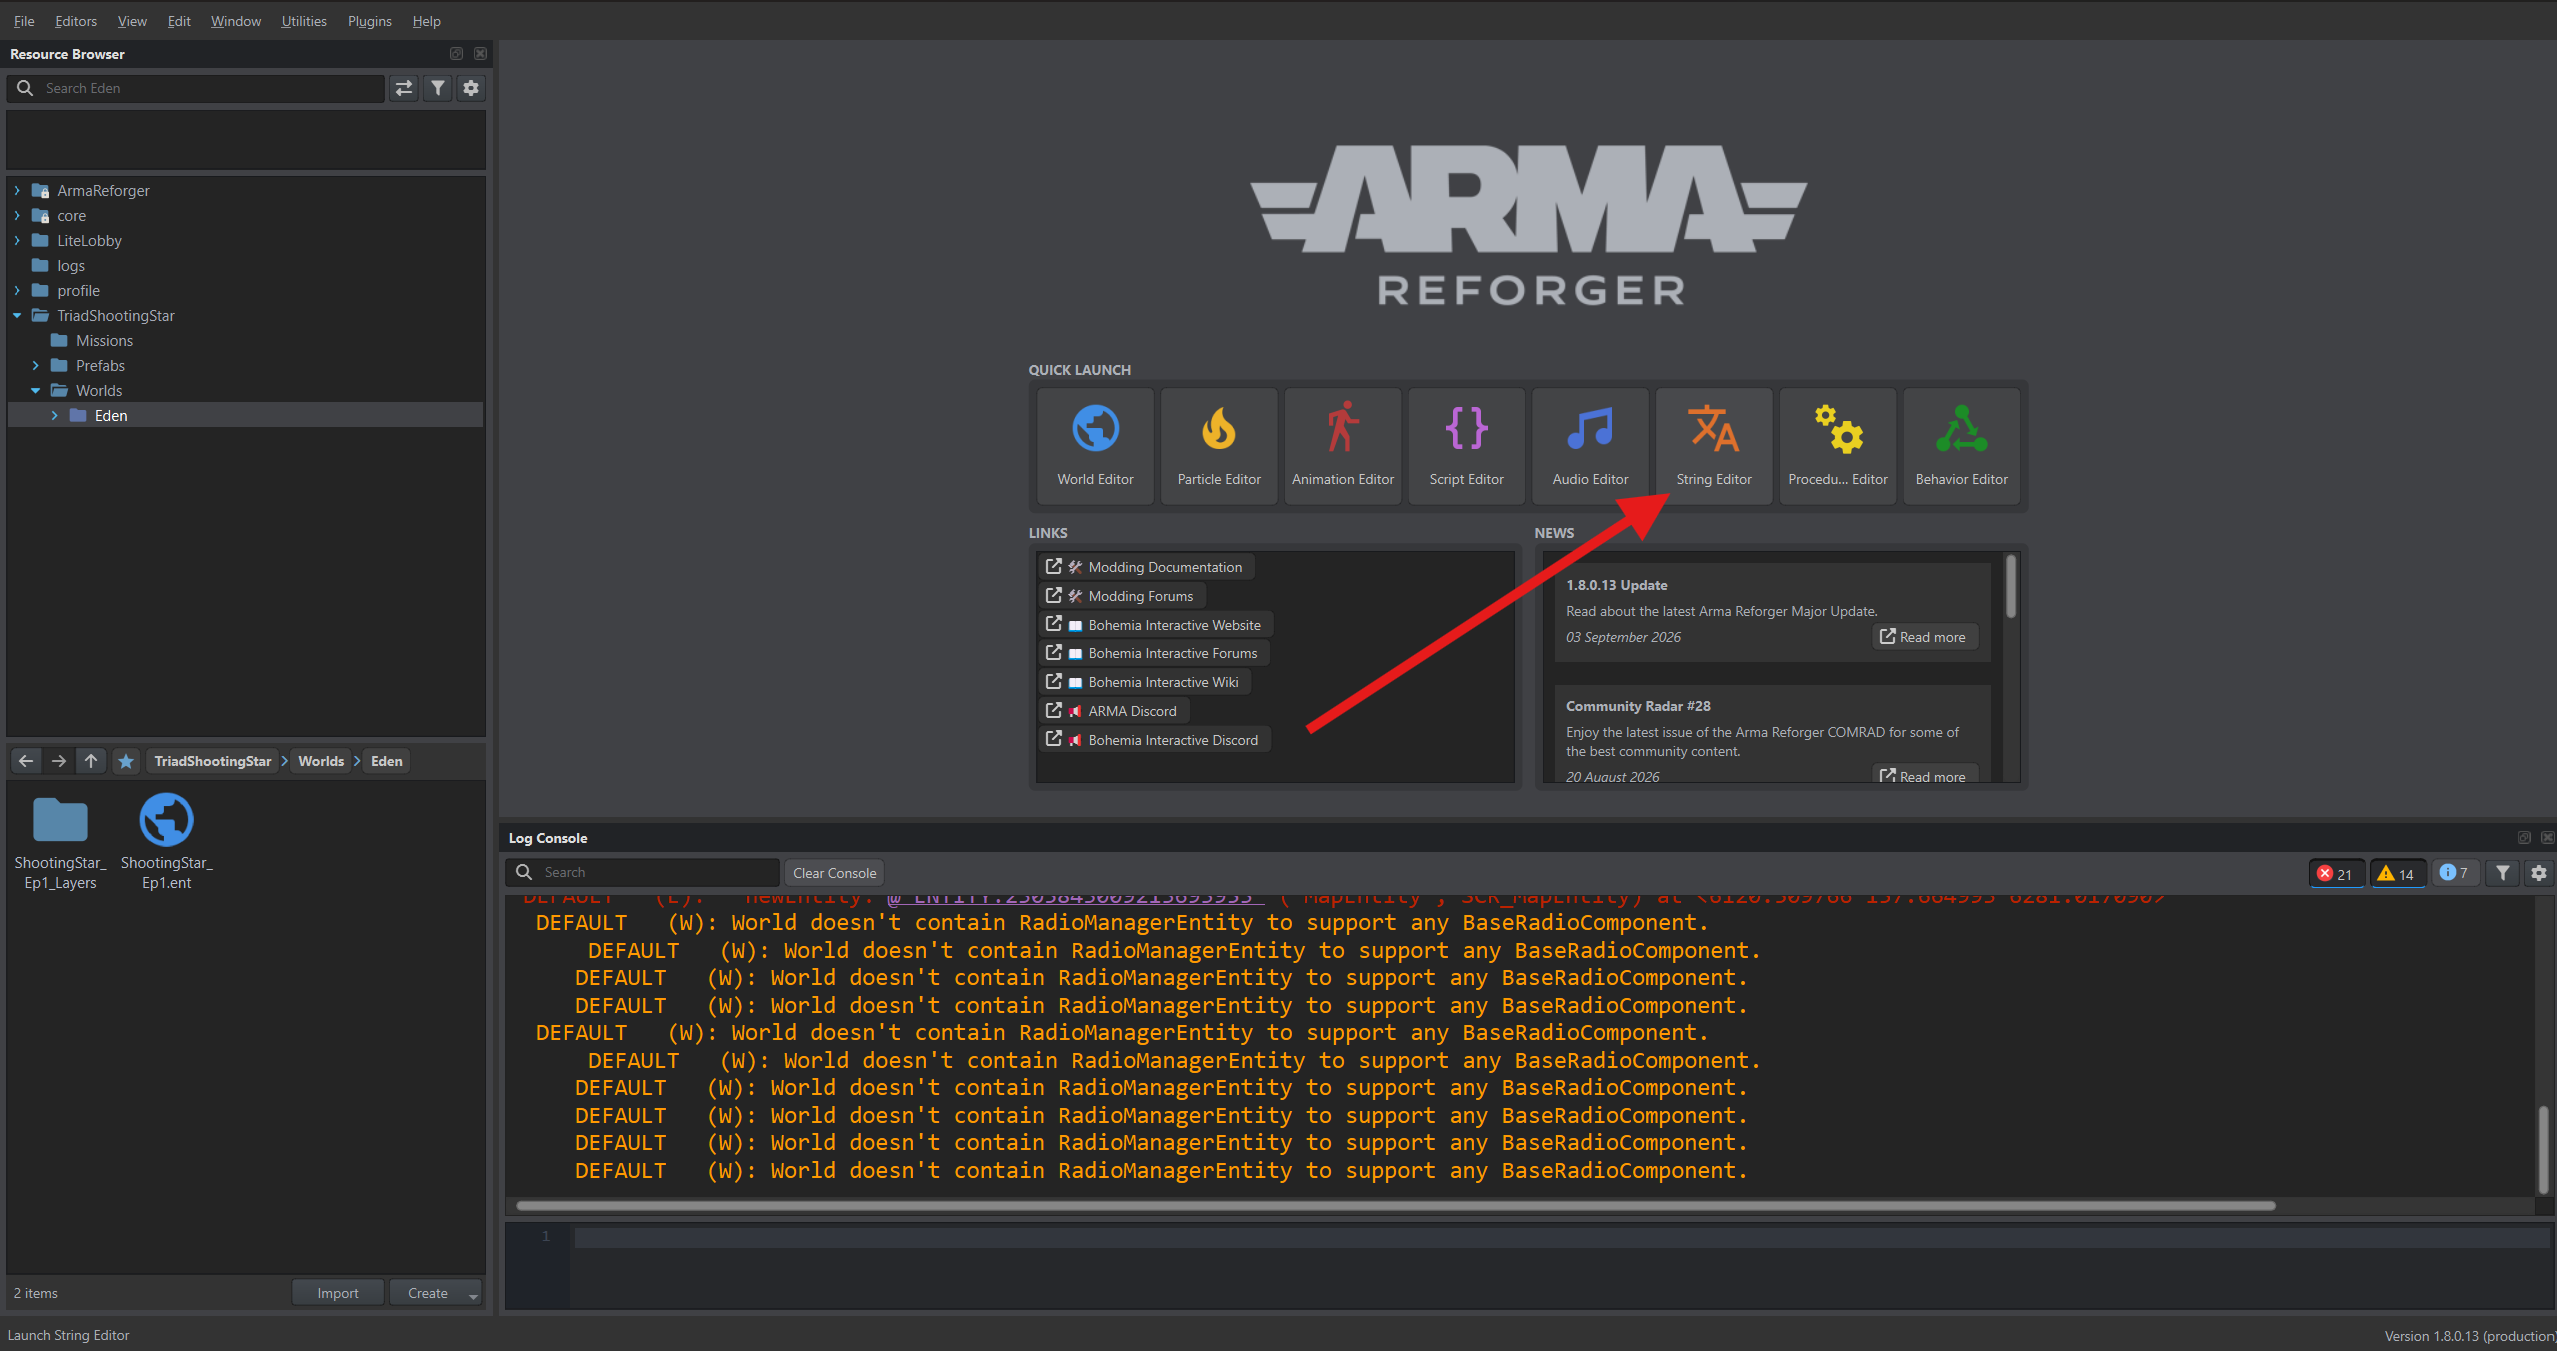
Section titled “Creating a translation table”In the main Workbench window, click String Editor under Quick Launch.
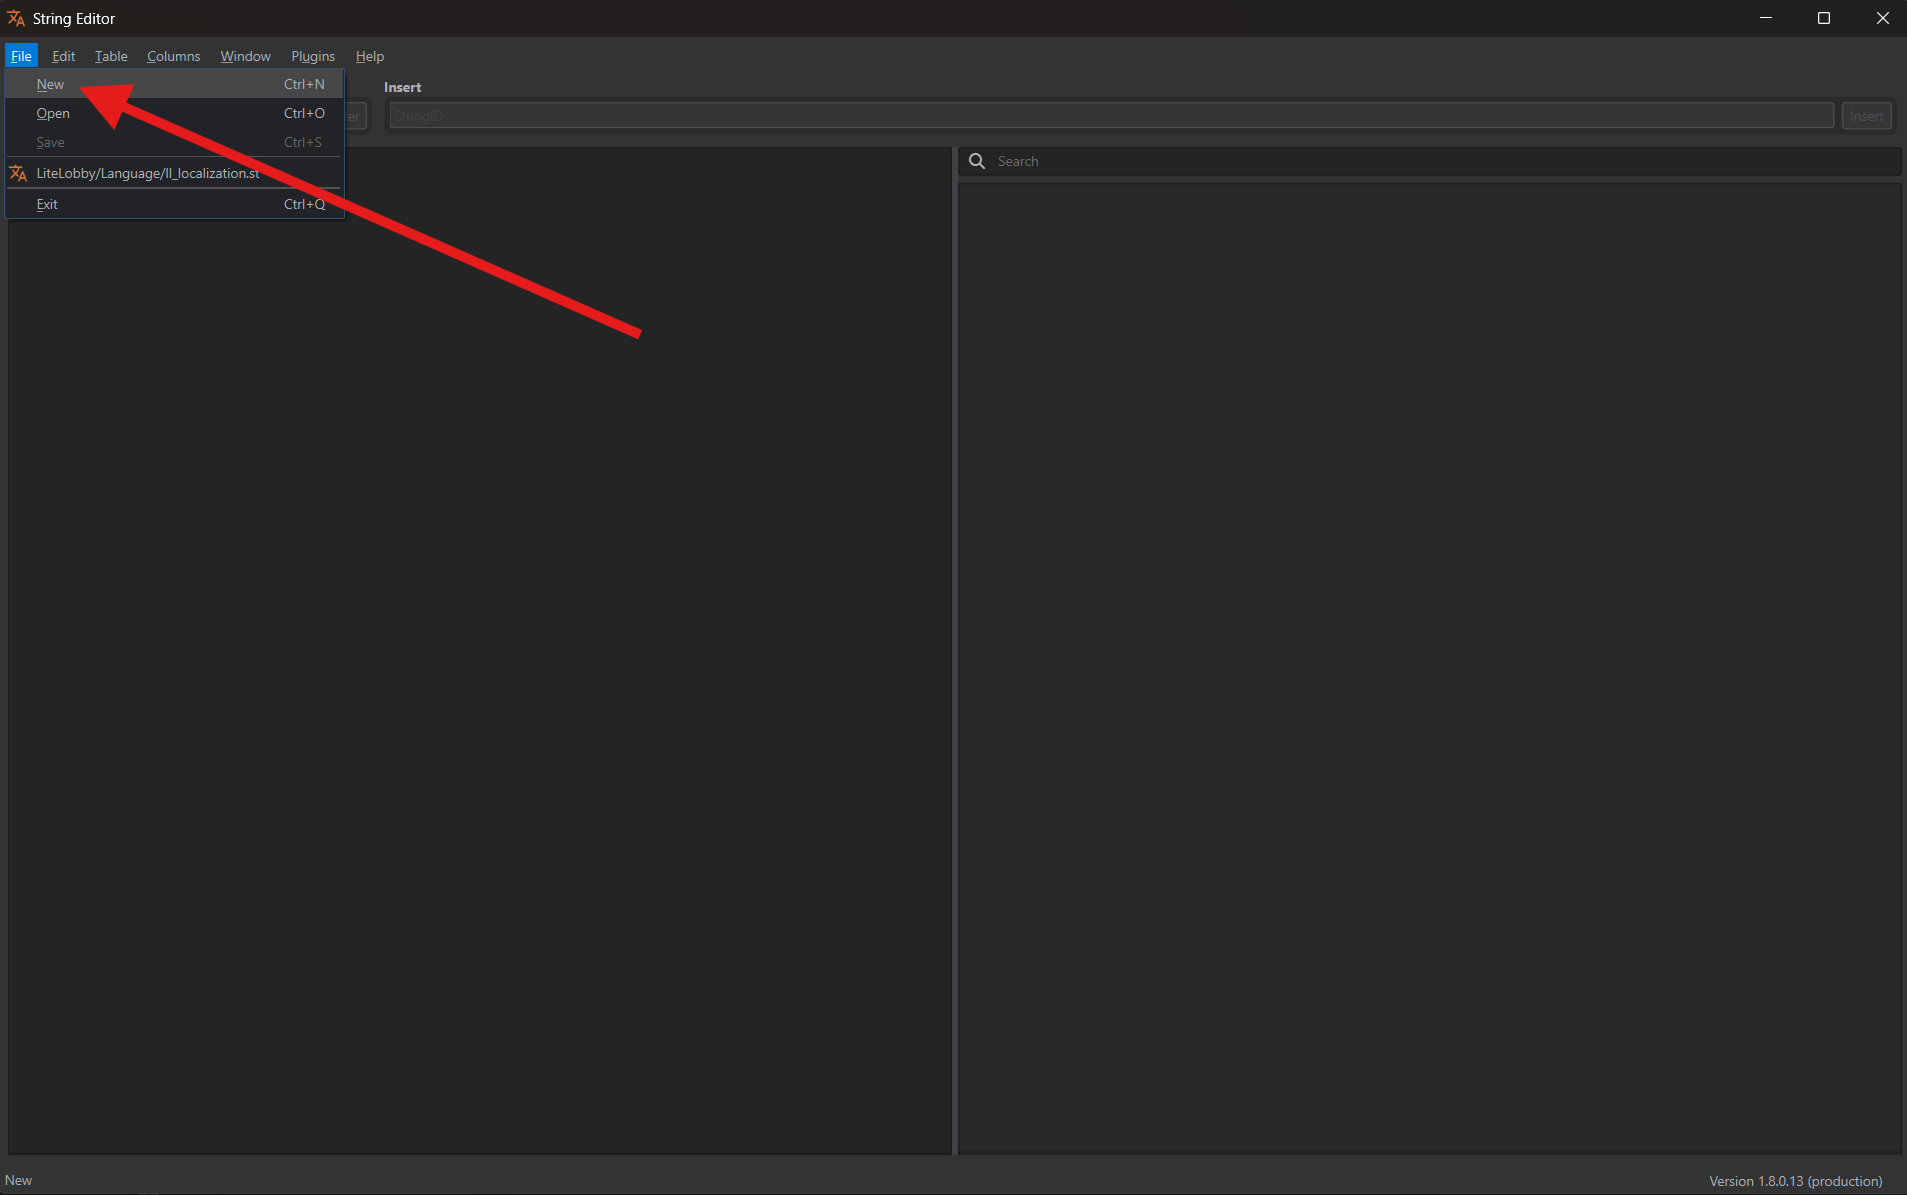
Select File → New.
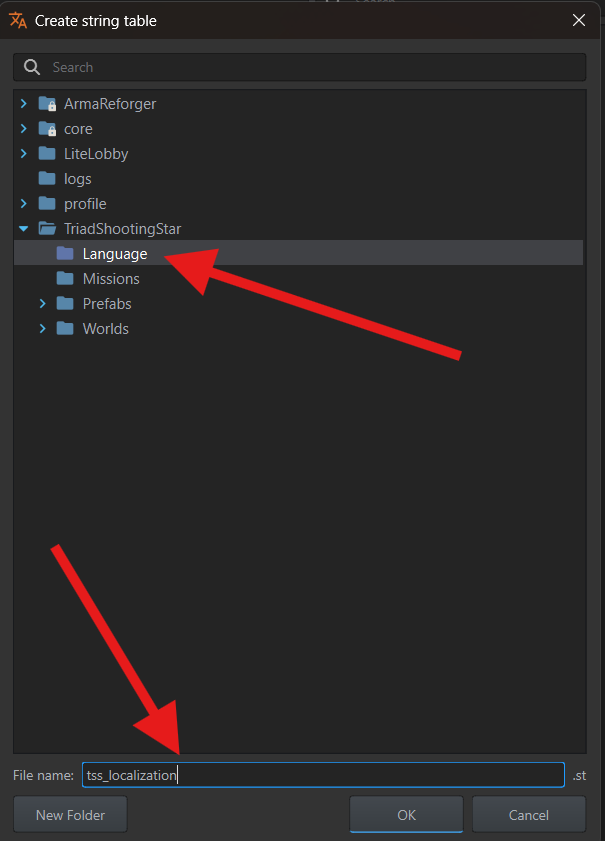
Inside your addon, create a Language folder using New Folder and open it. Enter tss_localization in File name and click OK. tss is our addon prefix; use your own prefix for your addon.
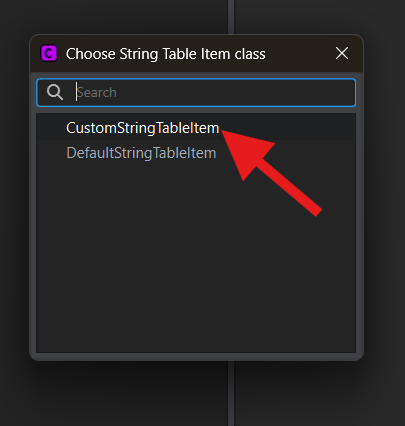
In the next dialog, select CustomStringTableItem.
Name in two languages
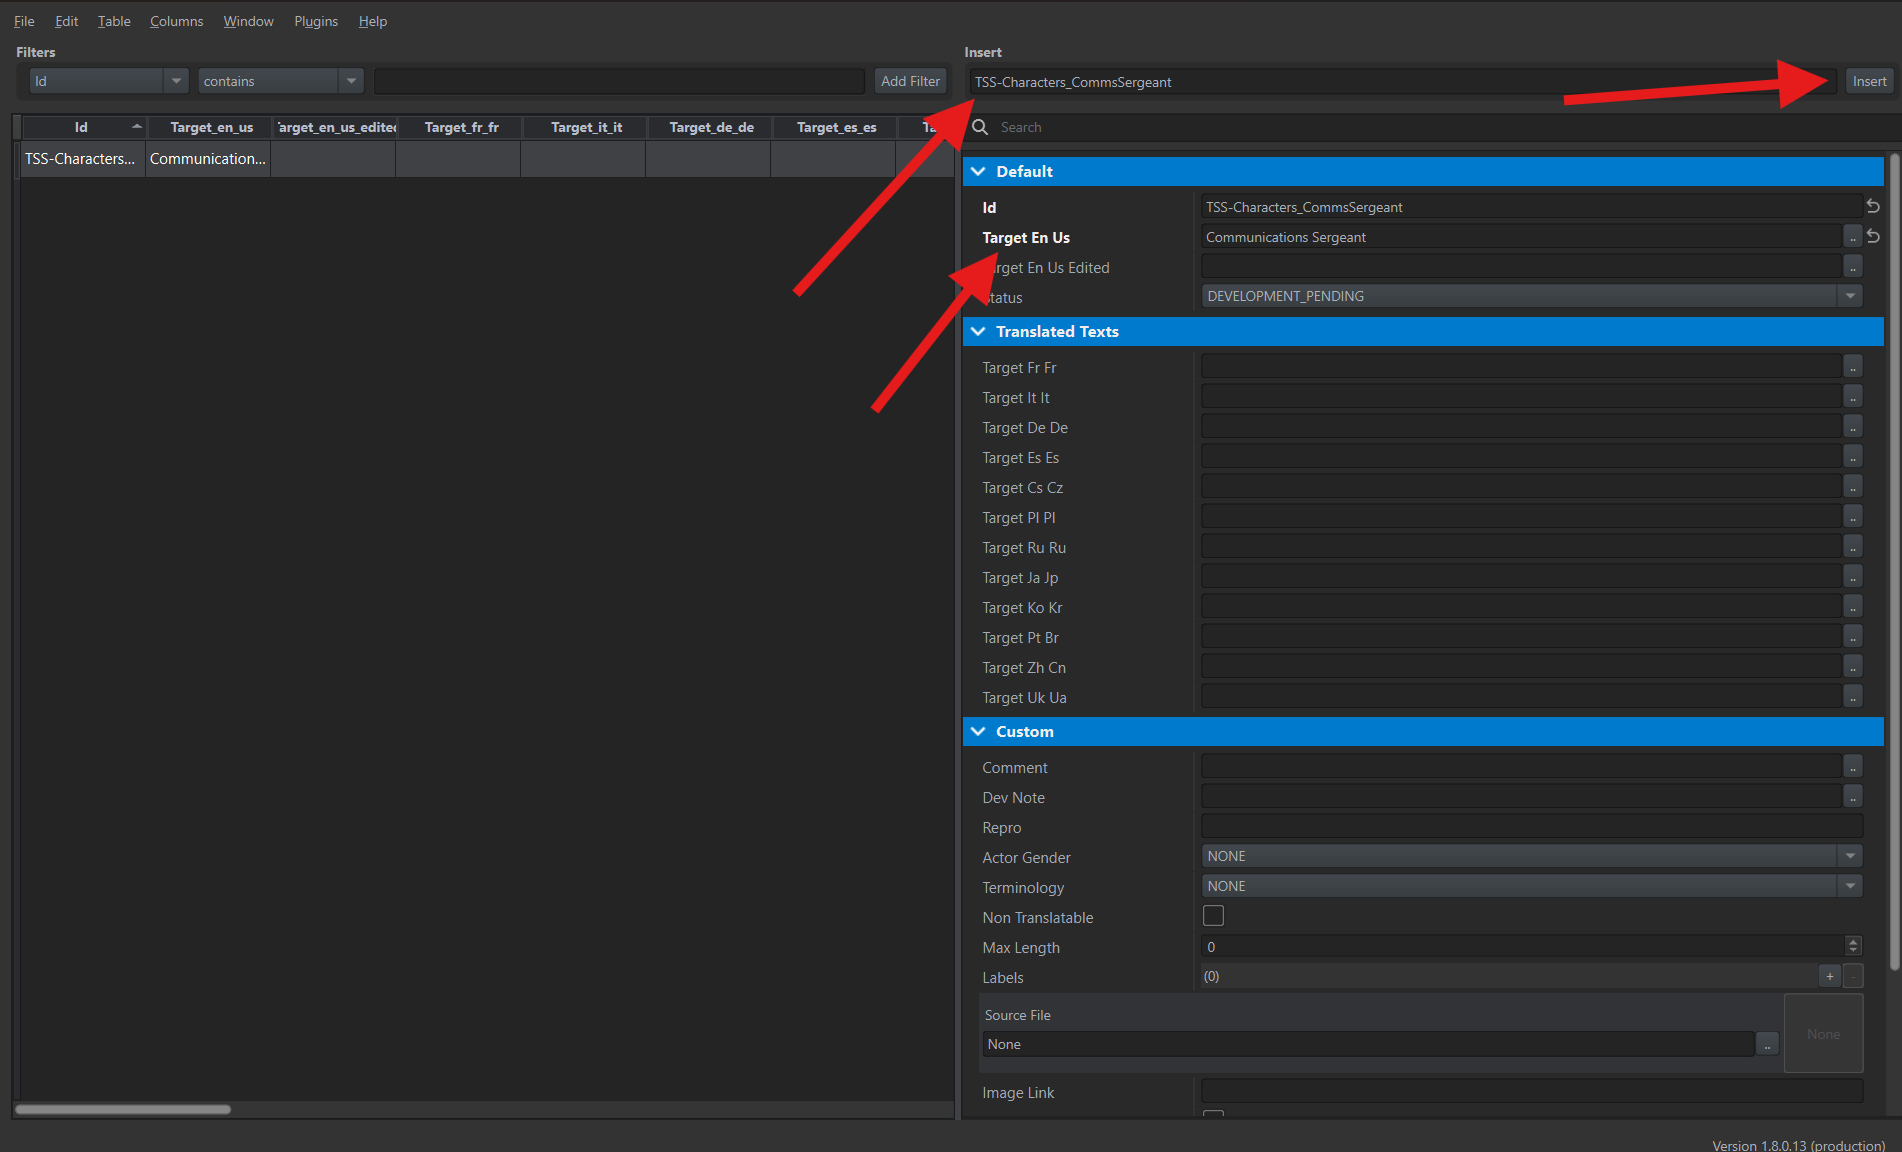
Section titled “Name in two languages”Enter TSS-Characters_CommsSergeant without # in the Insert field and click Insert. This is the key: an identifier the game uses to find the translated text.
Select the new row on the left and fill in the fields on the right:
- Target En Us —
Communications Sergeant. - Translated Texts → Target Ru Ru —
Сержант связи.
The second character’s name
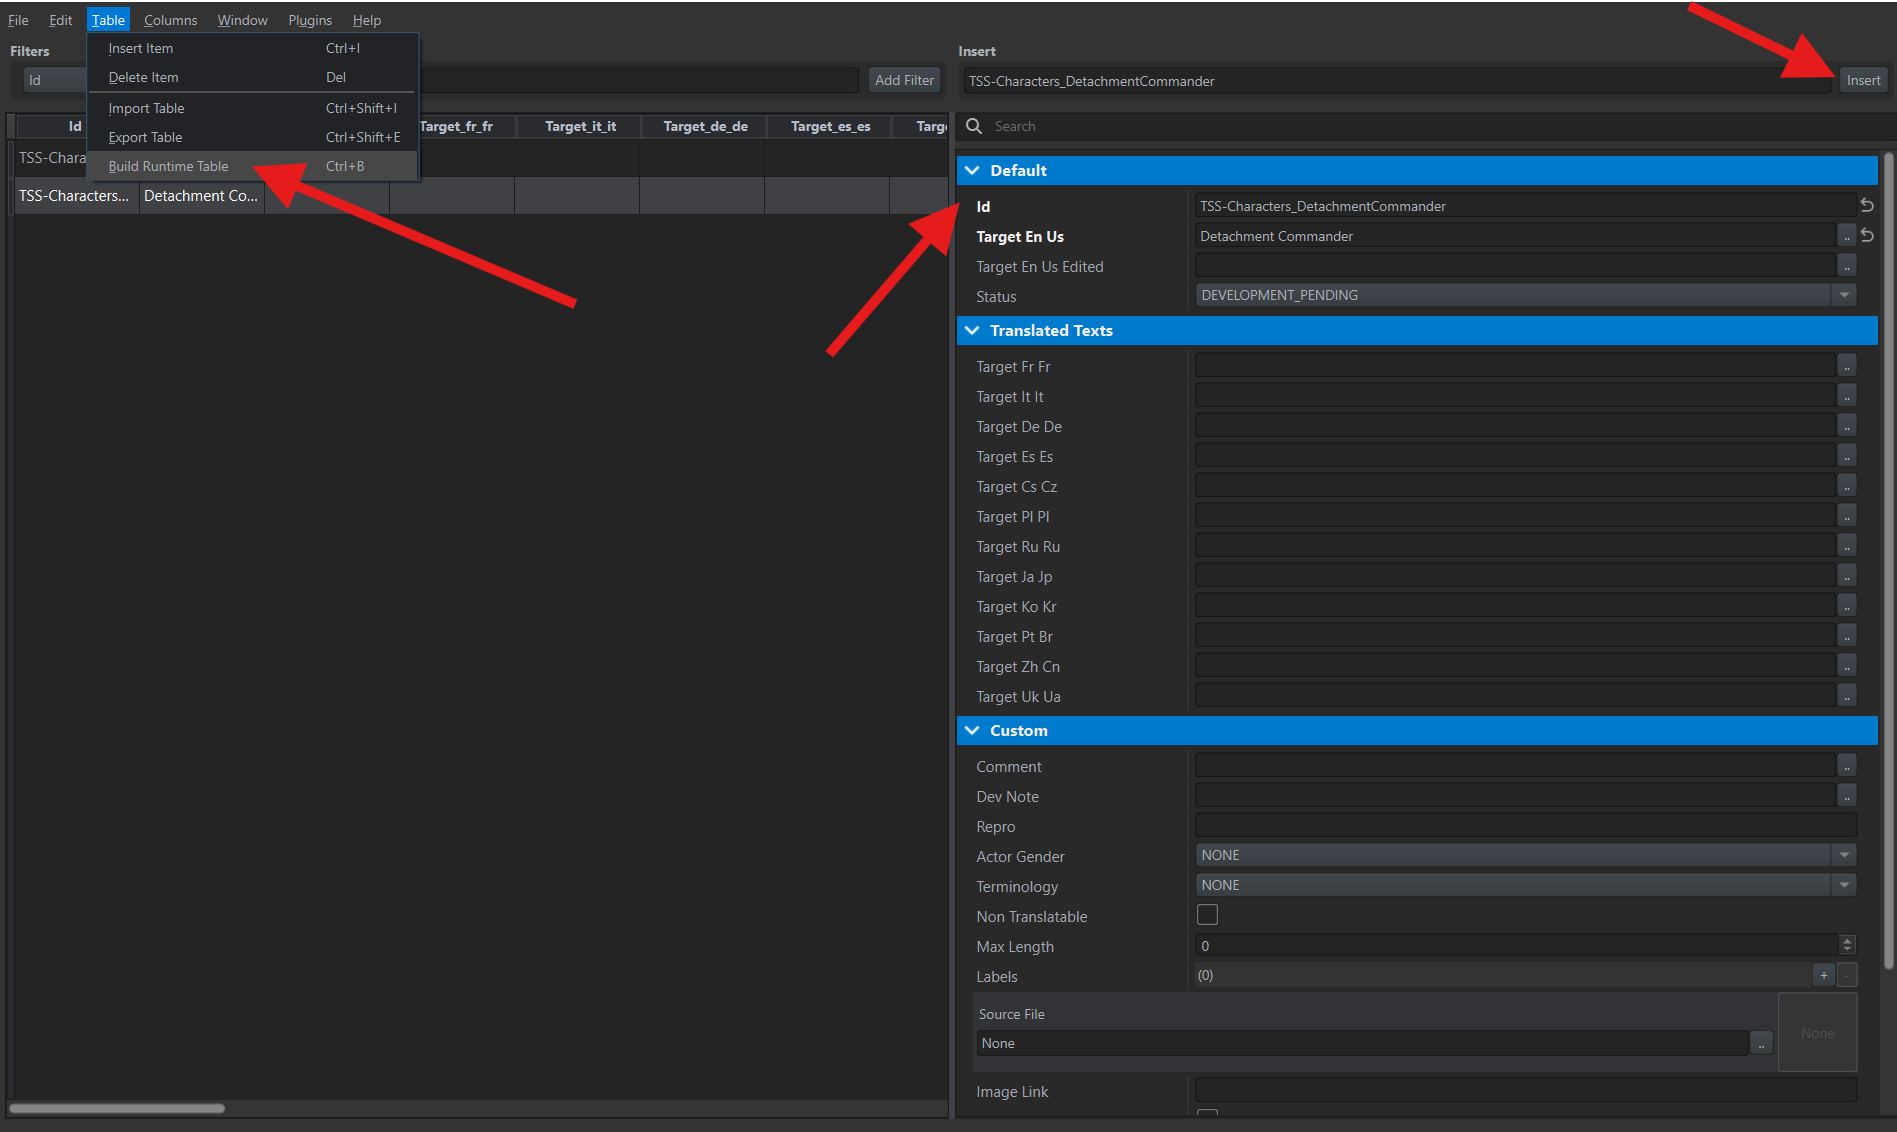
Section titled “The second character’s name”Add another row for the commander with the key TSS-Characters_DetachmentCommander and fill in the translations:
- Target En Us —
Detachment Commander. - Target Ru Ru —
Командир отряда.
Build the translation files
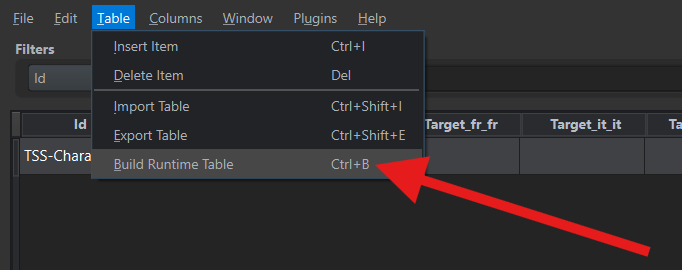
Section titled “Build the translation files”Press Ctrl+S, then select Table → Build Runtime Table (Ctrl+B). This creates the translation files the game reads. Repeat this command after changing text in the table.
Registering the table
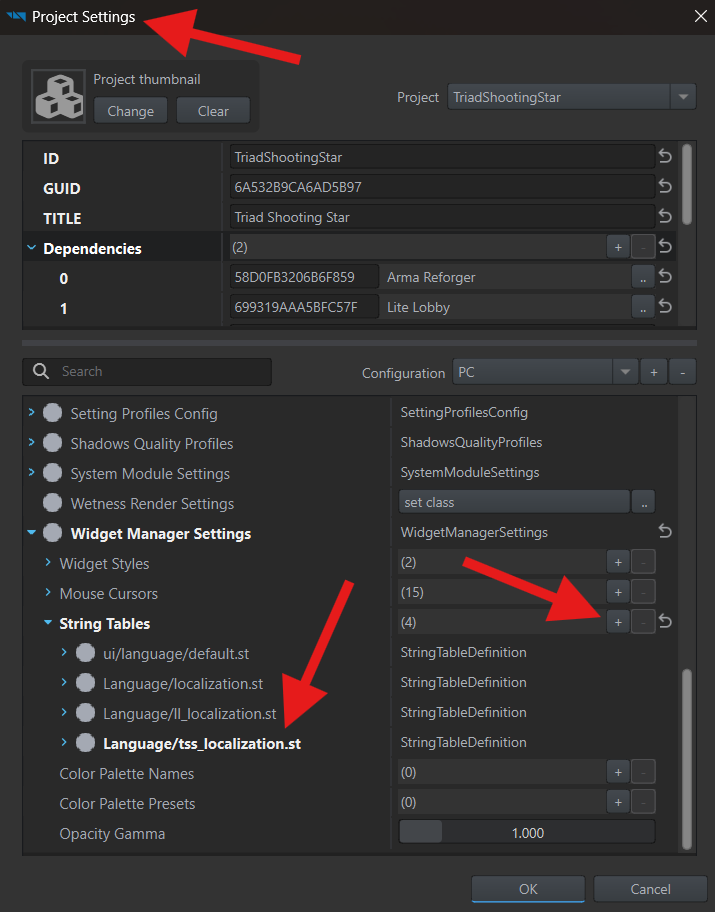
Section titled “Registering the table”In the main Workbench window, open File → Project Settings. Select your addon under Project and PC under Configuration.
- Expand Widget Manager Settings → String Tables and click
+. - Expand the new entry. Use
…beside String Table Source to selectLanguage/tss_localization.stfrom your addon. - In its Languages list, add entries for English and Russian. Set Code and the matching String Table Runtime file for each:
| Code | String Table Runtime |
|---|---|
en_us | Language/tss_localization.en_us.conf |
ru_ru | Language/tss_localization.ru_ru.conf |
If these entries are already filled in, do not add them again. Click OK.
Names and roles in the prefabs
Section titled “Names and roles in the prefabs”These settings are under SCR_EditableCharacterComponent → Visualization → UI Info:
- Name — the character’s name.
- Authored Labels — labels describing the character, including its role.
Character role
Section titled “Character role”Open TSS_Character_US_GB_CommsSergeant.et through Edit Prefab and select the character. Enter edita in the component search, select SCR_EditableCharacterComponent, and expand Visualization → UI Info.
In Authored Labels, replace ROLE_RIFLEMAN with ROLE_RADIOOPERATOR. This identifies the character’s role in the in-game editor.
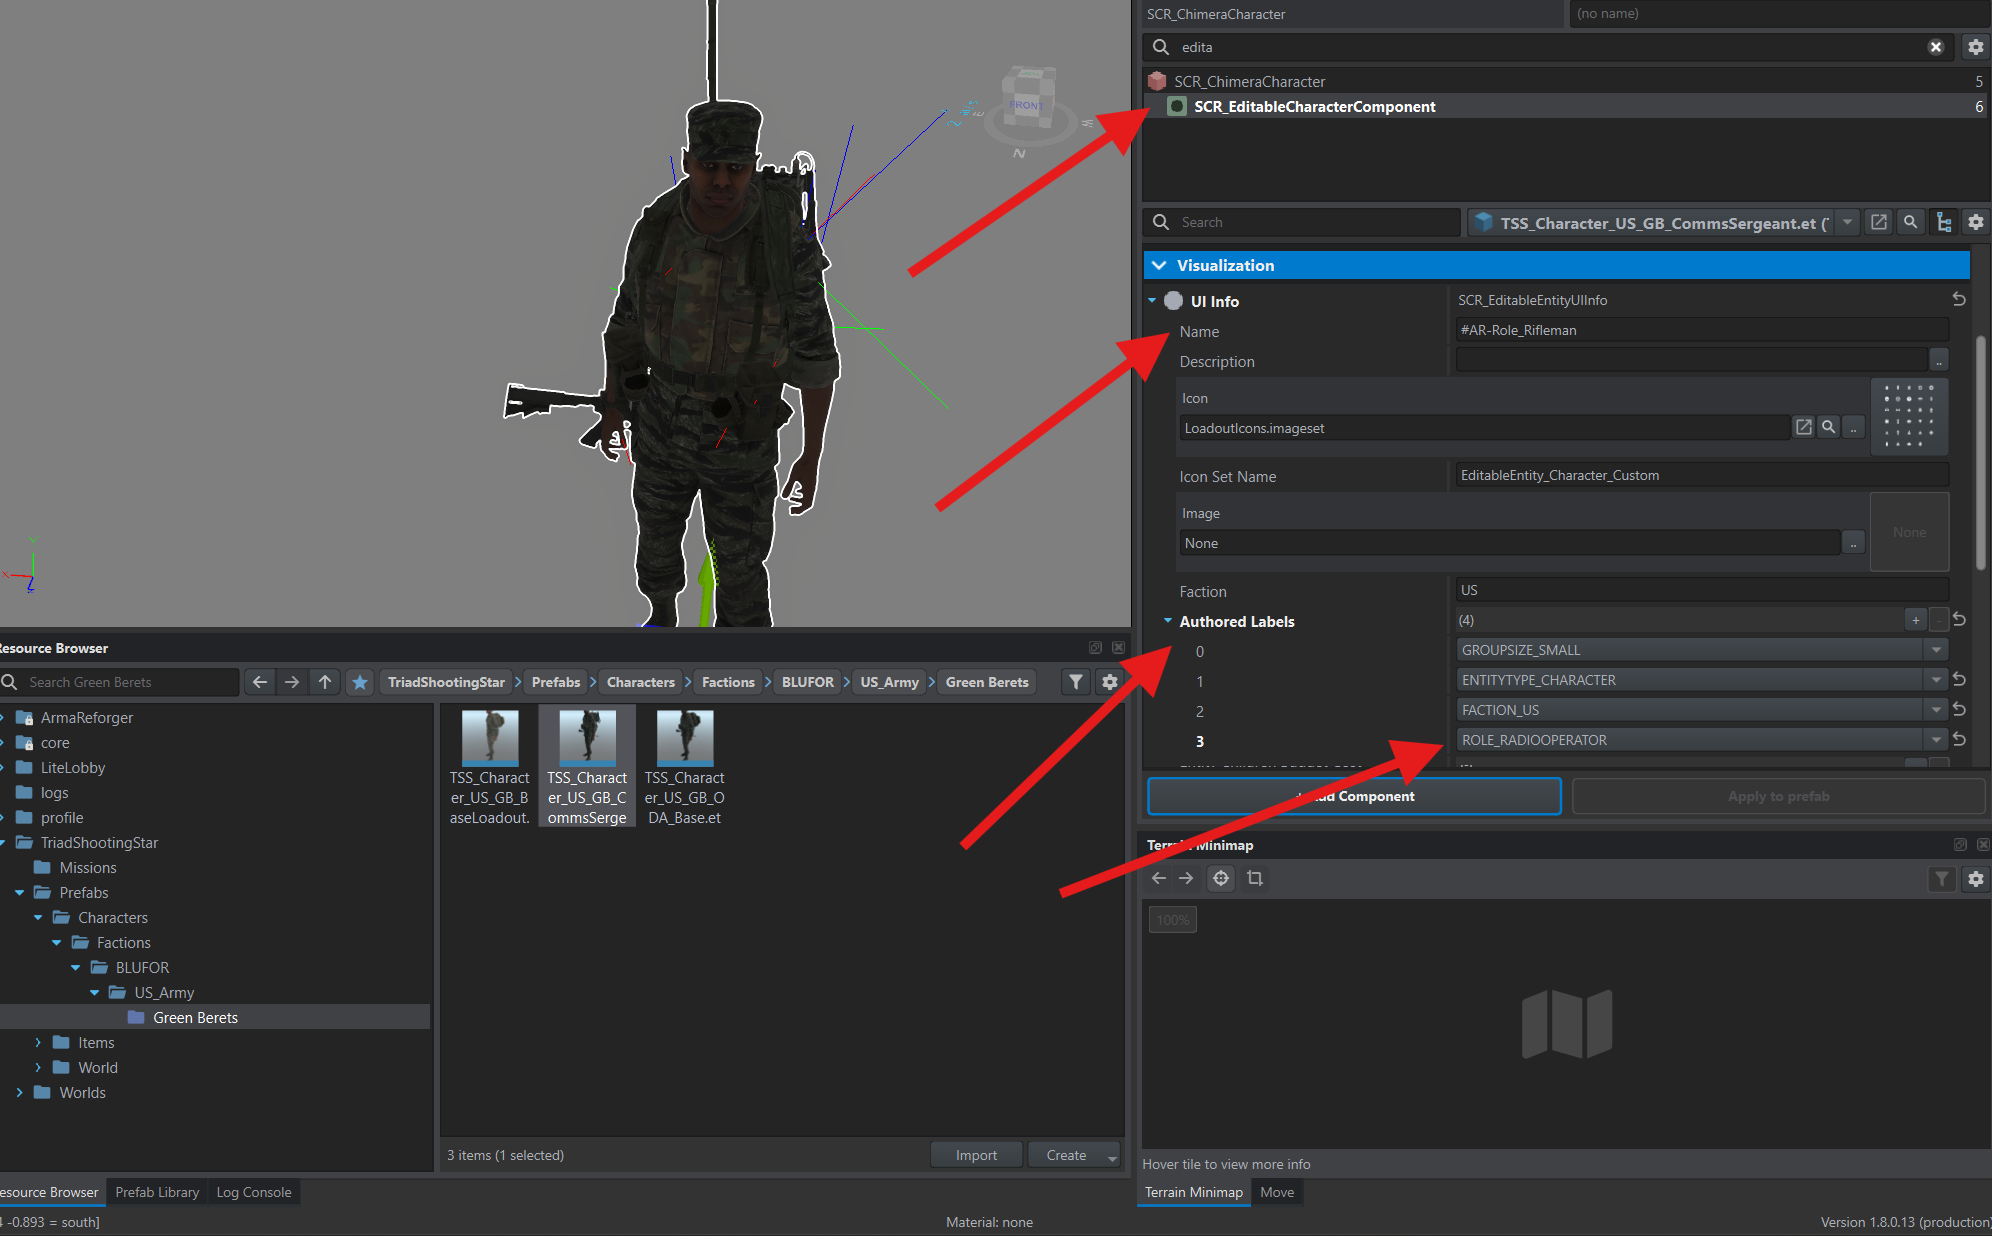
Name from the translation table
Section titled “Name from the translation table”Name still contains #AR-Role_Rifleman, a reference to the game’s “Rifleman” label. Replace it with #TSS-Characters_CommsSergeant.
Here, # is required: it marks a reference to a translation row. The key after it must exactly match the Id in String Editor.
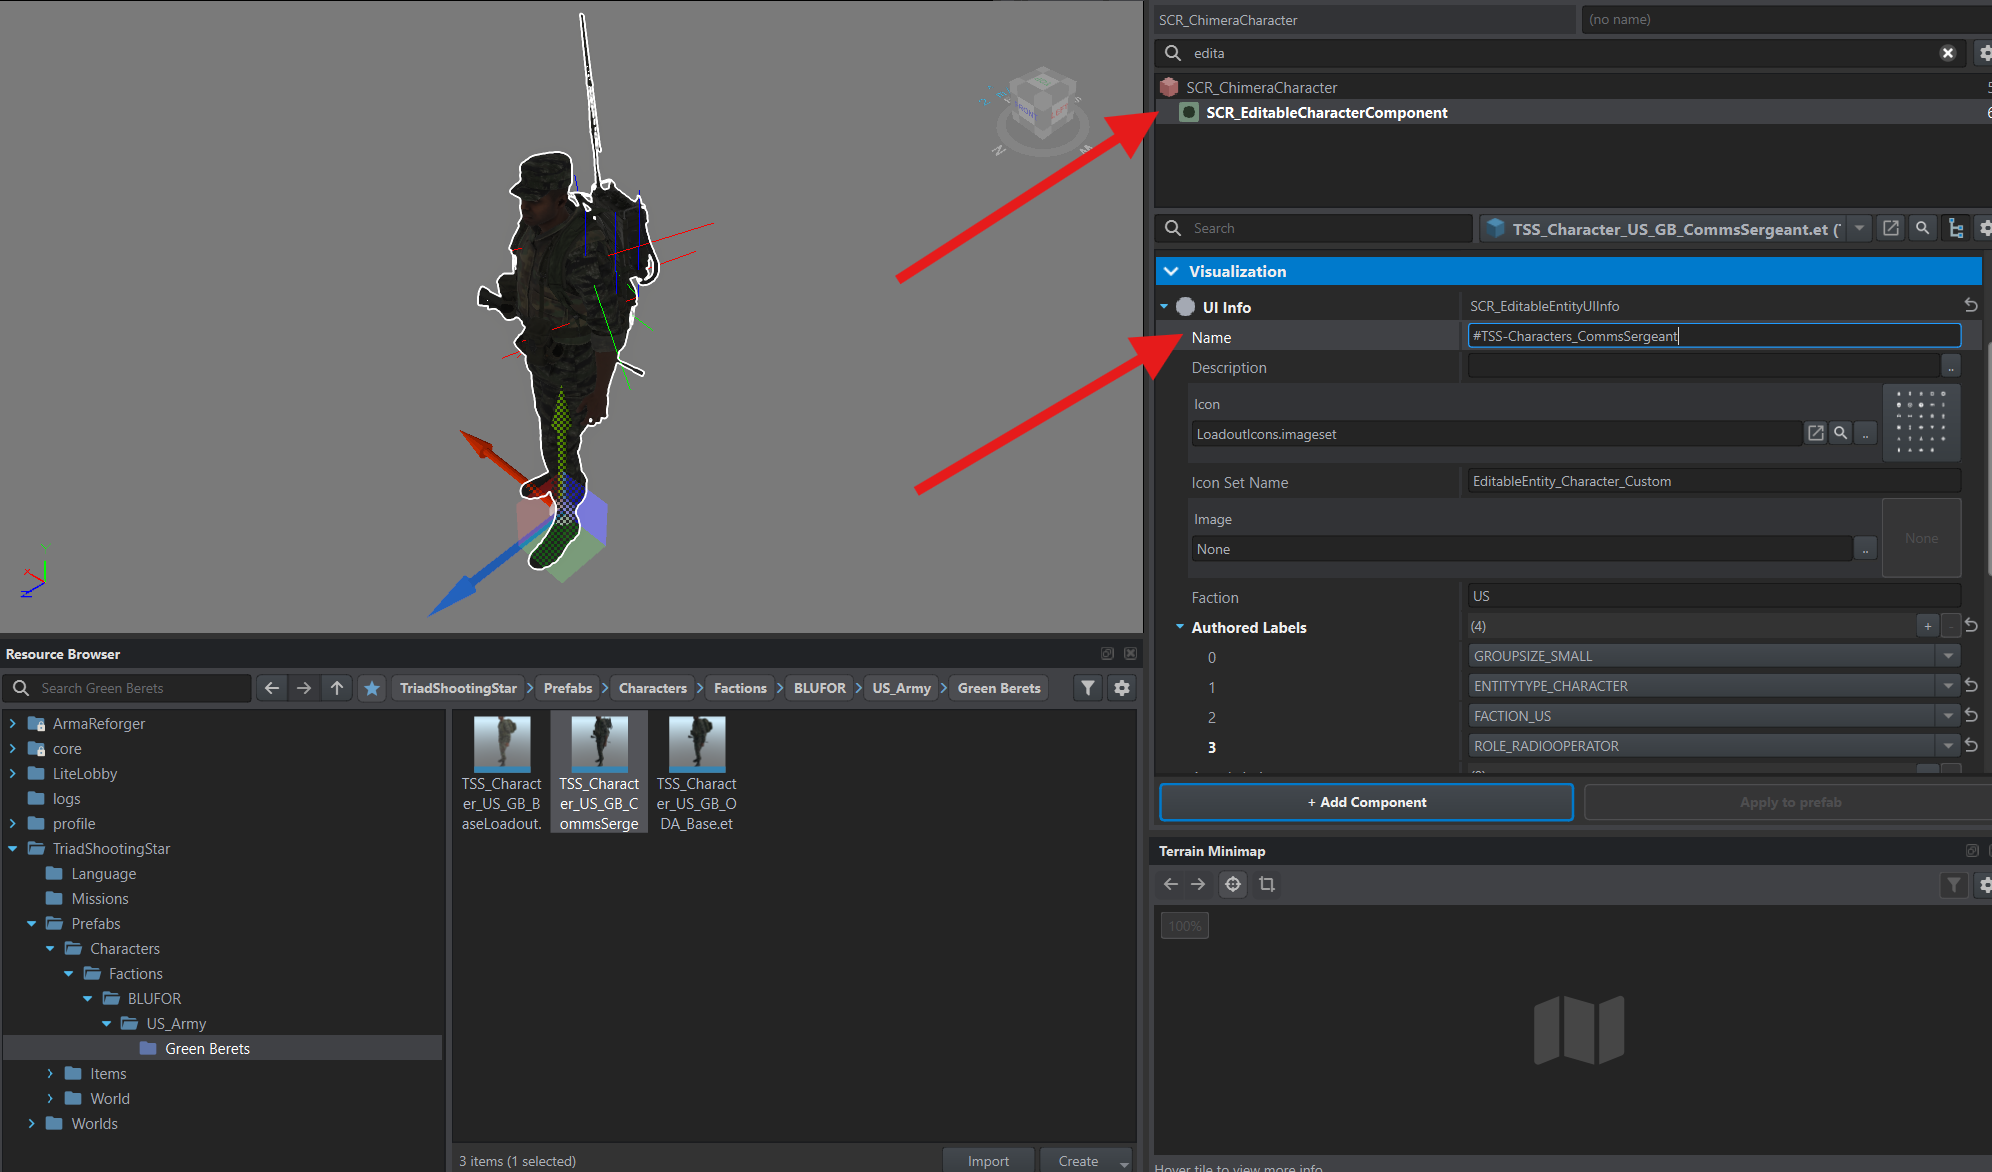
Save the prefab with Ctrl+S.
Configure the second character
Section titled “Configure the second character”Open TSS_Character_US_GB_DetachmentCommander.et through Edit Prefab, select the character, and expand the same SCR_EditableCharacterComponent → Visualization → UI Info section:
- Set Name to
#TSS-Characters_DetachmentCommander. - In Authored Labels, replace
ROLE_RIFLEMANwithROLE_LEADER.
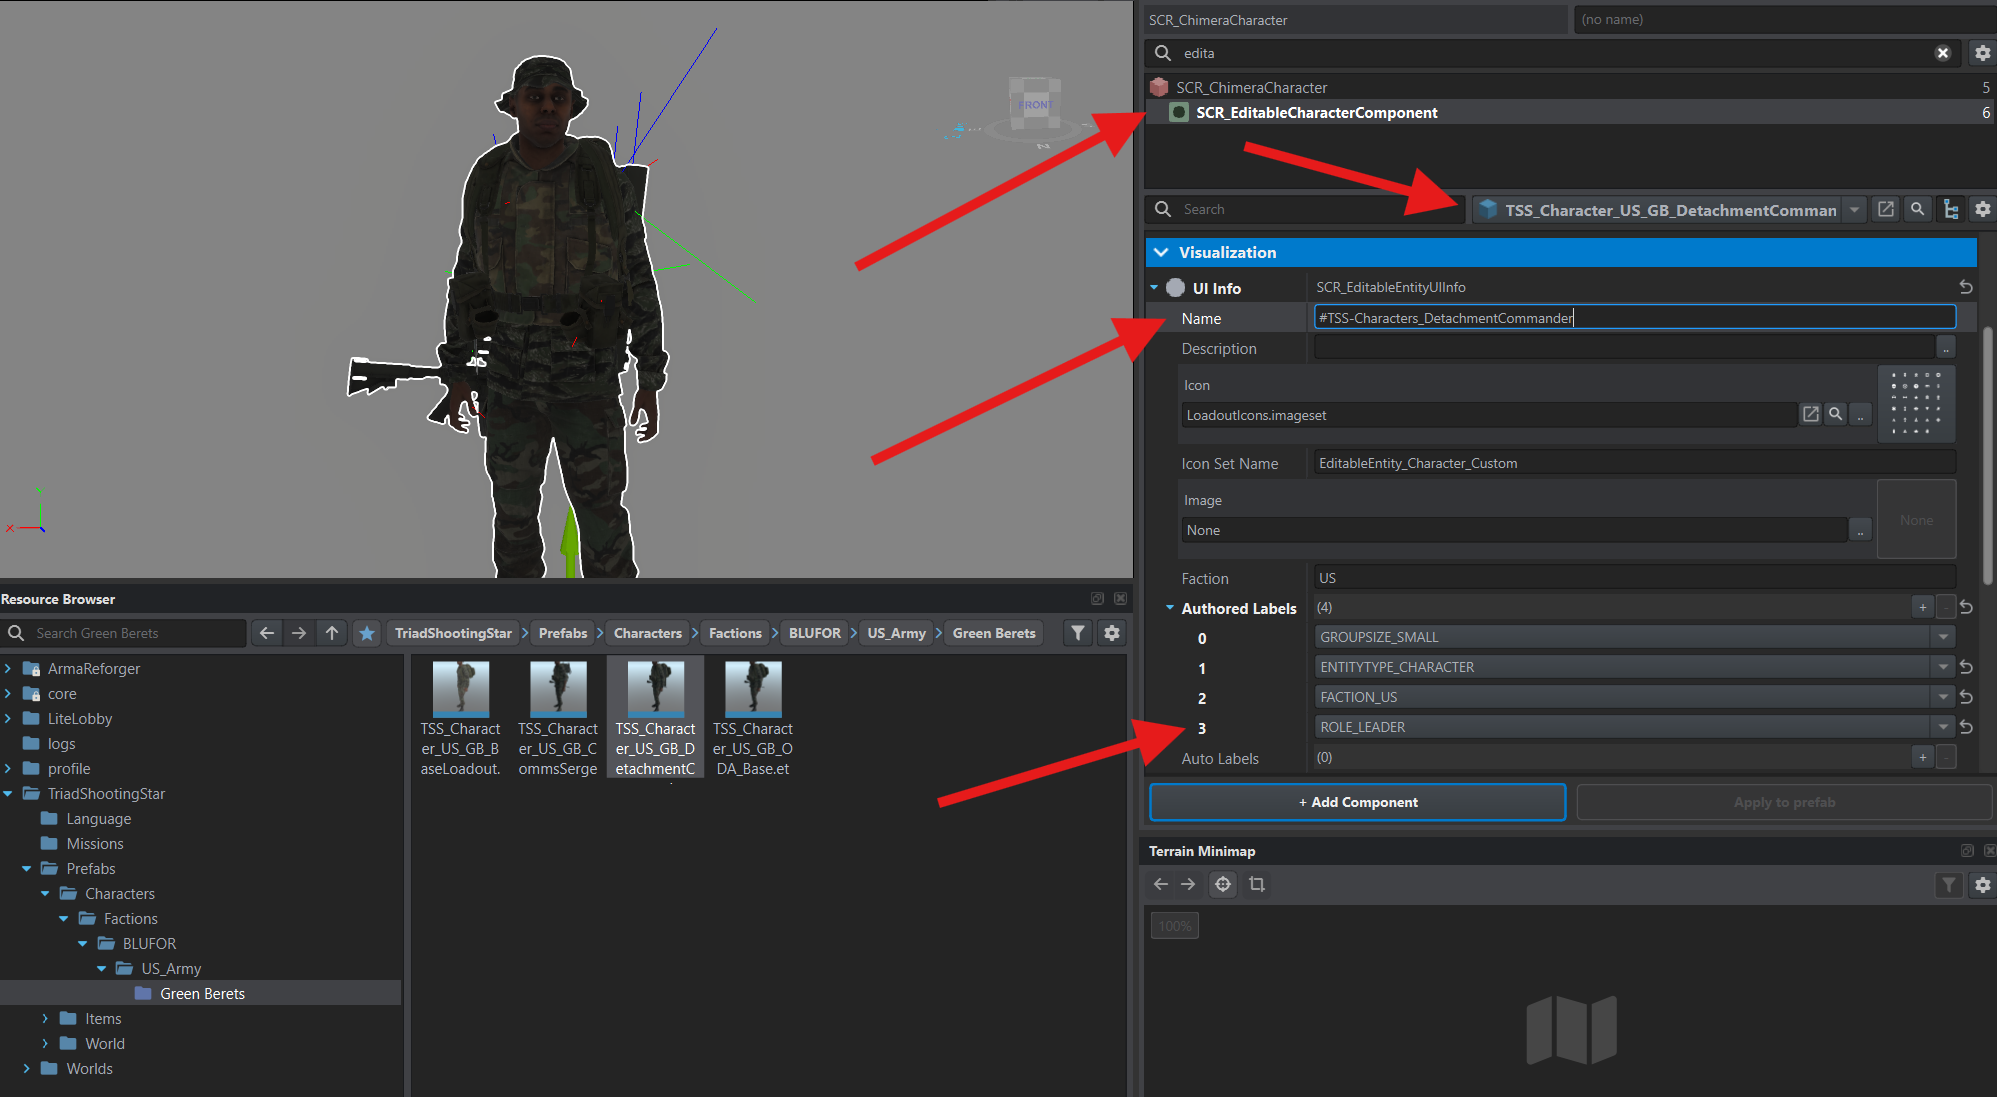
Save the prefab with Ctrl+S.
If a key starting with # appears instead of the name, check that it matches the row’s Id, the runtime files have been built, and the table is registered. Workbench may need a restart to load a new table.
Add characters to the catalog
Section titled “Add characters to the catalog”Names and roles are configured. Add the characters to the US faction catalog so they can be found and placed through Game Master.
Each character needs its own catalog entry. The entry references a character prefab and contains its availability settings for the in-game editor.
Override the catalog
Section titled “Override the catalog”In the ArmaReforger project’s Resource Browser, open Configs/EntityCatalog/US. Right-click Characters_EntityCatalog_US.conf and select Override in → your addon.
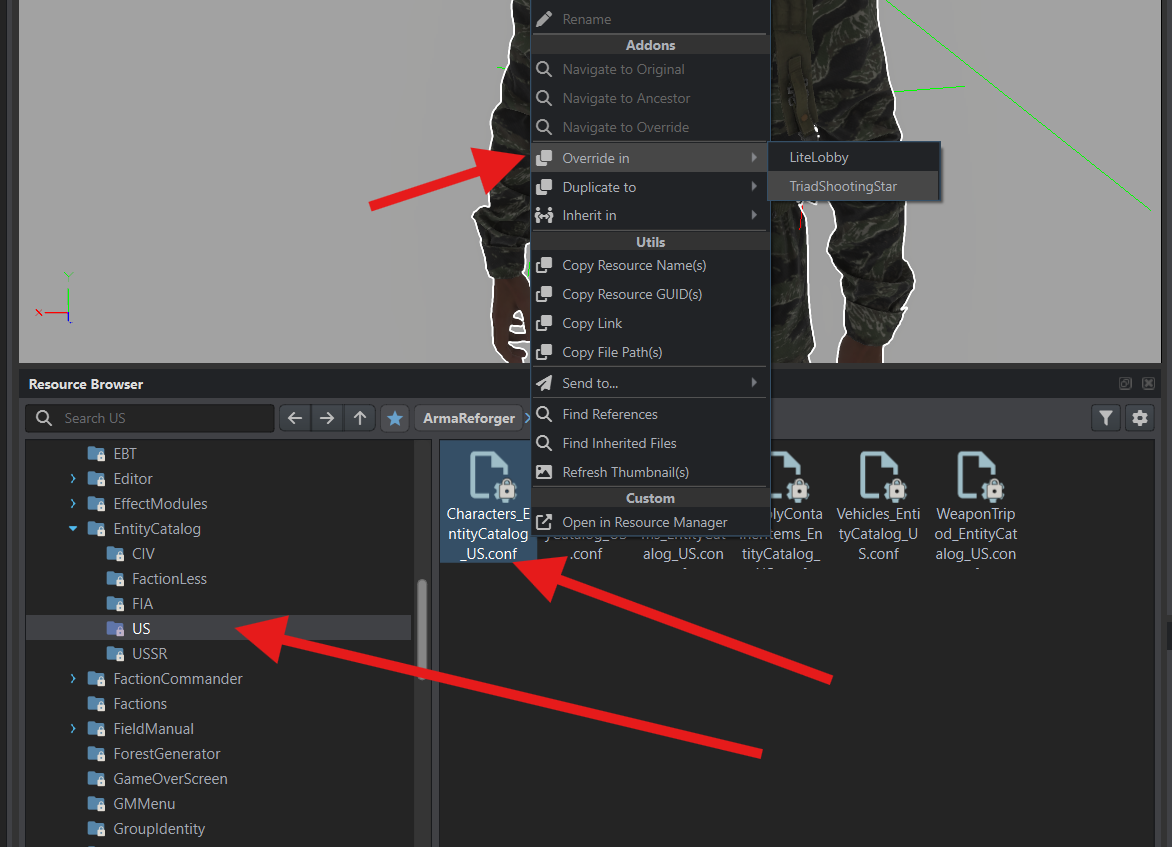
Use an override here because we are extending the catalog the game already uses. Keep the filename Characters_EntityCatalog_US.conf without a TSS_ prefix.
Add the characters
Section titled “Add the characters”In your addon, double-click this file under Configs/EntityCatalog/US to open it. In Entity Entry List, find Character_US_SF_Sapper_S.et, right-click the entry, and select Duplicate.
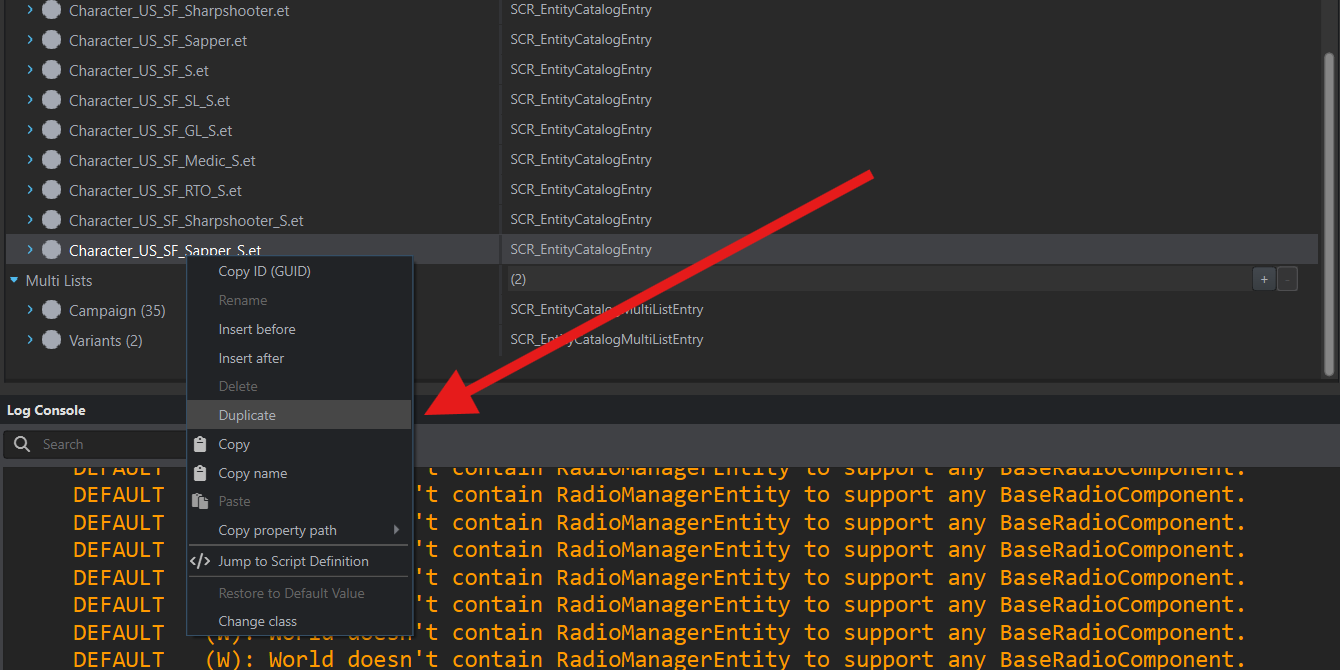
This copies the catalog entry; it does not create another prefab file.
Expand the added entry. In Resource Browser, open your addon’s Green Berets folder and drag TSS_Character_US_GB_CommsSergeant.et into Entity Prefab.
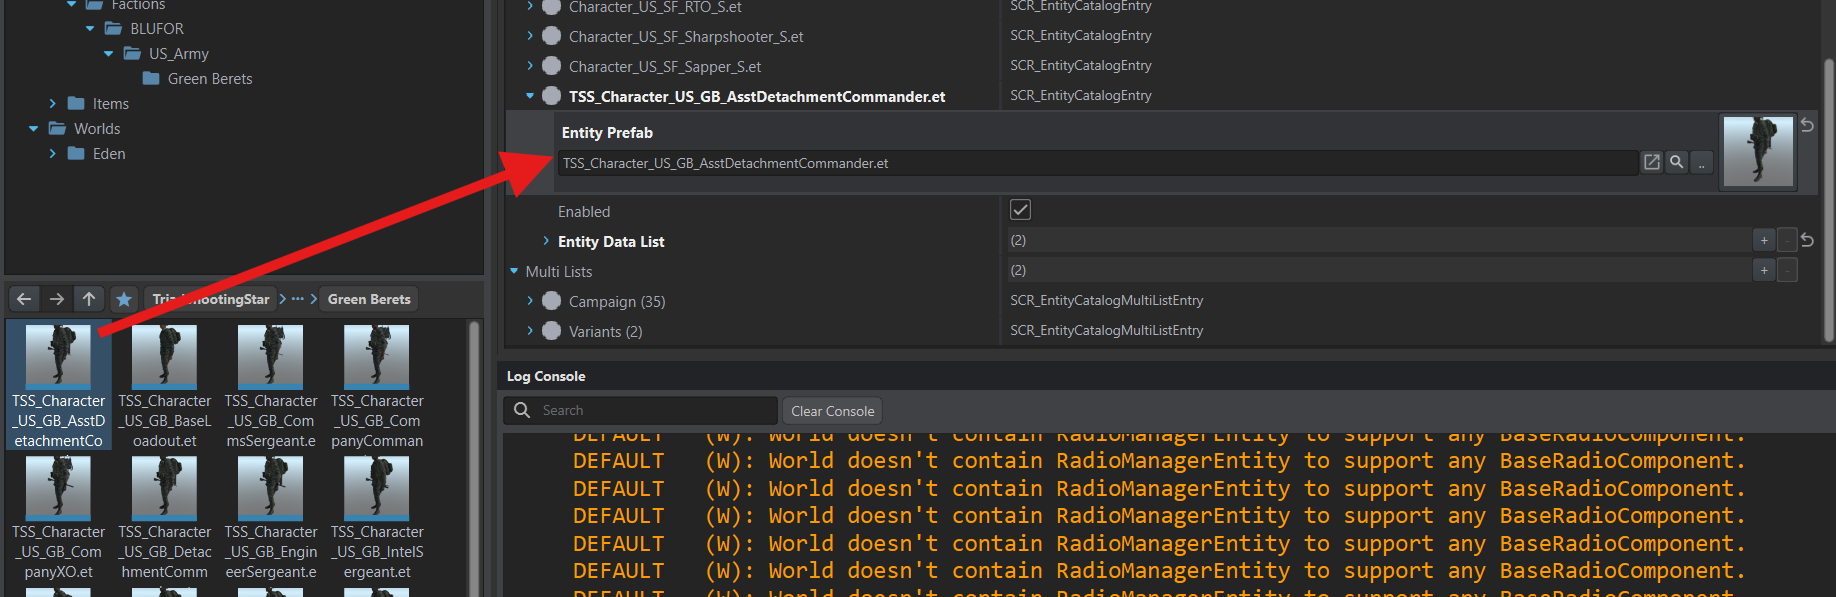
The copied entry already contains the settings needed by the in-game editor under Entity Data List. Our characters can use these settings unchanged.
Use Duplicate on the new entry and replace its Entity Prefab with TSS_Character_US_GB_DetachmentCommander.et. The catalog now has separate entries for the sergeant and commander.
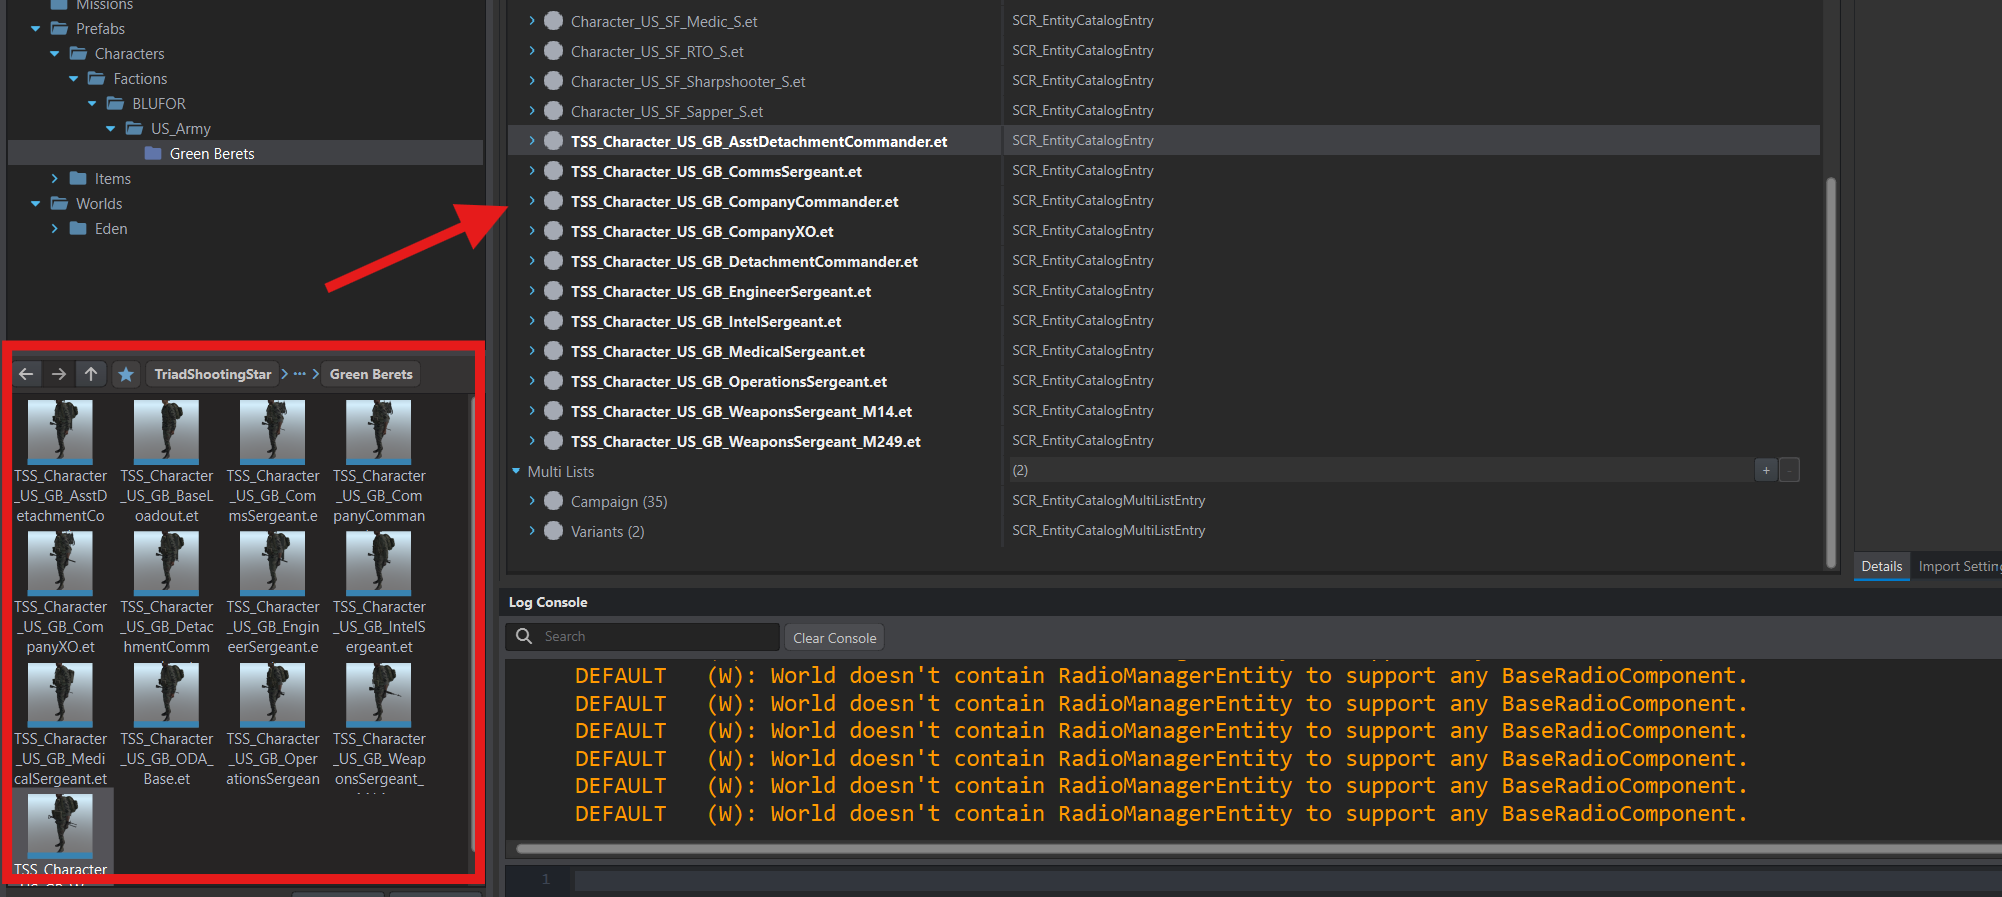
Add the other characters the same way as you finish their prefabs. BaseLoadout and ODA_Base are inheritance bases, so we do not add them to the catalog.
Save the catalog with Ctrl+S.
Check in game
Section titled “Check in game”Open your mission world in World Editor and click the green play button on the top toolbar.
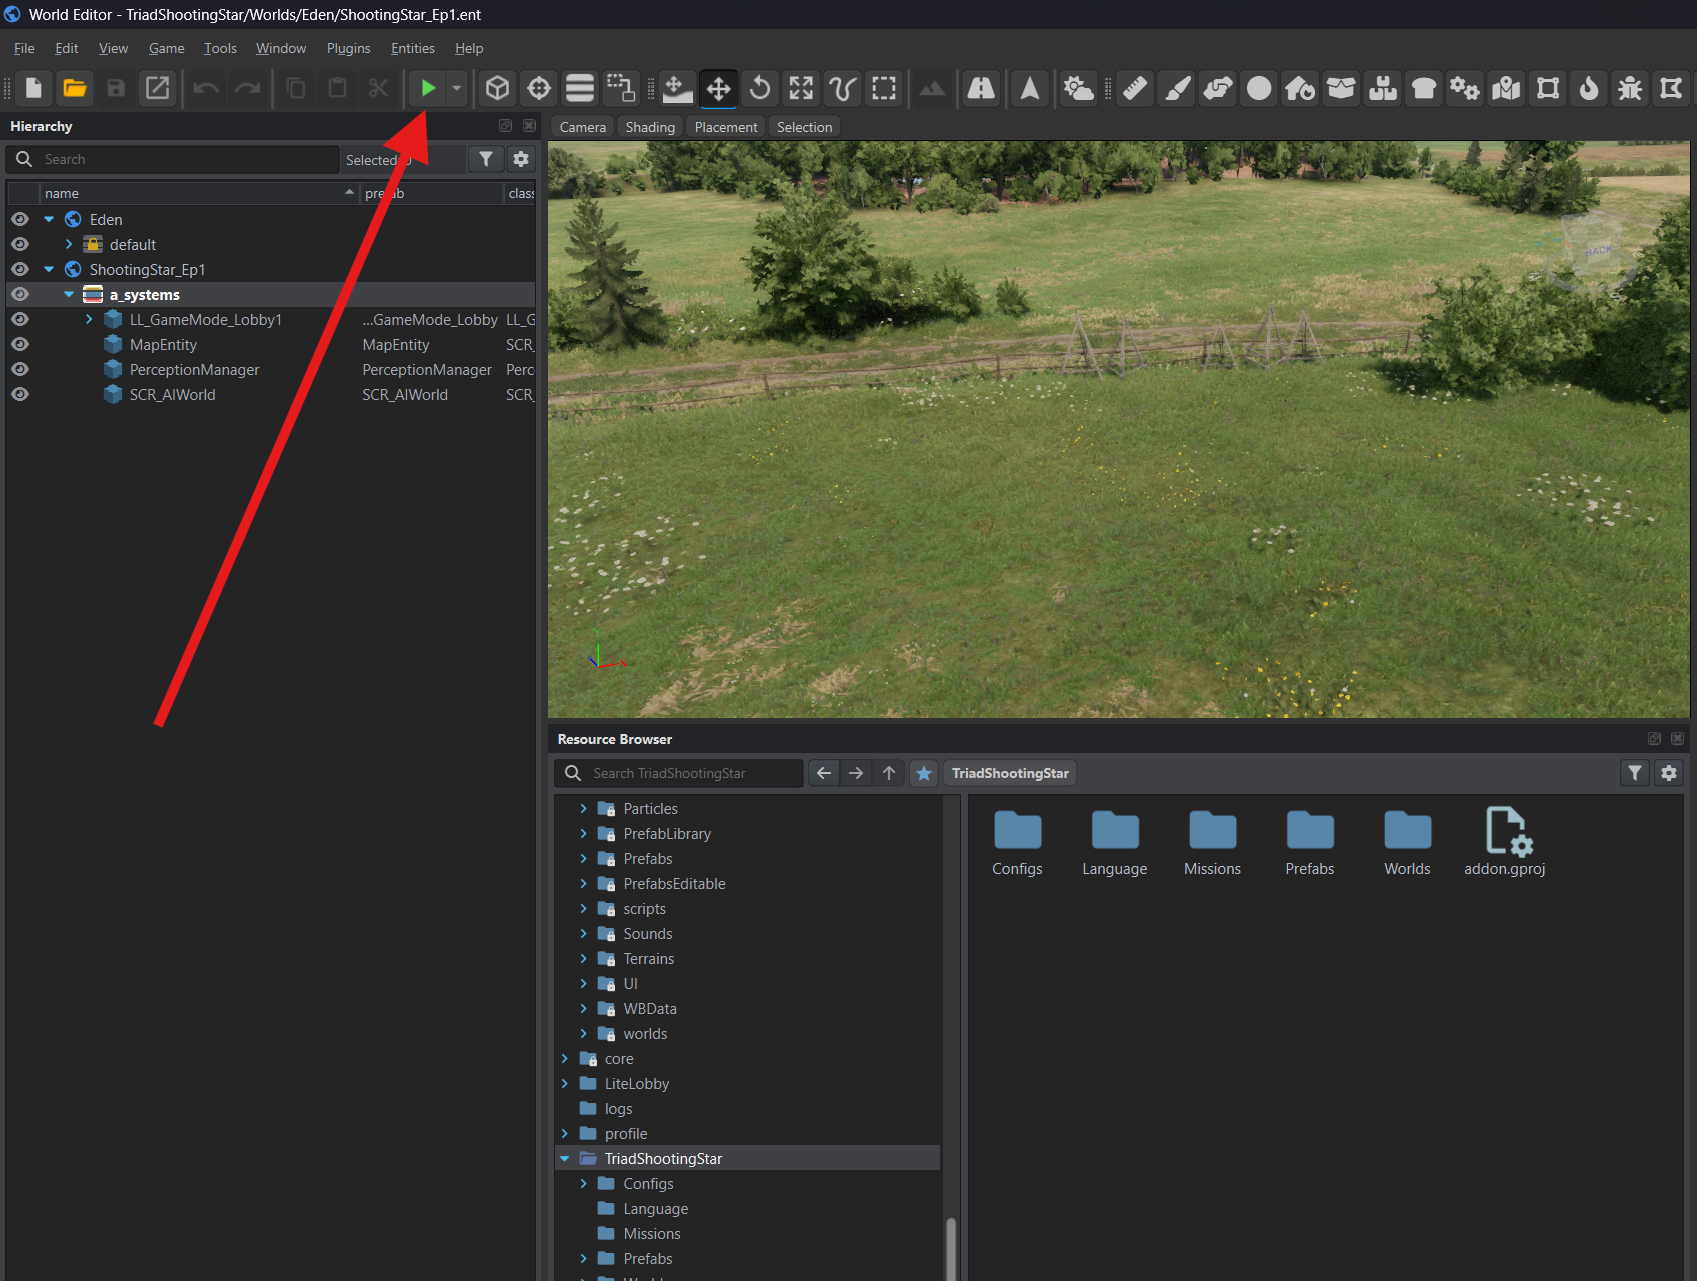
Find the characters
Section titled “Find the characters”After launching the mission, click Play in the lobby until gameplay starts. Then press Y to open Game Master.
U opens and closes the lobby; Y opens and closes Game Master.
In Game Master, press Tab to open Entity Browser, the catalog of objects you can place. In the filters on the right, select the US faction and Character type.
Use Search to find Communications Sergeant and Detachment Commander. With the game set to Russian, search for Сержант связи and Командир отряда.
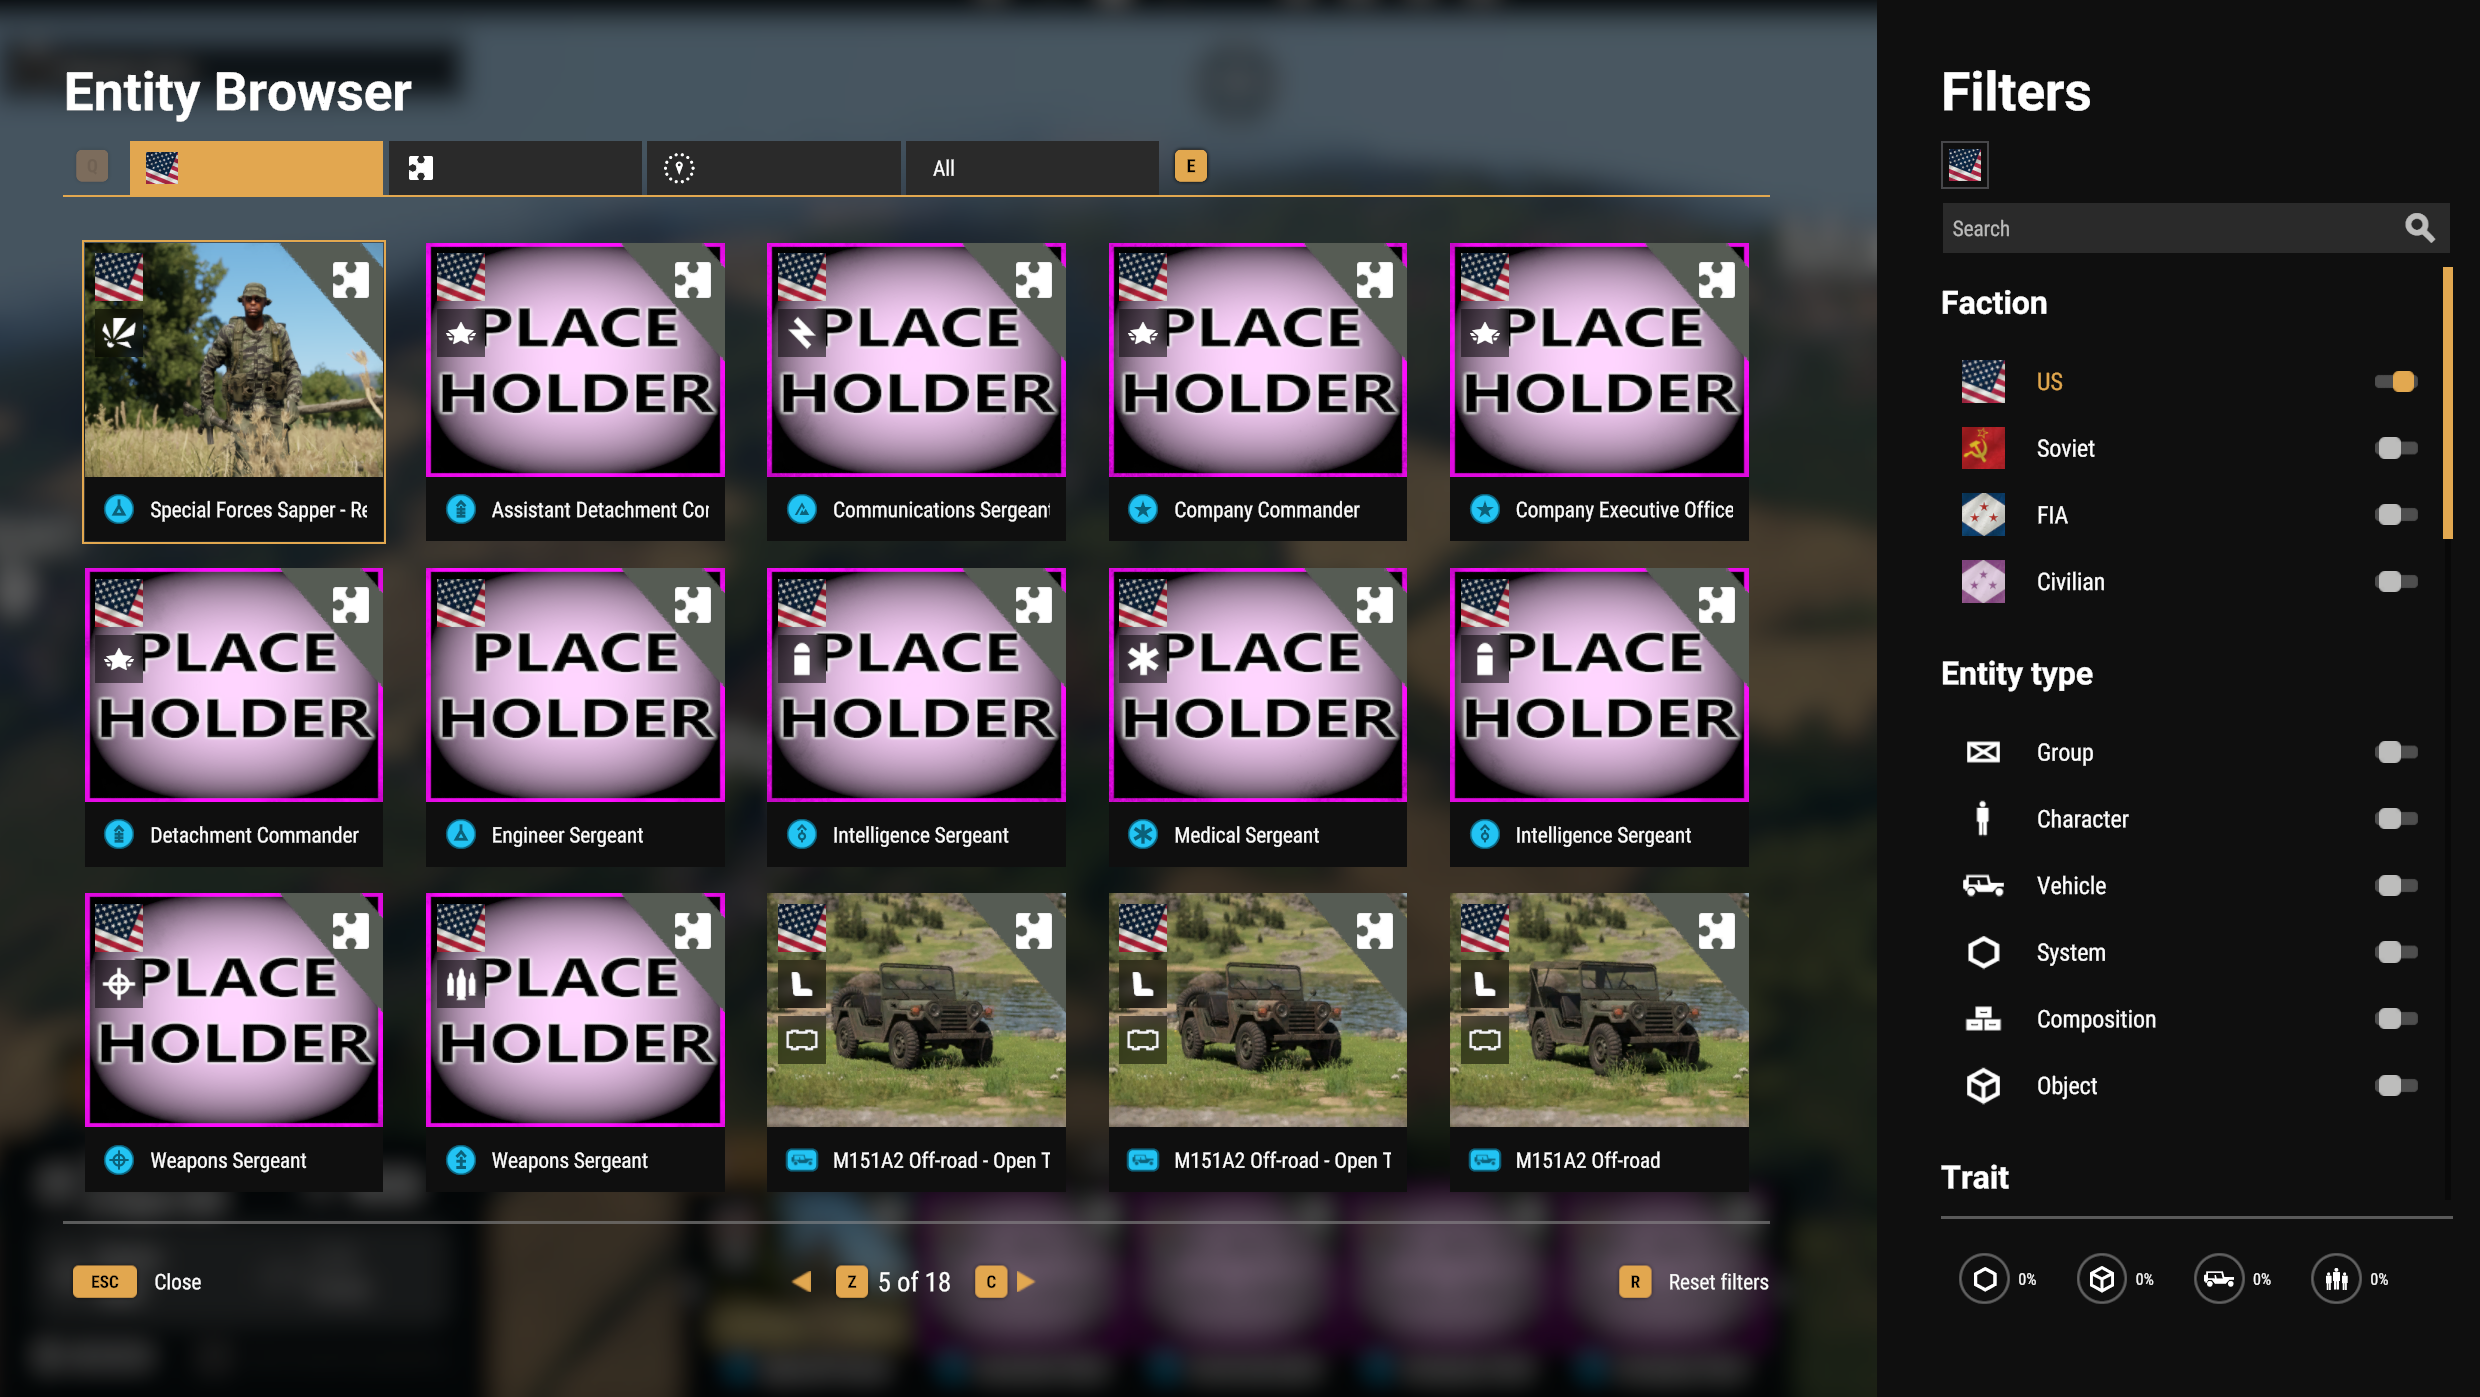
The thumbnails may still show PLACE HOLDER: preview images have not been prepared for these prefabs yet. You can still place the characters.
If a character is missing, check its catalog entry. If its name appears as a key starting with #, check the translation reference.
Place the characters
Section titled “Place the characters”Select a character card, point at the ground, and left-click. Place the other character the same way. Right-click cancels placement.
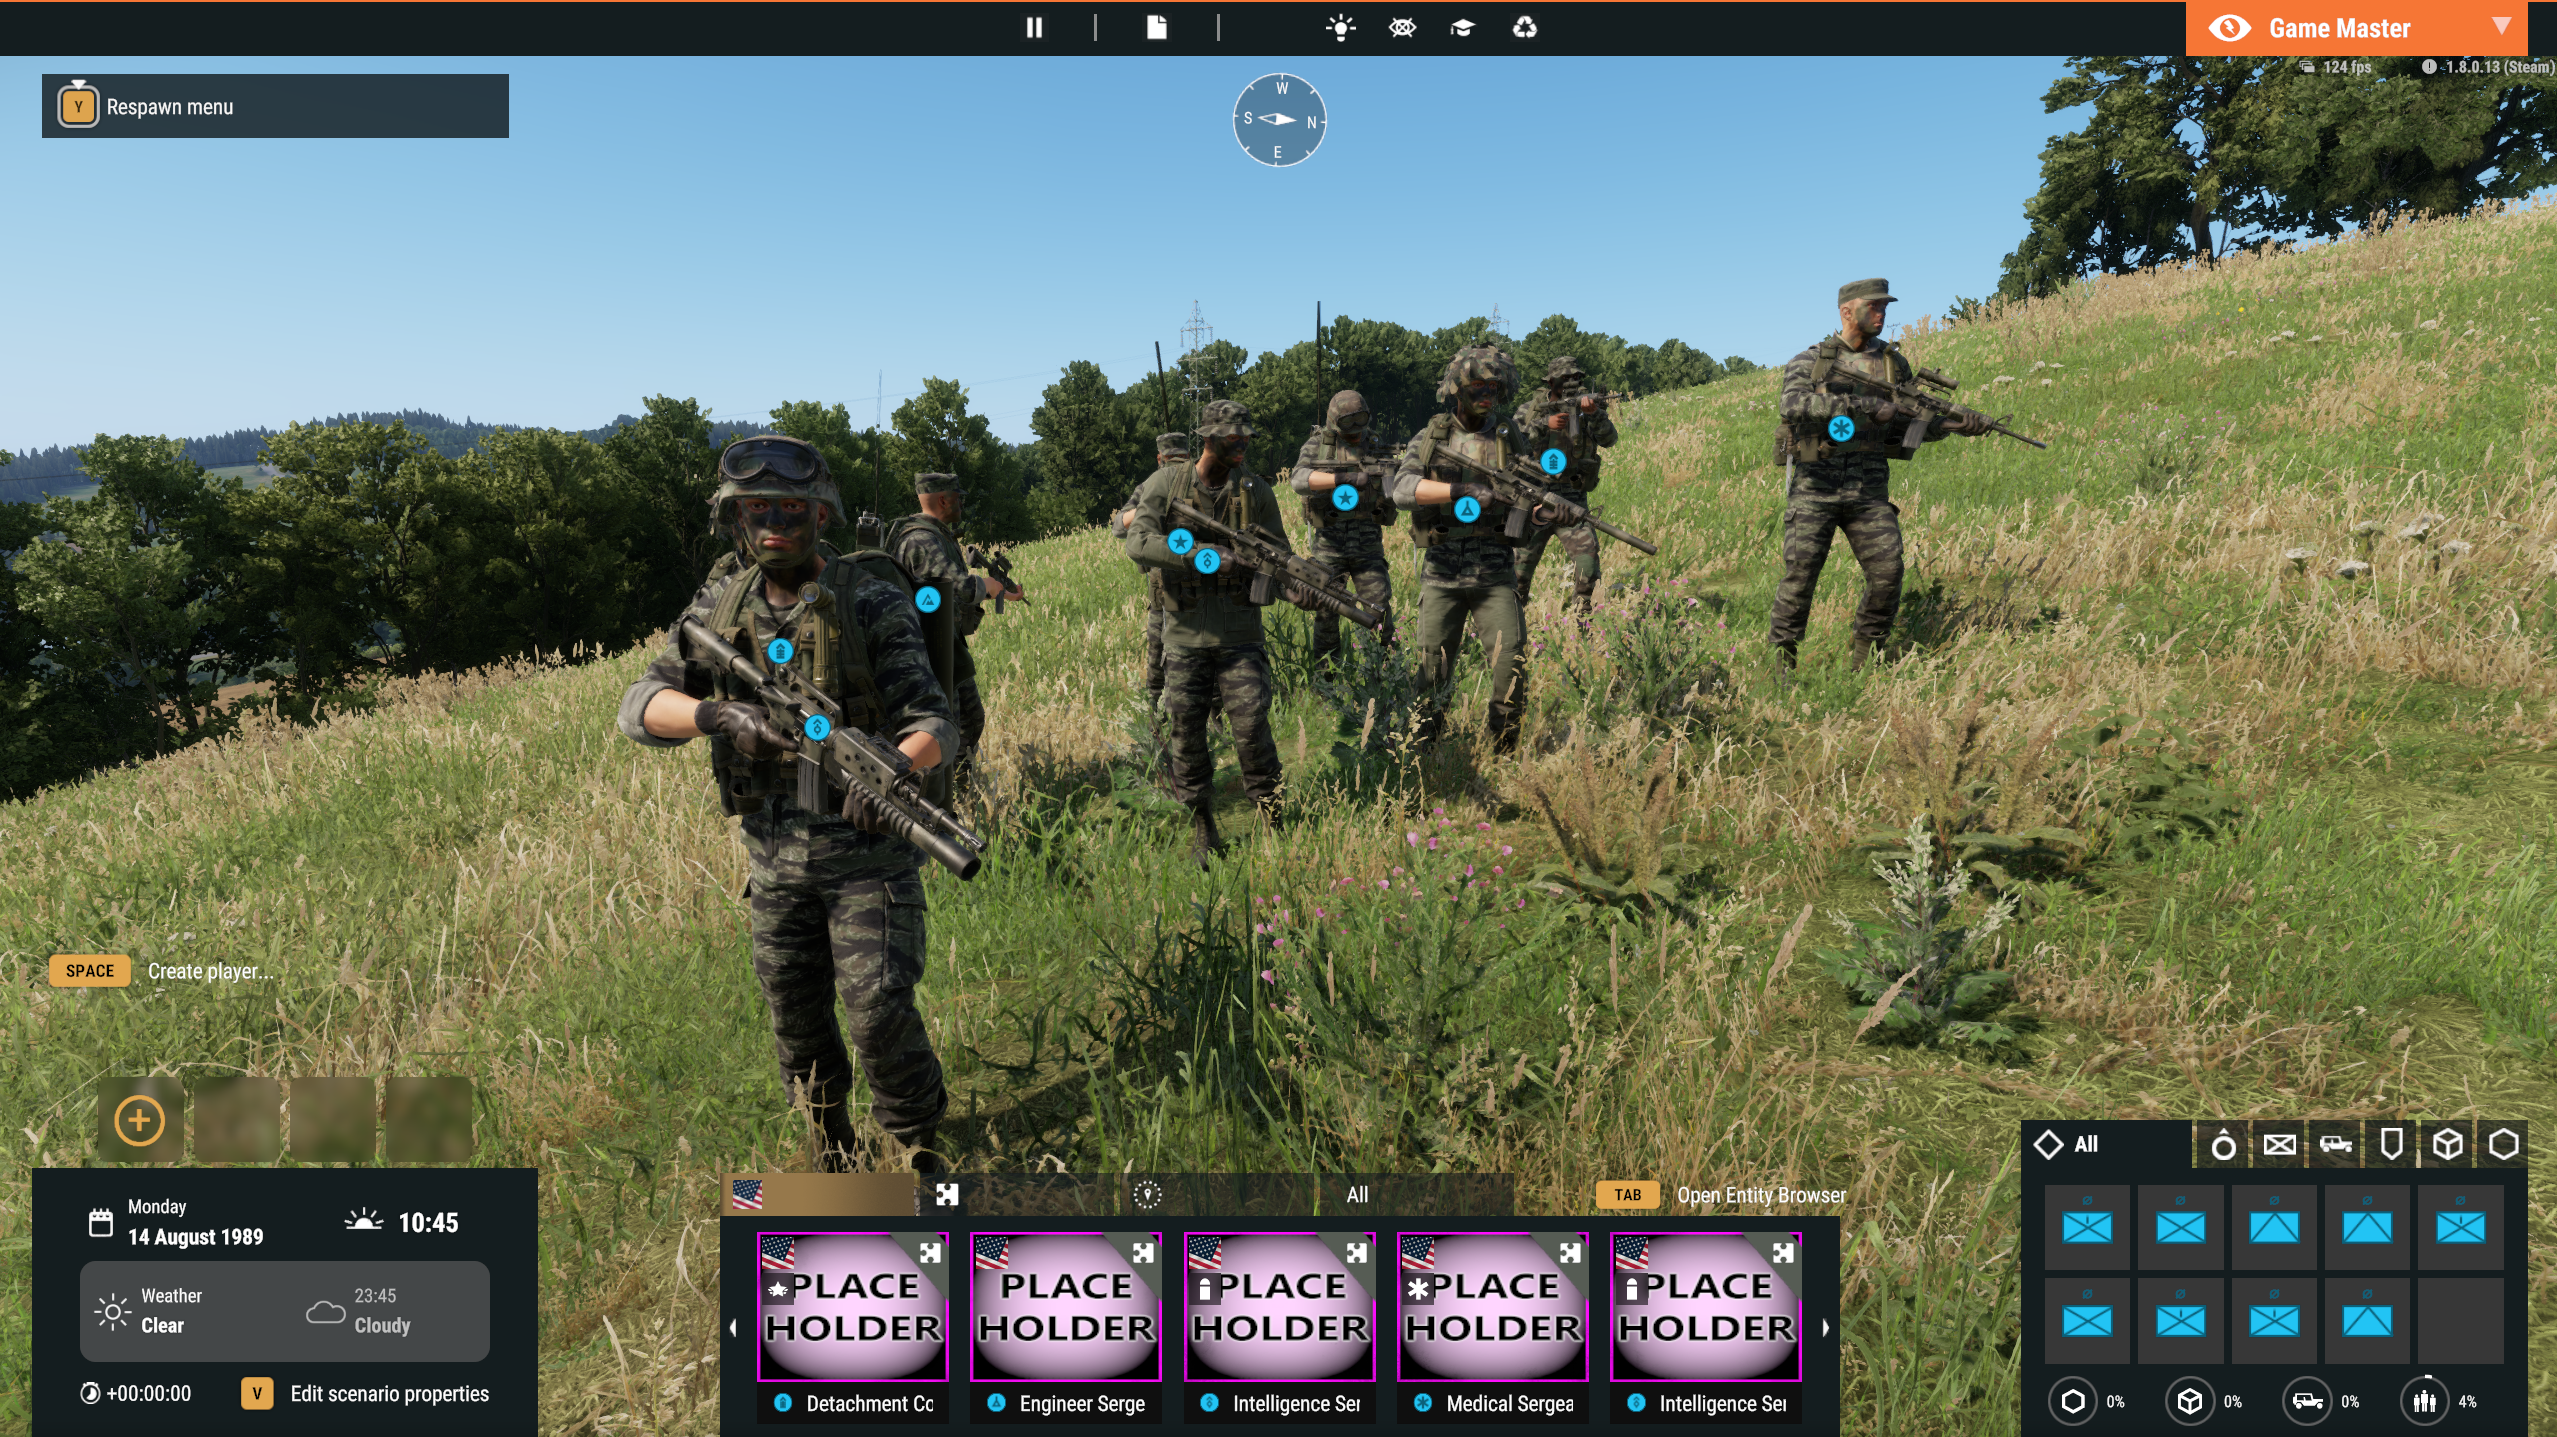
Inspect both characters: the sergeant should have a backpack radio, patrol cap, and rolled-sleeve jacket; the commander should have an M72A3 and binoculars. Compare their uniforms and weapons with their prefab settings.
Group prefab
Section titled “Group prefab”A group prefab combines several character prefabs so you can place the entire unit at once. The example creates Split Team Alpha, the first half of an ODA in Triad Shooting Star. Use your own names and roster for your unit.
Create the prefab
Section titled “Create the prefab”Stop the test session and return to World Editor.
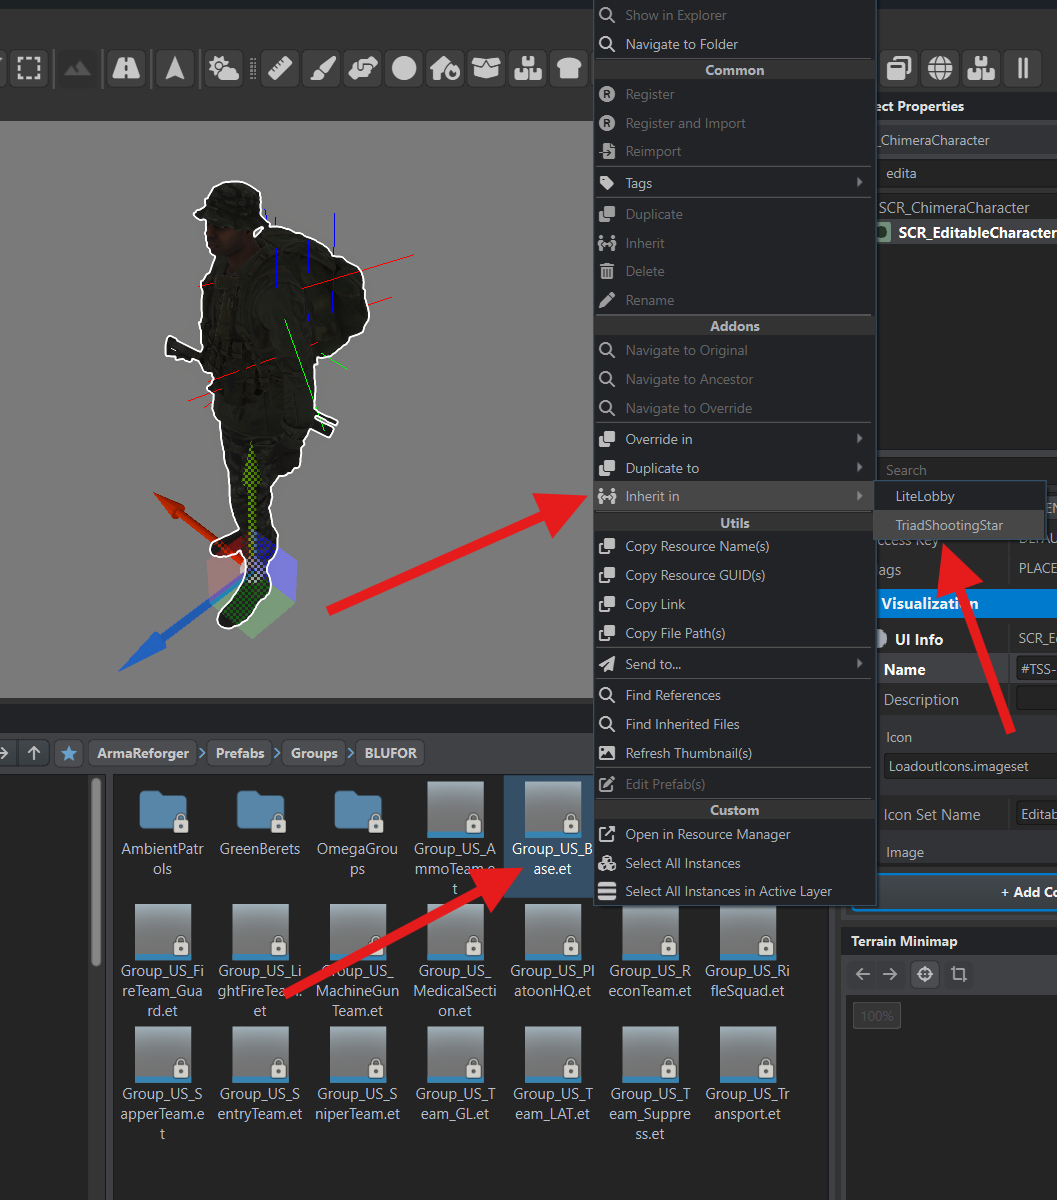
In the ArmaReforger project, open Prefabs/Groups/BLUFOR. Right-click Group_US_Base.et and select Inherit in → your addon.
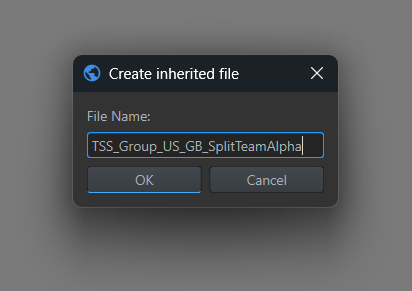
Enter TSS_Group_US_GB_SplitTeamAlpha and click OK.
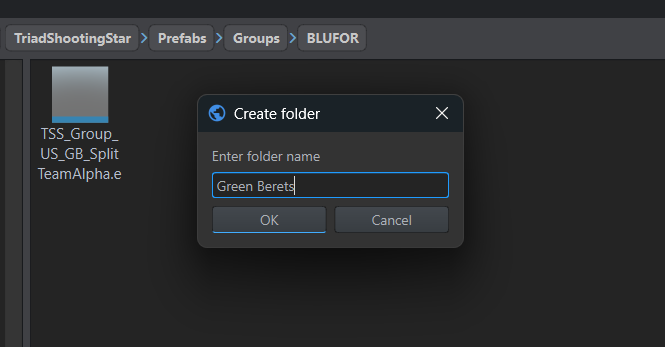
In your addon, open Prefabs/Groups/BLUFOR. Right-click an empty area in Resource Browser, create a Green Berets folder, and drag the new prefab into it.
Group name
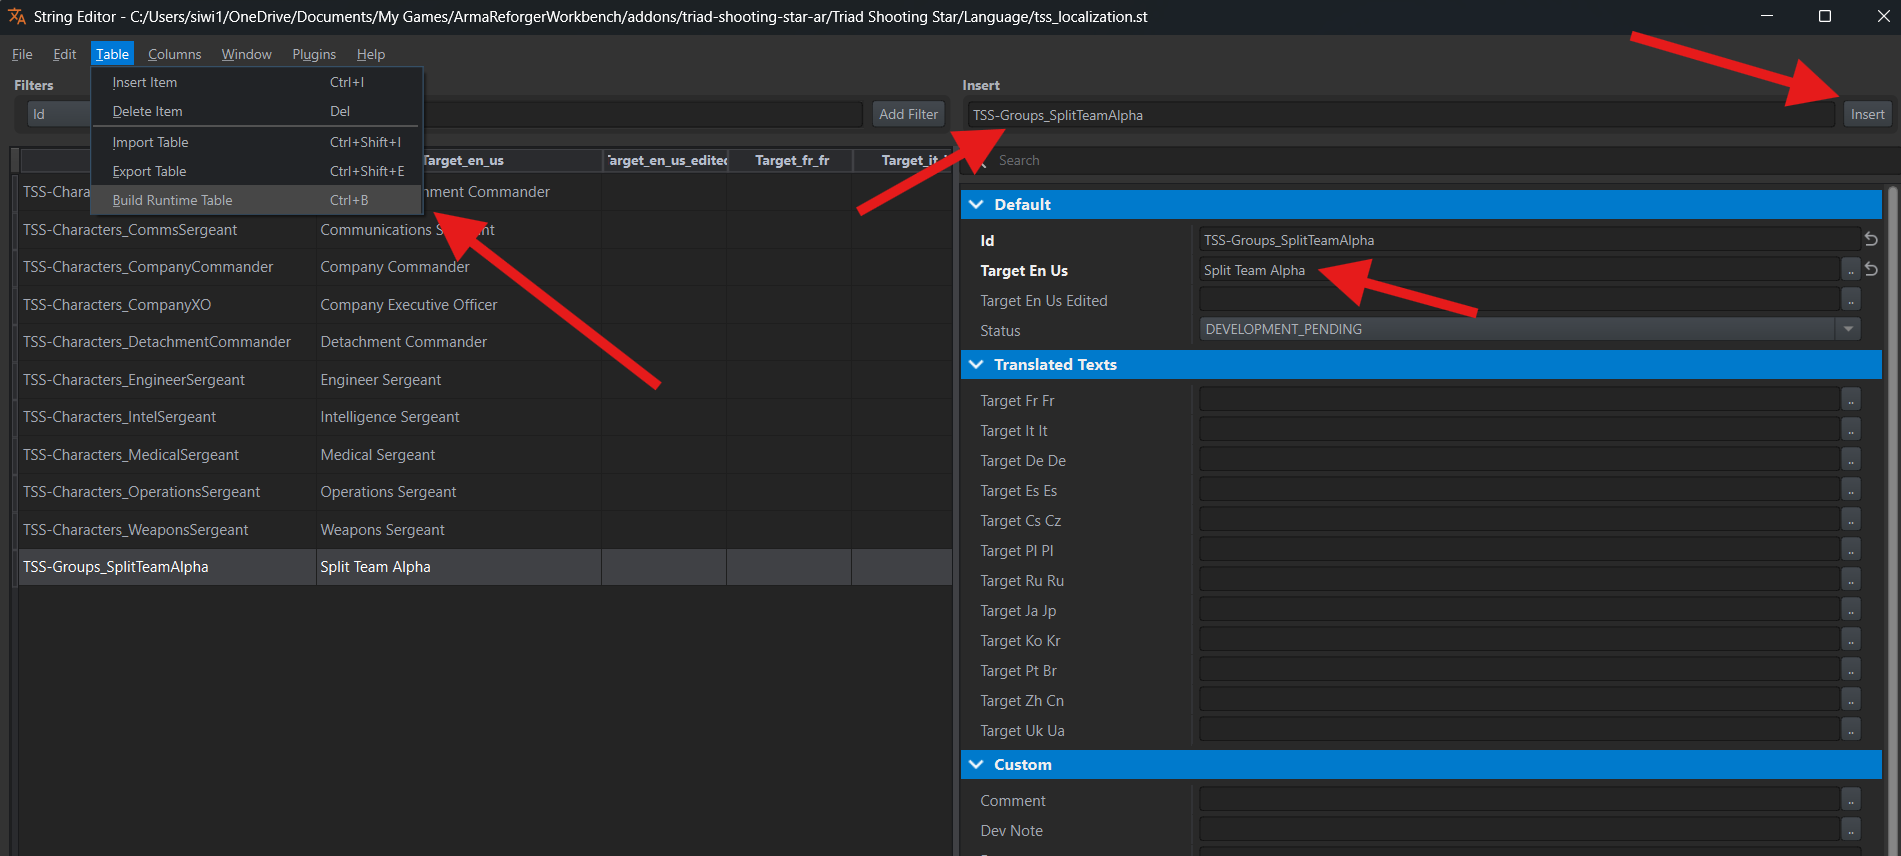
Section titled “Group name”Open Language/tss_localization.st in String Editor. Add a row with the key TSS-Groups_SplitTeamAlpha:
- Target En Us —
Split Team Alpha. - Target Ru Ru —
Группа «Альфа».
Save the table with Ctrl+S and build the translations with Ctrl+B.
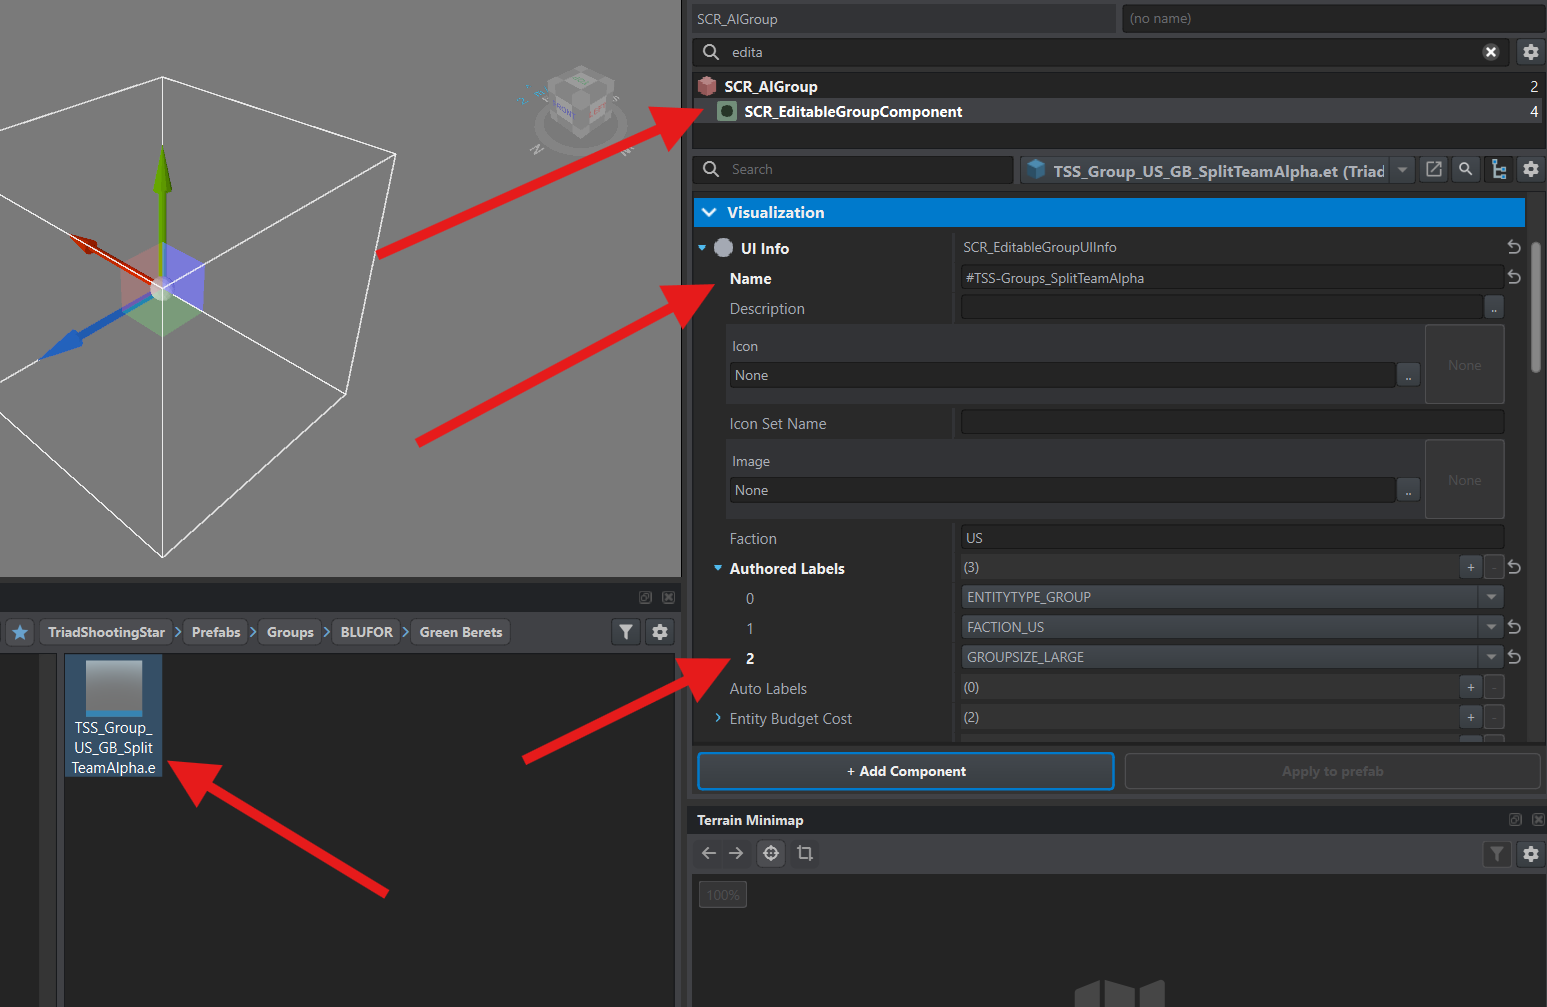
Open TSS_Group_US_GB_SplitTeamAlpha.et with Edit Prefab and select the group entity. Enter edita in the component search, select SCR_EditableGroupComponent, and expand Visualization → UI Info.
Set Name to #TSS-Groups_SplitTeamAlpha. Under Authored Labels, use + to add GROUPSIZE_LARGE, as in the example. This is a size category for the in-game editor.
Military symbol
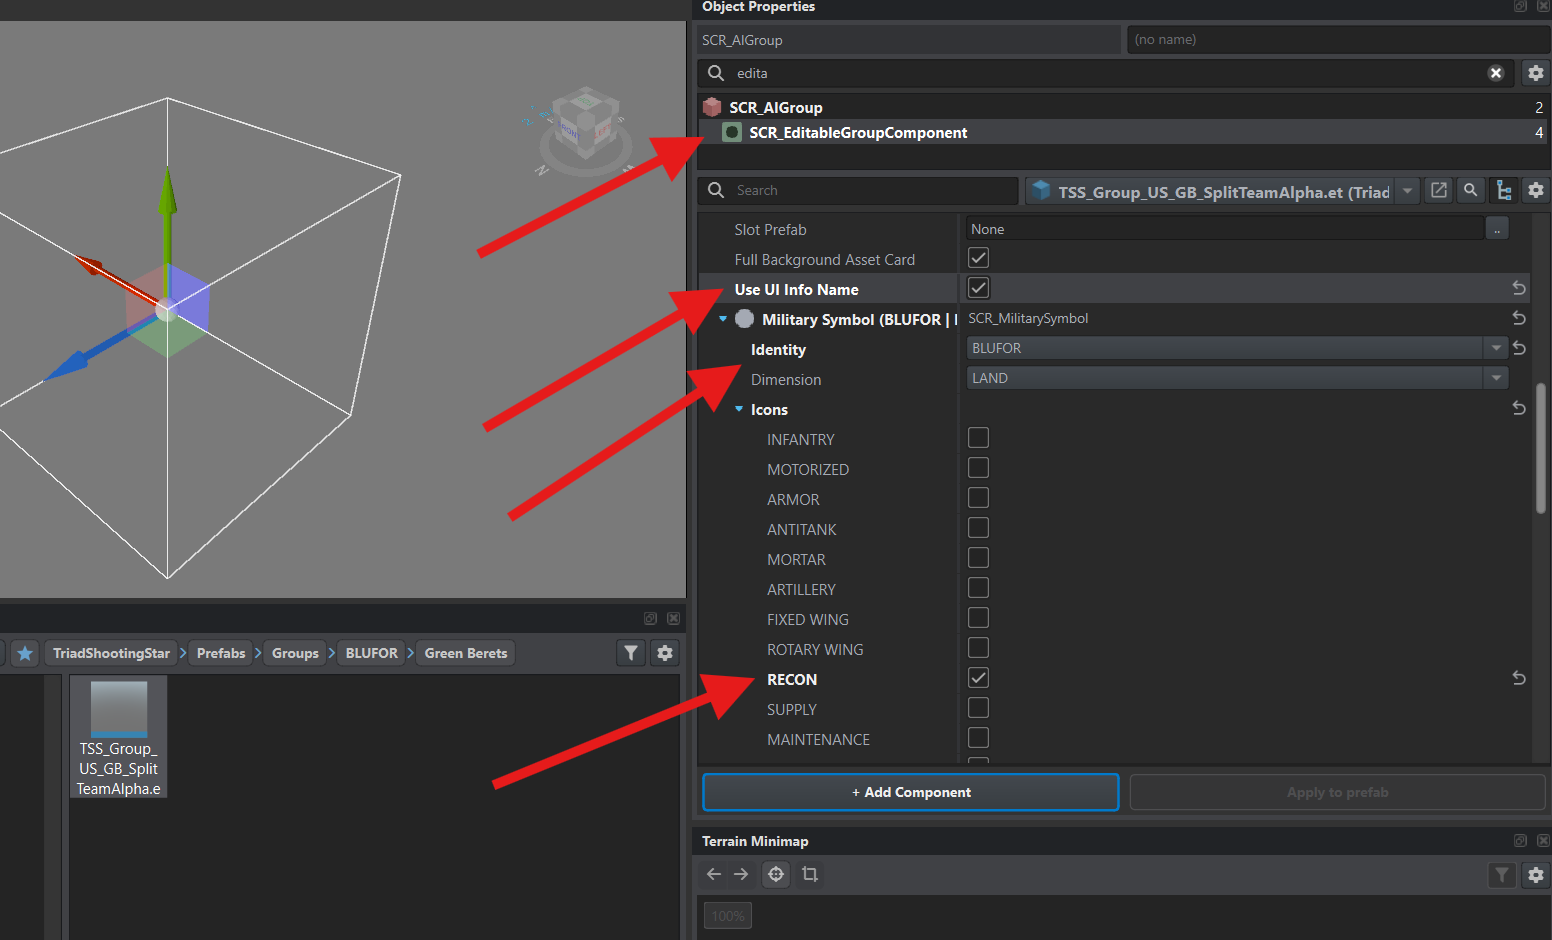
Section titled “Military symbol”Further down, enable Use UI Info Name so the group uses the text from Name. Under Military Symbol, set:
- Identity —
BLUFOR. - Dimension —
LAND. - Icons — check
RECON.
This gives the group a BLUFOR ground reconnaissance symbol.
Group members
Section titled “Group members”Alpha has six characters. The previous chapters created the commander and communications sergeant. The completed mission includes four more specialists: an operations sergeant, machine gunner, engineer, and medic. Their prefabs were created the same way as those two characters.
To reproduce Alpha’s roster, first create these four prefabs using the names in the table below and equip them for their roles. For your own unit, choose character prefabs with the roles and equipment you need. Add the characters to the group once all their prefabs are ready.
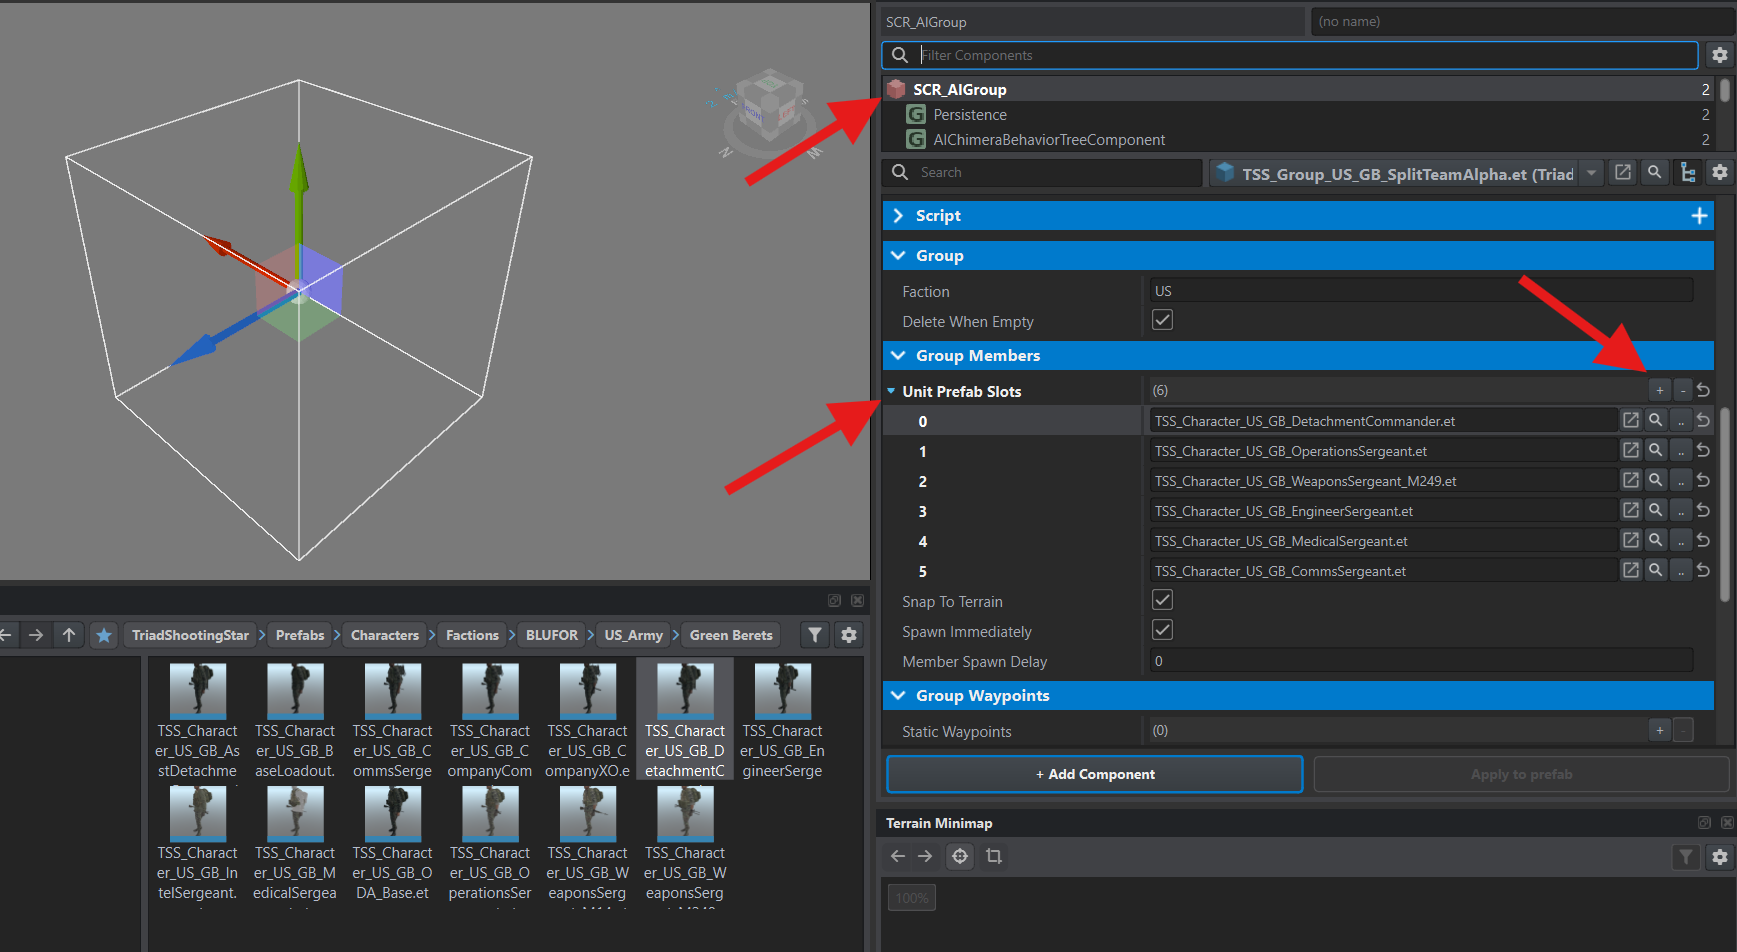
Clear the component search and select the SCR_AIGroup entity itself. Expand Group Members → Unit Prefab Slots and add six entries with +.
From your addon’s Prefabs/Characters/Factions/BLUFOR/US_Army/Green Berets folder, drag the prefabs into the entries in this order:
| Entry | Prefab |
|---|---|
0 | TSS_Character_US_GB_DetachmentCommander.et |
1 | TSS_Character_US_GB_OperationsSergeant.et |
2 | TSS_Character_US_GB_WeaponsSergeant_M249.et |
3 | TSS_Character_US_GB_EngineerSergeant.et |
4 | TSS_Character_US_GB_MedicalSergeant.et |
5 | TSS_Character_US_GB_CommsSergeant.et |
Each entry represents one character. For a different unit composition, assign your own prefabs.
Formation
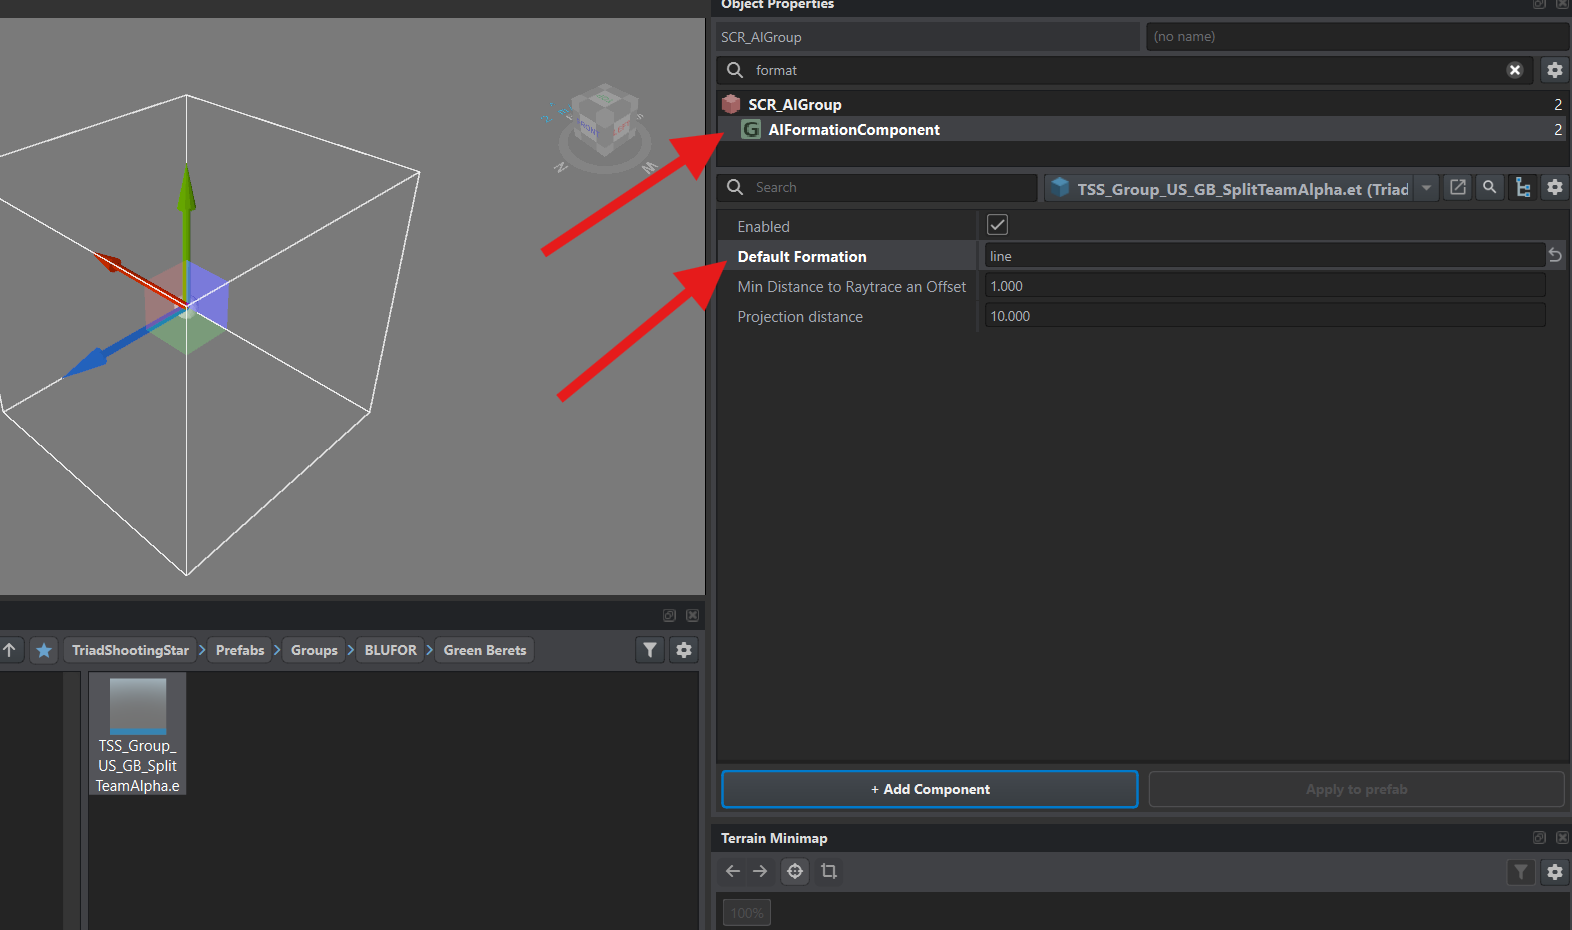
Section titled “Formation”Enter format in the component search and select AIFormationComponent. Set Default Formation to line, as in the example.
Save the group prefab with Ctrl+S.
Checking the group in Game Master
Section titled “Checking the group in Game Master”Add the group prefab to the US faction catalog so it appears in Game Master.
Register the group
Section titled “Register the group”In the ArmaReforger project, open Configs/EntityCatalog/US. Right-click Groups_EntityCatalog_US.conf and select Override in → your addon.
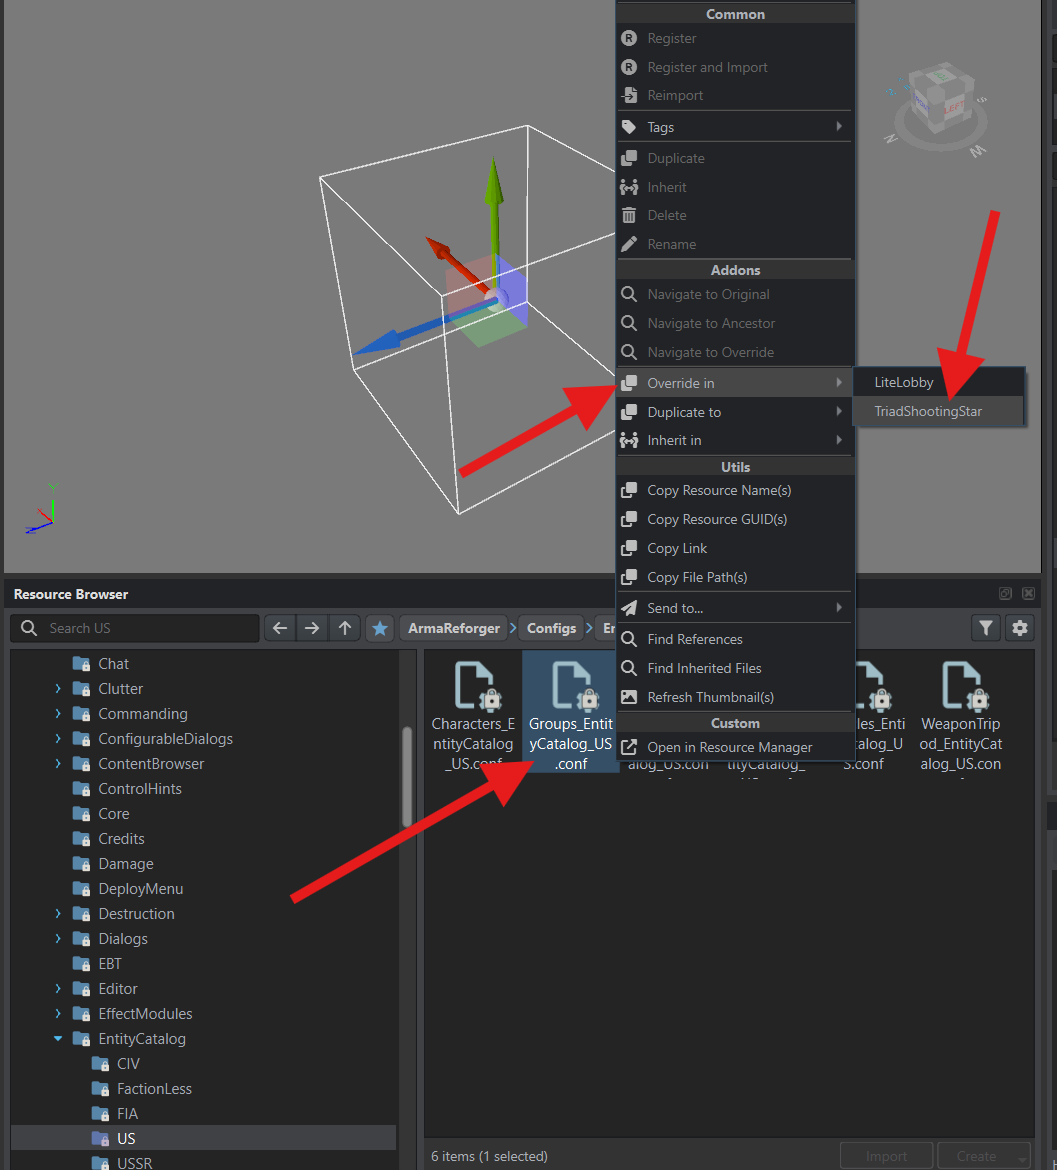
In your addon, double-click this file to open it. Under Entity Entry List, find Group_US_EngineerTeam.et, right-click the entry, and select Duplicate.
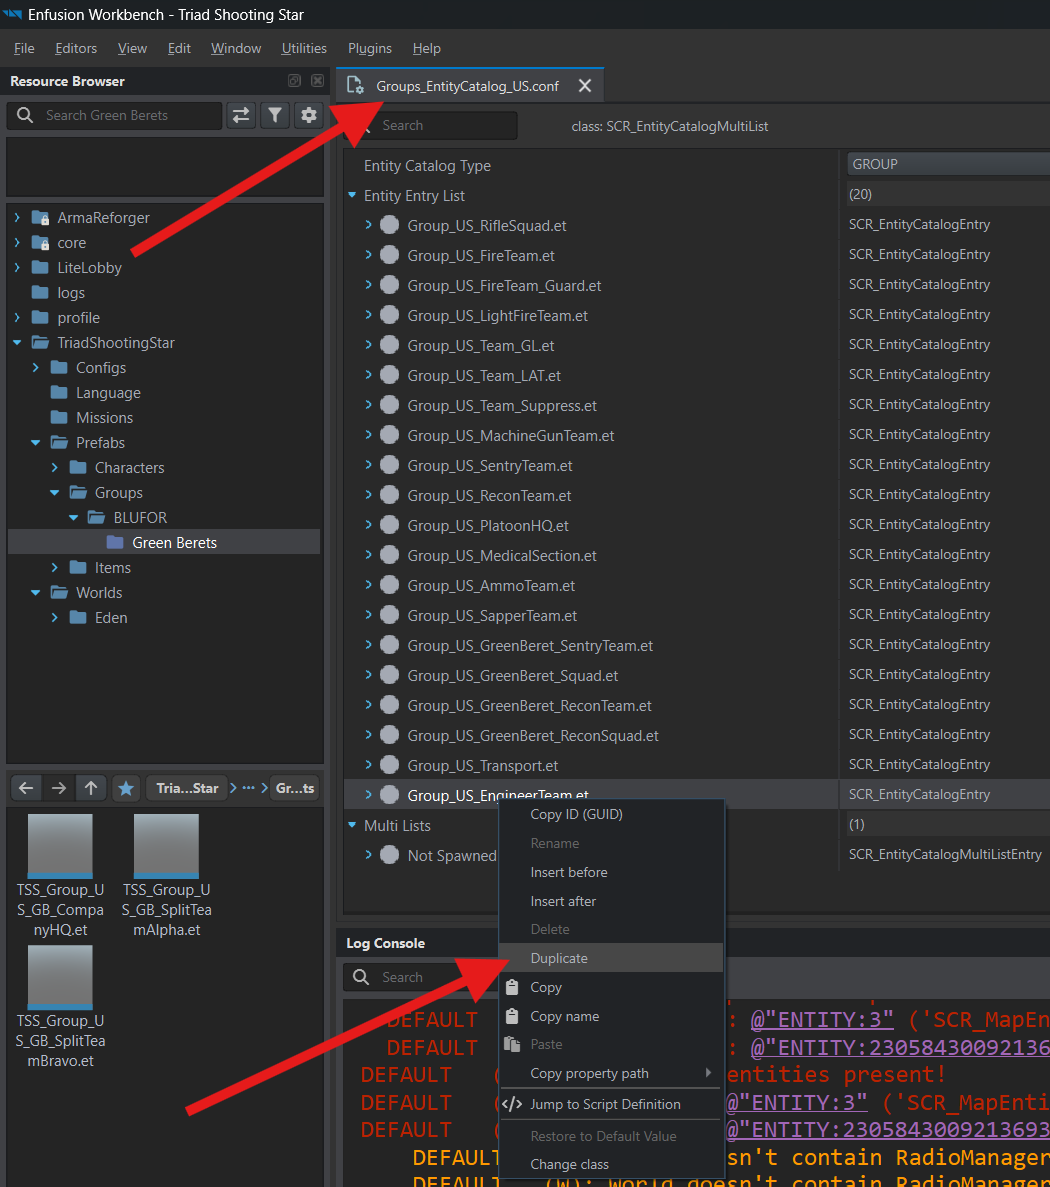
Expand the new entry. From your addon’s Prefabs/Groups/BLUFOR/Green Berets folder, drag TSS_Group_US_GB_SplitTeamAlpha.et into its Entity Prefab field.
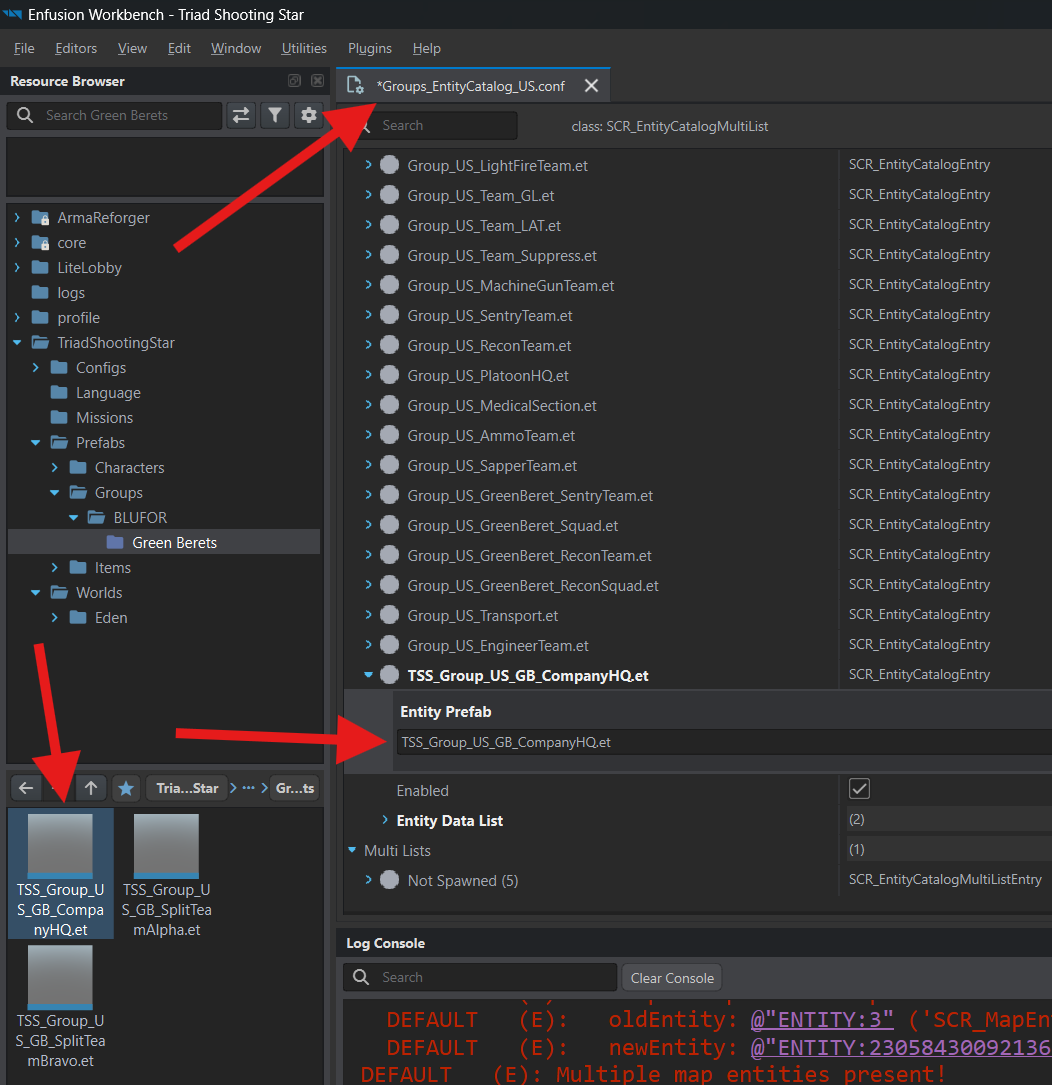
The Entity Data List settings have already been copied from the existing entry. Save the catalog with Ctrl+S.
Check the group
Section titled “Check the group”Launch the mission and open Game Master. Press Tab. In Entity Browser, select the US faction and Group type; clear the Character filter if it is still selected from the previous check.
Find your group by name in Search. For the example, enter Alpha, or Альфа with the game set to Russian.
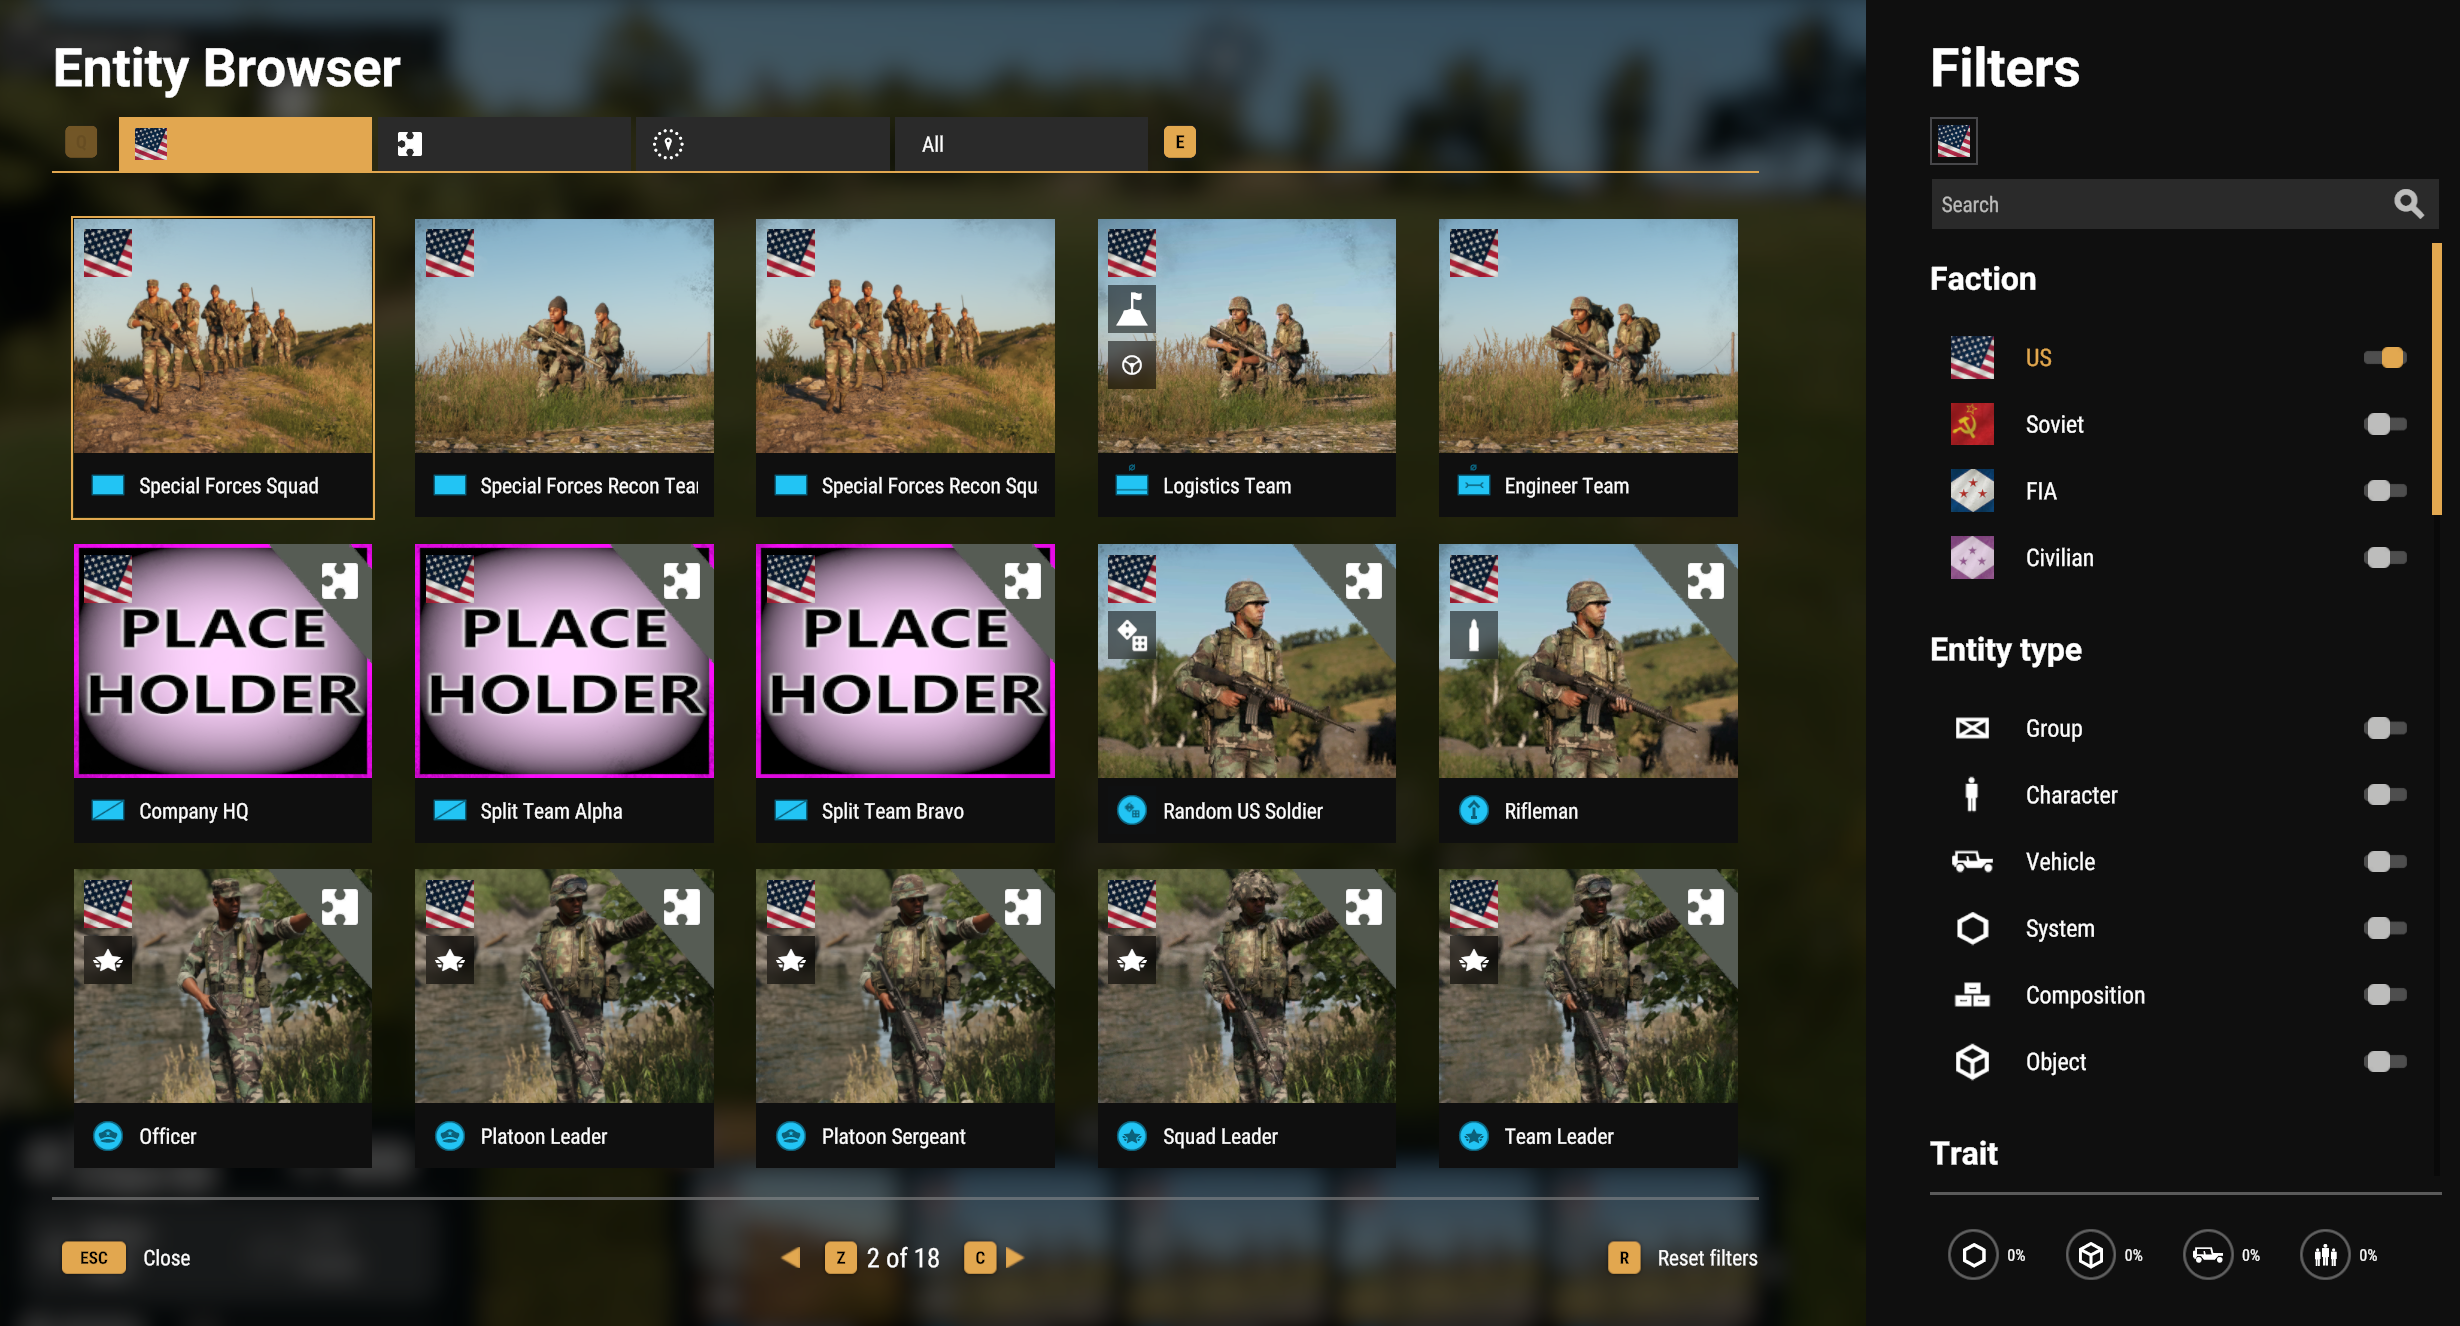
Select your group and left-click the ground to place it. All characters listed in Unit Prefab Slots should appear; the Alpha example has six. Check the roster and equipment. If someone is missing, check the group’s prefab list.
In the next chapter, place the completed groups in the mission and configure playable slots.